Some users report that they have gotten error message "'javac' is not recognized as an internal or external command, operable program or batch file." This post from MiniTool Partition Wizard offers you 3 solutions.
Javac Is Not Recognized Windows 10
I’m trying to use javac with the windows command prompt, but it’s not working. After adding the directory “C:Program FilesJavajdk1.6.0_16bin” to the end of the PATH environment variable, the java command works fine, but using javac gives me the following error: ‘javac’ is not recognized as an internal or external command, operable program or batch file. –stackoverflow.com
Javac is the Java language compiler included in the JDK. This tool can compile source files with the suffix of .java into bytecodes with the suffix of .class that can be run on the Java virtual machine.
To use javac, users should add the Java JDK into the PATH Environment Variables. Then, run the javac command. For example:
- C:cd java files
- C:java files>set path=C:Program Files (x86)Javajdk1.7.0bin
- C:java files>javac Hello.java
However, sometimes you may get the “javac is not recognized” error. In this case, please try the following methods to troubleshoot this issue.
Fixes to the “Could Not Create the Java Virtual Machine” Error
Fix 1. Check Whether You Have JDK File Installed
The javac file is contained in the JDK file (Java Development Kit). In general, this tool will not come along with Java and you should install it separately. Please open C:Program FilesJava folder and check whether there is a folder named “jdk-xxx“. If there is no such a folder, please download and install JDK first.
Fix 2. Check Whether the Javac Path Is Correct
As mentioned before, to add the javac into the PATH Environment Variables, you should use the command: set path=”javac path”. For example: set path=C:Program Files (x86)Javajdk1.7.0bin. However, some people type a wrong javac path (for example, omit the “” symbols).
To make sure you can add the javac into the PATH Environment Variables smoothly, please follow the steps below:
- Open File Explorer.
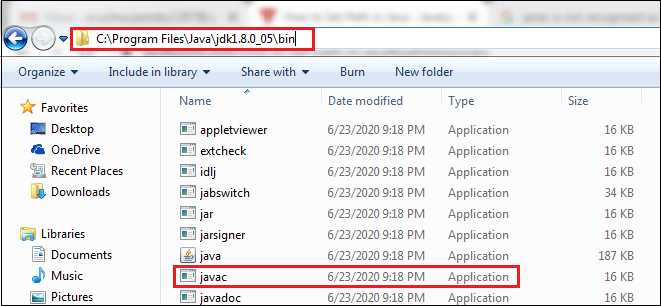
- Go to the directory where you have installed the JDK. Inside the JDK folder, search the bin folder and open it.
- Copy the location of the bin folder that contains the javac.
- Switch to the Command Prompt and type the command to add path variables.

Fix 3. Add Path Variable Using GUI
If the command fails to add path variable still, you can use this method.
- Press Windows key + R to open up a Run dialog box.
- Type “sysdm.cpl” and press Enter to open the System Properties window.
- Skip to the Advanced tab, and then click Environment Variables button at the bottom section.
- In the newly opened window, in the System variables section, highlight Path and then click Edit button under this section.
- In the new window, click New button, and then copy the location of the bin folder that contains the javac into the list.
Through this way, you can add the javac to path variables. In most cases, the “javac is not recognized Windows 10” issue can be solved through the above ways. But if you have other solutions, please share with us by leaving a comment below.


User Comments :