When using the DS4 Exclusively feature via InputMapper, a lot of users report InputMapper Exclusive Mode not working. Why Input Mapper could not open DS4 exclusively? How to fix it? Now, MiniTool will explore the answers together with you.
According to many user reports, the InputMapper Exclusive Mode not working issue often occurs installing Windows 10 anniversary updates or Windows 10 fall creators update. The Use Exclusive Mode feature appears in the Settings menu of an older InputMapper version. However, the anniversary and creator updates changed the way that InputMapper opens the DS4 exclusively mode. That’s why Input Mapper could not open DS4 exclusively. To fix the issue, you can try the following solutions.
Fix 1. Install InputMapper HidGuardian on Your Computer
Although the anniversary and the creator updates caused conflict with InputMapper, its developer introduced a new tool that can help fix the Input Mapper failed to connect exclusively problem on Windows 10. This tool is used with the parent application InputMapper, which ensures that your computer can run InputMapper Exclusive Mode without interference.
Step 1. Click here to download the InputMapper HidGuardian tool and install it on your Windows 10 PC.
Step 2. Open the installation folder, and then right-click the .bat file and select Run as administrator before you start InputMapper.
Step 3. Keep the tool open until you click on the Run DS4 Exclusively button.
If you still encounter the InputMapper Exclusive Mode not working issue, then move on to the following methods.
Fix 2. Re-enable the Bluetooth HID Device
If you changed the way that the Bluetooth HID device or HID-Complaint game controller interacts with the DS4 controller, the Input Mapper could not open DS4 exclusively. In this case, you can fix the issue by re-enabling the HID device. Here’s how:
Step 1. Turn off all applications that you are using to connect a DS4 controller to the computer, including InputMapper, DS4Widnows, SCP, or the DS4Tool.
Step 2. Disconnect the PS controller to your computer.
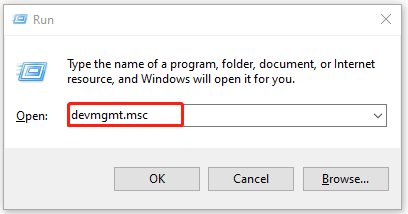
Step 3. Press Win + R keys to open the Run dialog box, and then type devmgmt.msc in it and hit Enter to open Device Manager.
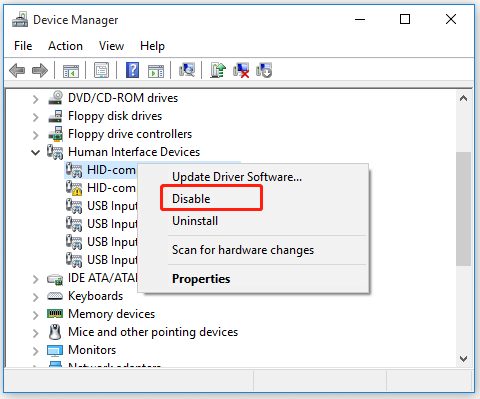
Step 4. Expand the Human Interface Devices category, and then right-click the Bluetooth HID Device and select Disabled. If you are using a wired controller, right-click the HID-Compliant game controller and select Disable.
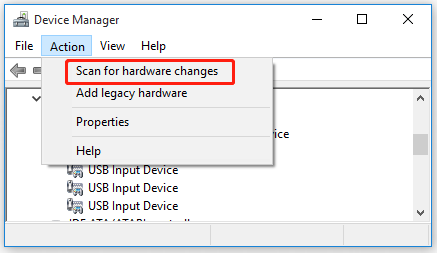
Step 5. Once disabled, navigate to Action > Scan for Hardware changes from the top menu. After the list of devices is refreshed, you can right-click the Bluetooth HID Device again and select Enable.
Now, you can connect the PS4 controller to your computer and launch the required applications to check if the InputMapper no compatible controllers detected issue is fixed.
Fix 3.Configure the Exclusive Mode for HidGuardian
Some users reported that the InputMapper Exclusive Mode not working problem can be fixed by configuring the Exclusive Mode of HidGuardian. If you also installed the tool, you can try this method. Make sure that you logged in as an administrator and follow the steps below:
Steps for Bluetooth Controller:
Step 1. Open the Device Manager again and right-click the Bluetooth HID Device and select Properties.
Step 2. Navigate to the Details tab, and select Hardware IDs from the drop-down menu, right-click the first ID, and select Copy.
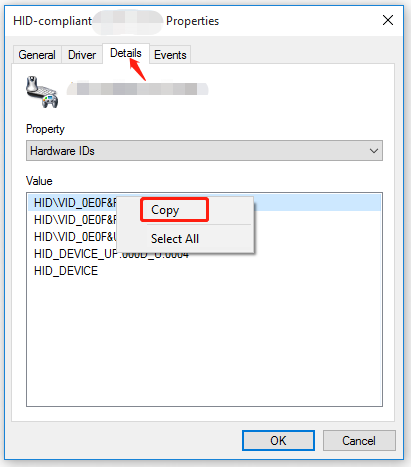
Step 3. Open a Notepad and paste the ID to it, then replace BTHENUM in the ID with HID and save the change. For example, the hardware is BTHENUMVID_0E0F&PID_0007&REV_0100, then change it to HIDVID_0E0F&PID_0007&REV_0100.
Step 4. Open the Run box again, and then type regedit in it and hit Enter. In the Registry Editor, navigate to the following entry key:
HKEY_LOCAL_MACHINESYSTEMCurrentControlSetServicesHidGuardianParameters
Step 5. Double click the Affected Devices key and paste the modified ID into the Value date box. Click on OK to save changes.
Now, you can relaunch the application and check if the InputMapper failed to connect exclusively problem is gone.
Steps for Wired Controller:
Step 1. Repeat Steps 1 to 2 in the above guide to copy the first IDs of the hardware. At this time, we don’t have to change the IDs.
Step 2. Open the Registry Editor again and go the same registry entry path as the first guide, and then paste the first IDs to the value date of the Affected Devices.
How to fix Input Mapper failed to connect exclusively? The top 3 methods have been illustrated. Now, it’s your turn to try them.


![How to Fix HID Compliant Touch Screen Missing [Ultimate Guide]](https://images.minitool.com/partitionwizard.com/images/uploads/2021/03/hid-compliant-touch-screen-missing-thumbnail.jpg)
User Comments :