This post mainly focuses on Hyper-V Manager, including its basic information, main features, and access methods. In addition to that, you can obtain some extra information about it from this post of MiniTool.
An Overview of Hyper-V Manager
What is Hyper-V Manager?
Microsoft Hyper-V Manager, a free GUI (graphical user interface) management tool, was initially introduced with Windows Server 2008. Now, it can be enabled on any Windows operating systems that have Hyper-V. Once the Hyper-V is installed on the Windows machine, Hyper-V Manager is enabled by default.
You can even open Hyper-V Manager in Windows 7, in which it functions as one of the Remote Server Administration Tools (RSAT). To use Hyper-V tools, you are required to install RSAT.
Also read: VMware VS VirtualBox, Which Is Better for You
What does Hyper-V Manager do?
Hyper V Manager is free in most times, but it needs you pay while buying a fully licensed copy of Windows OS. It can be used to create, change, and delete virtual machines (VMs). Moreover, you can remotely manage Windows Server Core or Hyper-V Server with the help of Hyper-V Manager.
However, when remotely managing a Hyper-V host, you sometimes may encounter the Hyper-B Manager versions and the Hyper-V host not compatible issue. If so, you can only use the feature set available for the Hyper-V host version that you are running.
Given that fact, it is recommended that you manage a Hyper-V host with the identical OS or a system that runs a similar Windows Server version at least. Nevertheless, you can manage PCs running earlier Windows Server versions (like Windows Server 2012/R2 and Windows 8/8.1) in Windows Server 2016 and Windows 10.
In addition to that, when connecting to another Windows Server 2016 or Windows 10 host remotely, you can also give an alternative set of credentials in Hyper-V Manager and save them for later use. By doing so, the logging in process will be easier.
Further reading:
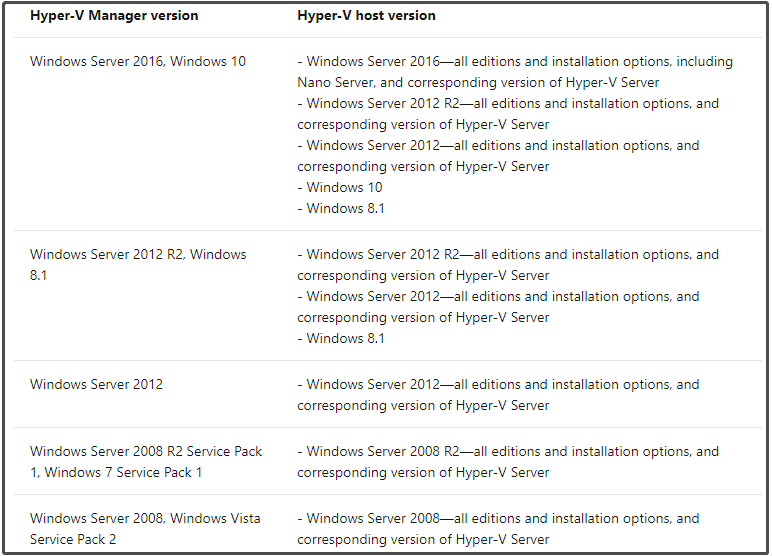
To avoid this issue, you can refer to the chart below. It shows supported combinations of Hyper-V hosts and Hyper-V Manager versions.
Main Features of Hyper-V Manager
Here, we summarize the main features of Hyper-V Manager as follows.
- Interact with each Hyper-V host and VM.
- Manage a small number of Hyper-V hosts both locally and remotely.
- Configure Hyper-V feature settings like Live Migration.
- Create, destroy, and configure Hyper-V virtual machines or virtual hard disks.
- Create, delete, apply, and revert checkpoints.
- Configure and control Hyper-V replication.
- Can be used for managing two infrastructure components (Hyper-V hosts and VMs), including their checkpoints, virtual switches, and virtual hard disks.
- Uses native Windows Management Instrumentation for event detection and delivery. Therefore, any changes occur in a Hyper-V host or a VM can be identified and reflected immediately in a graphical user interface.
Recommended reading: Windows USB/DVD Download Tool: What Is It and How to Use It
How to Open Hyper-V Manager
Steps to open or enable Hyper-V Manager vary on different systems.
Steps for Enabling Hyper-V Manager on Windows
- Press Windows and I keys to open Settings.
- Click on Apps to continue.
- Click Apps & features
- Scroll down the content in the right side of the window until you locate to the Related settings section.
- Click Programs and Features under this section.
- Tap Turn Windows features on or off in the elevated window.
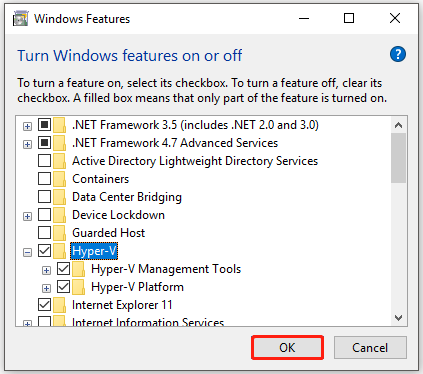
- Highlight the Hyper-V checkbox including the Hyper-V Management Tools sub-box. Then click OK to start the process.
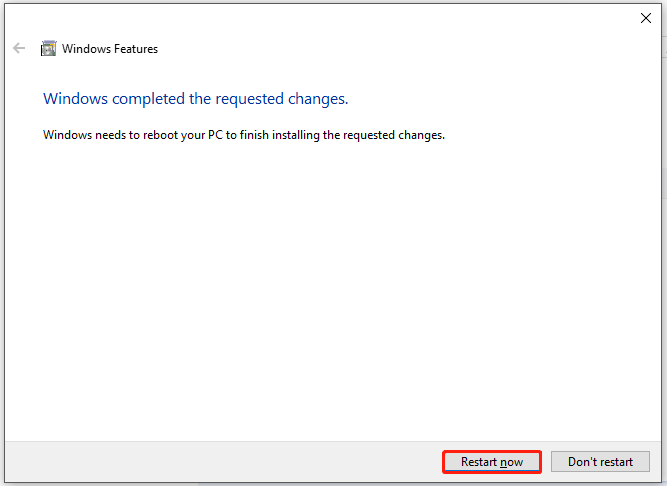
Once Windows completed the requested changes, you will receive the window below. As it requires, click Restart now to finish installing the requested changes.
Alternatively, you can also open Hyper V Manager Windows 10 from PowerShell. Here’s how to do.
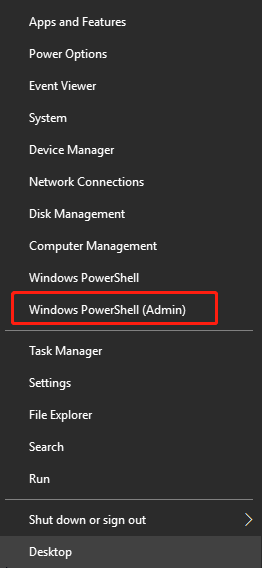
Step 1: Right-click on the Windows icon on the desktop and then click Windows PowerShell (Admin) in the prompted menu.
Step 2: Type the command below in the elevated PowerShell window and hit Enter.
Enable-WindowsOptionalFeature -Online -FeatureName Microsoft-Hyper-V -All

Step 3: Then the installation will start automatically and you can see the screen below. After the installation process ends, restart your PC to adopt all changes.

Also read: How to Install Ubuntu on VirtualBox? Here’s the Full Guide
Steps for Enabling Hyper-V Manager on Windows Server
- Open Server Manager > click on Manage.
- Choose Add Roles and Features to open Add Roles and Features Wizard.
- Click Features and then expand Remote Server Administration Tools and Role administration tools.
- Check the Hyper-V Management Tools box and save the changes.
How to open Hyper-V Manager? Well, detailed steps for opening it on Windows and Server systems have shown to you. Try them now!

User Comments :