What Is CrystalDiskMark?
CrystalDiskMark is a storage benchmarking utility that can test the performance of read and write operations of storage disks in your computer. It works by constantly reading and writing precisely sized blocks of data from various storage disks.
Apart from that, CrystalDiskMark can also be used to diagnose problems. For example, if your computer or server is sluggish, running CrystalDiskMark is an excellent way to help narrow down the problem. Likewise, if your NAS is having performance issues, CrystalDiskMark is the perfect way to see if those performance issues are starting at the network or physical computer hardware level.
CrystalDiskMark is also a good way to measure the capacity of an enterprise environment. For example, let’s say you need to deploy a new application that requires a certain amount of IOPS. You can use CrystalDiskMark to benchmark your application.
Well, the CrystalDiskMark how to use? Please keep reading.
How to Use CrystalDiskMark to Test Your Performance of Hard Drive?
Before using CrystalDiskMark, you should know what each button represents. As you can see in the image below, there are 5 green buttons on the left, 4 boxes for selecting test parameters, and the results box in the center.
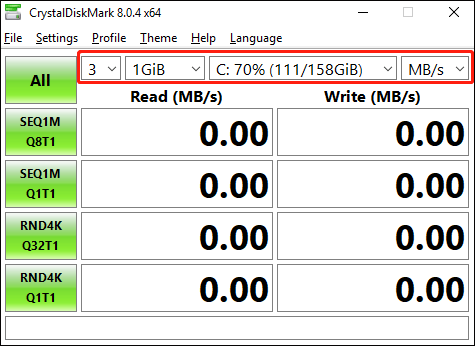
So, let’s start by choosing 4 boxes, which basically test parameters you have to choose.
- The first option lets you choose the test count – the number of tests the tool should perform. It ranges from 1 to 9.
- The second option allows you to choose the test size. It ranges from 16MiB to 64000MiB.
- The third option is for drive selection. It will list all the recognized storage drives on your machine. From the list, you just have to choose one.
- The fourth option is for unit selection. It gives you 4 units to show the speed. They are MB/s, GB/s, IOPS (input-output per second), and microseconds.
In the center of the screen, there are two sections for read and write speeds.
So, if you click the All button, this tool will start executing all tests. And, if you want to perform each test manually, press the remaining green button after the previous test is over.
Whenever you get a new device or upgrade your hard drive. It’s really necessary to test their performance to make sure the drives work as advertised.
4 green buttons on the left are as follows.
- SEQ1M Q8T1
- SEQ1M Q1T1
- RND4K Q32T16
- RND4K Q1T1
Before I go into the details of the different tests listed above, let’s first understand what size allocation is. When a data transaction occurs between the operating system and storage, it takes some time. Such data transactions are often referred to as input/output operations. And, how many input/output operations happen in one second is called IOPS.
Then, touch on another conception “block size”. Different operating systems have different sets of rules for allocating sizes. Also, the size of a block determines the data that can fit in it.
Now consider a Notepad text file that is 1KB in size and you want to save it. Therefore, creating a 4KB block is much more economical than creating a 1MB block. Because 4KB allocation size will prevent storage from being wasted. However, at the same time, it also has its own shortcomings. Larger blocks provide higher data transfer rates than smaller blocks.
Q is defined as the queue depth and represents the number of requests at a certain point in time. T is defined as Threats and represents the number of processes accessing the disk at a specific time.
The deeper the queue depth and the more threads on the drive, the worse it will perform.
Next, we show you what each button represents.
1. SEQ1M Q8T1
SEQ1M Q8T1 is interpreted as a sequential test of 1 MB block size data, with a total of 8 tasks on thread 1.
Sequential speed represents the read and write speed of large files. Here, a large file is nothing more than your movie, a large Zip, or any compressed file, etc.
Since the allocation size of a piece of data is large, they are copied quickly.
Q8 shows the amounts of tasks CrystalDiskMark will perform at the same point. Your computer cannot perform 8 tasks at the same point in storage.
As a result, it puts the process into the queue to make it easy for the machine to remember and handle it well. So, this test may be demanding, but nothing compared to the RND4K Q32T16 test.
In addition to that, processes in the queue will take a fraction of a second to initiate a data transaction. It is always faster than SEQ1M Q1T1.
2. SEQ1M Q1T1
It is interpreted as a sequential test of 1 MB block size data, executing a total of 1 task in sequence on thread 1. It is the same as SEQ1M Q8T1. The difference here is the number of processes in the queue. The read and write speed readings for this test will always be less than the SEQ1M Q1T1. It shows the read and write speed of a process in the queue.
3. RND4K Q32T16
It is interpreted as a random 4 Kibibyte test of 32 processes in queue on 16 threads. It will put a huge burden on storage. In this case, SSD will be much better than HDD.
In this test, the tool will read and write data from different blocks of 4 kibibyte size with nearly 32 parallel or serial processes – thanks to multithreading. Actually, it is similar to previewing video files in your PC, sometimes it takes some time to load from the hidden thumbnails folder. Some videos are faster, while others have to wait.
4. RND4K Q1T1
It is interpreted as Random 4 Kibibyte Test 1 Process in Queue on One Thread. Like the SEQ1M Q1T1, it will perform the RND4K test on one thread against one process in the queue.
It basically provides information on how long it takes when you try to read, copy or move smaller individual files.
After that, you can compare the test results with the performance information provided by the manufacturer.
Next, you can learn how to use CrystalDiskMark for SSD or hard drive.
To measure your drive’s read and write performance using CrystalDiskMark, close all running programs and use the following steps:
Step 1: Launch CrystalDiskMark to access its interface.
Step 2: Select the number of runs. (If the default is 5, you can change it to 3, which should be enough to get more accurate results.)
Step 3: Select the file size. (In most cases, the default selection is more than sufficient.)
Step 4: Select the drive (HDD or SSD) you want to test.
Step 5: Click the All button.
After completing the above steps, the performance test will run on the disk for a few minutes, depending on the drive.
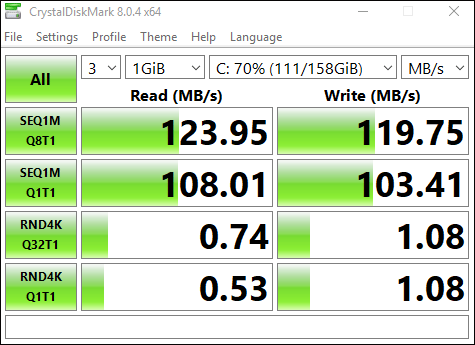
Once complete, you will see benchmark results in megabytes per second. You can then hover over the results to see the IOPS results for the test.
I have learned how to use CrystalDiskMark. Since then, I know if my hard drive is performing as well as the seller says.Click to tweet
Free Alternative to CrystalDiskMark
In addition to this software, there is also software that also has a speed measurement function called MiniTool Partition Wizard.
MiniTool Partition Wizard is a free hard drive speed test tool, compatible with Windows 11/10/8/7. You can use it to test the read and write performance of almost any storage device, including computer internal hard drives, external hard drives like Seagate hard drives, SSDs, USB drives, and more.
MiniTool Partition Wizard FreeClick to Download100%Clean & Safe
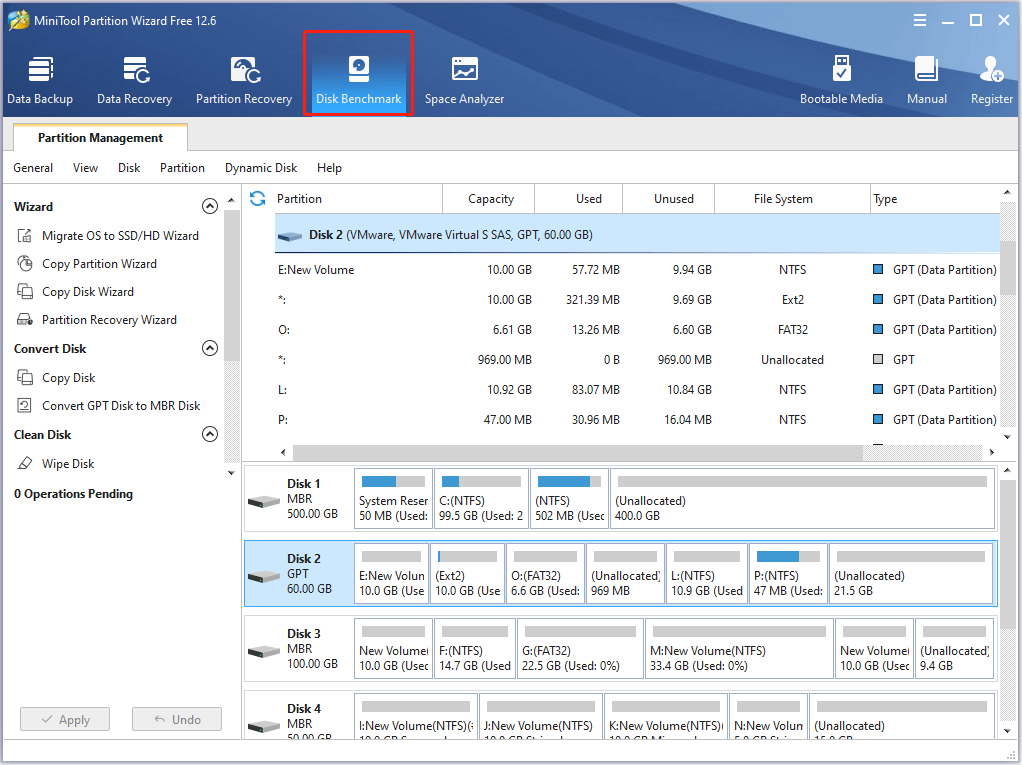
Step 1: Run MiniTool Partition Wizard to get the main interface. Then from the toolbar, select Disk Benchmark.
Step 2: In the Disk Benchmark window, configure the following parameters.
- Select a drive: Select a partition to start benchmarking.
- Transfer Size: The size of the data transferred at one time, ranging from 1KB to 2048KB.
- Total Length: The total amount of data to transfer, ranging from 100MB to 4096MB.
- Queue Number: Queue up several read and write tasks on the drive.
- Thread Number: Use how many threads to test the speed of the hard drive.
- Test Mode: Choose a disk, which can be Sequential, Random, Sequential & Random.
- Cool Down Time: Set a cooldown time to reduce the hard drive temperature.
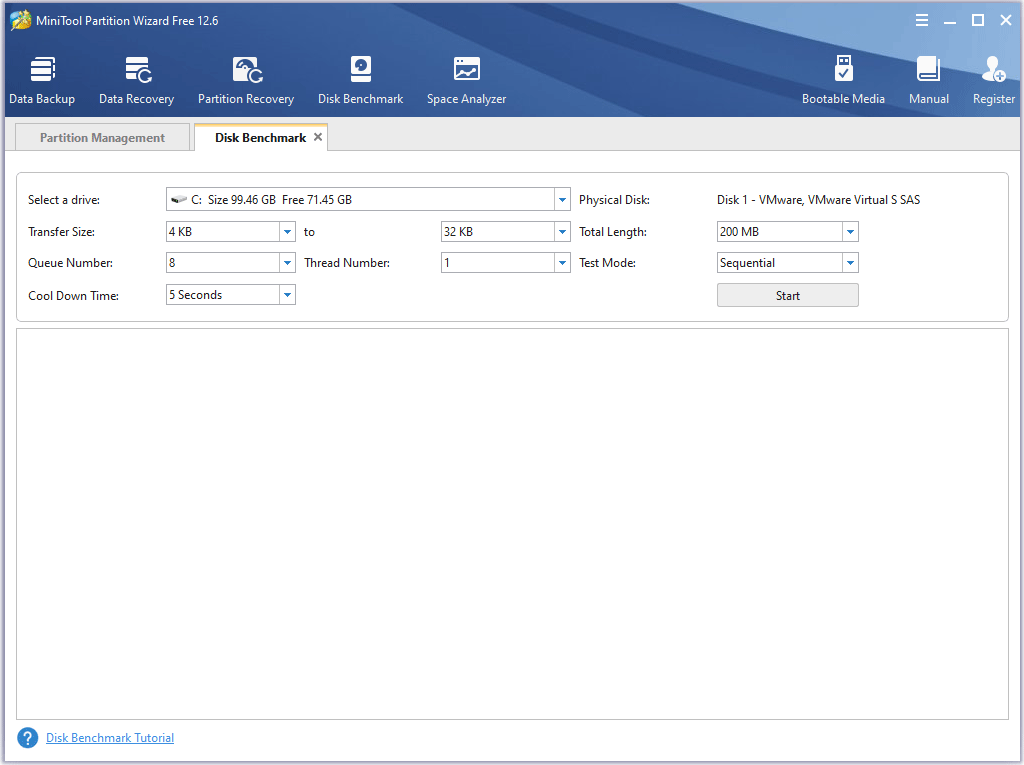
Step 3: After configuring all parameters, click Start to test the hard drive or SSD read and write speed.
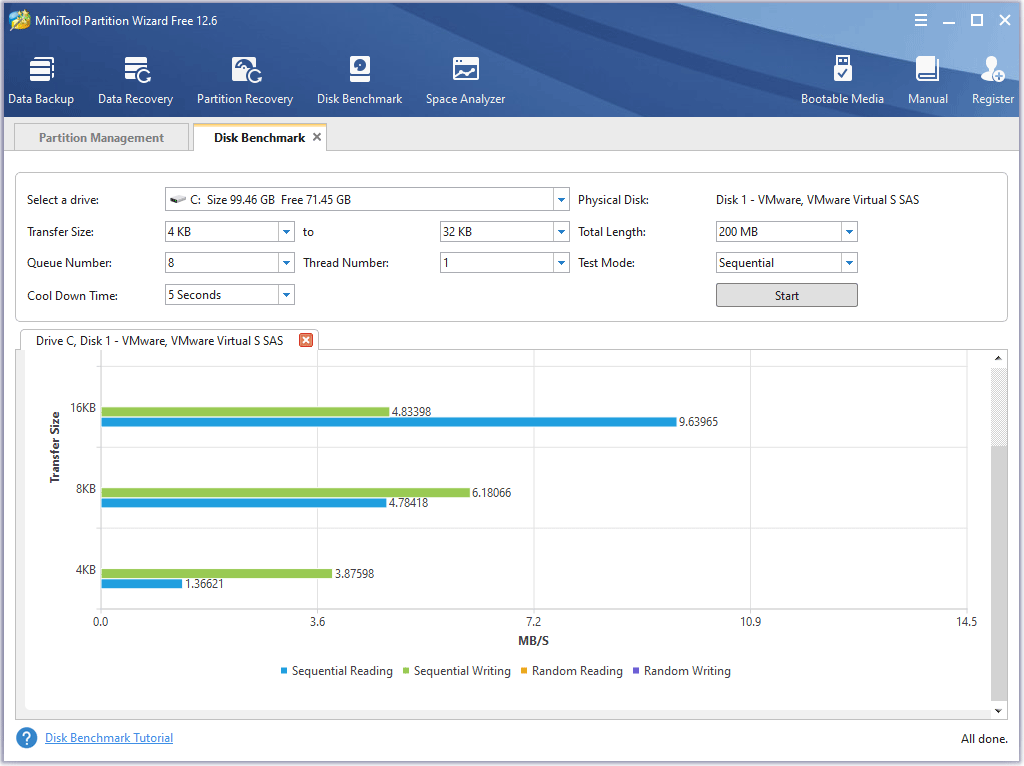
After that, you can check the hard drive test result and compare it with the standard read & write speed of hard drive.
Bonus: How to Increase Hard Drive Speed in Windows?
If you find your (external) drive is very slow after a hard drive benchmark, you can try these methods to increase the speed of your hard drive.
1. Scan Bad Sectors
If there are bad sectors on the hard disk, it will slow down the hard disk. You can easily check your hard drive for bad sectors with the MiniTool Partition Wizard Disk Surface Test feature.
MiniTool Partition Wizard FreeClick to Download100%Clean & Safe
Step 1: On the interface of MiniTool Partition Wizard and right click the target disk and choose the Surface Test option.
Step 2: In the Surface Test window, click the Start Now button.
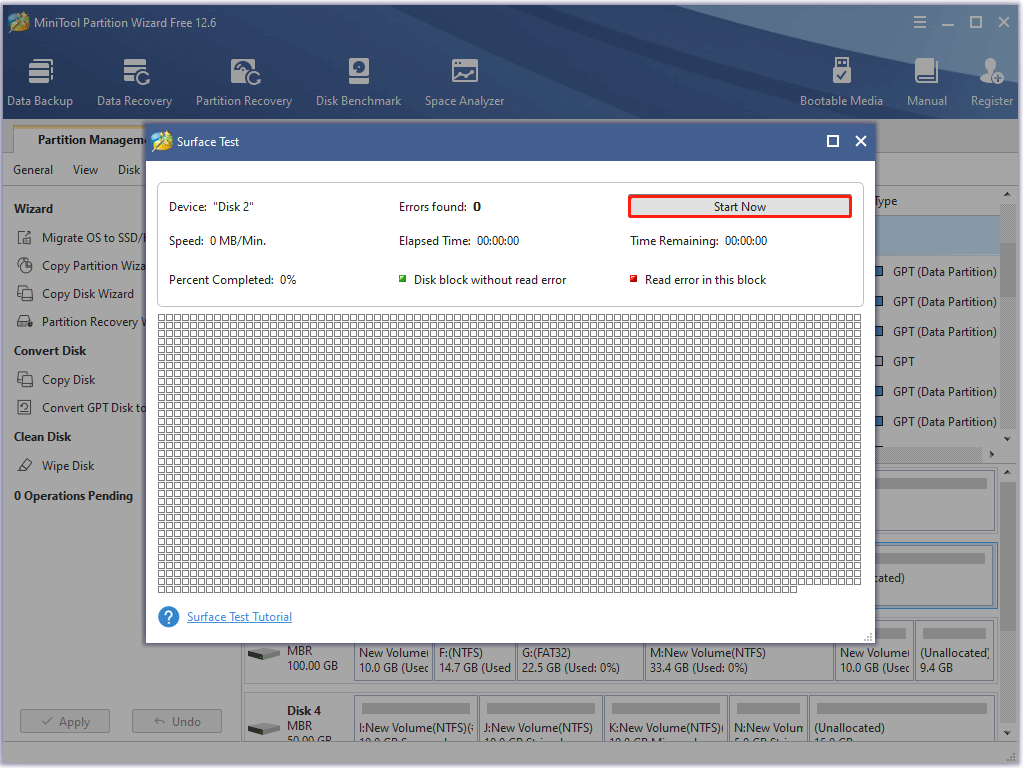
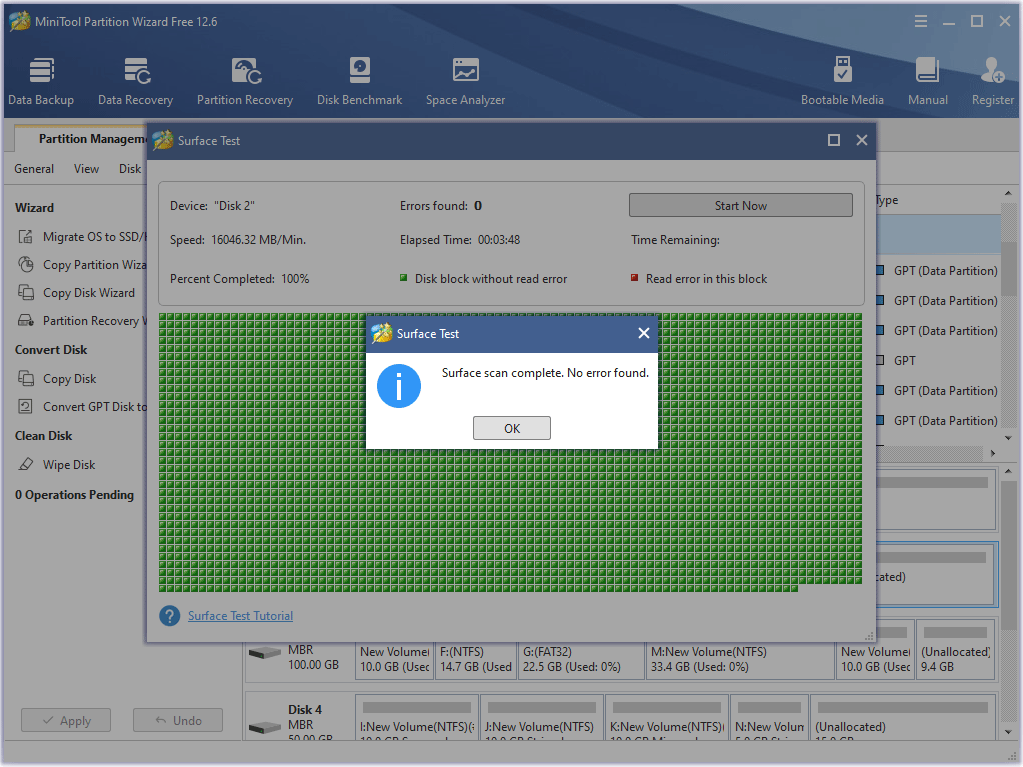
After the disk testing, it will tell you if your hard drive has some bad sectors. If it is, it will be marked red; if not, it will be marked green.
If your hard disk has bad sectors, you can use some professional software to bypass the bad sectors, or send it to a professional disk repair shop. If nothing helps, you can replace the drive with a new one.
2. Delete Temporary Files
Internet browsers used to access the Internet have a habit of storing large amounts of temporary Internet files on your hard drive. These files take up a lot of space and can slow down your hard drive. By removing these temporary files, you can instantly increase the speed of your hard drive.
What if you delete important files by mistake? You can refer to this article: How to Easily Recover Deleted/Lost Files on PC in Seconds
3. Defragment the Hard Drive
Since a fragmented hard drive can reduce the performance of the hard drive, it is best to defragment the hard drive to increase its speed and performance. Defragmentation is the process of piecing together bits and pieces of a file into a block for faster hard drive access.
4. Partition Your Hard Drive
Distributing the hard drive into multiple partitions can also greatly increase the speed of the hard drive. The more partitions you have on your hard drive, the more organized the hard drive will be, and ultimately, its speed will increase.
Bottom Line
After reading this post, you may learn what CrystalDiskMark is and how to use CrystalDiskMark. Besides that, you may learn another useful disk benchmark tool called as MiniTool Partition Wizard.
Hope you can benefit from this article. If you have any suggestions or need any help when you use MiniTool Partition Wizard, you are welcome to send us an email at [email protected].

User Comments :