Origin is a popular game platform. If you don’t need it anymore, here MiniTool Partition Wizard provides three methods on how to uninstall Origin, and you can follow this tutorial to remove it.
Origin, a digital distribution platform developed by Electronic Arts, is used for purchasing and playing video games. It is available in 19 languages and users can play it on Microsoft Windows, macOS, OS, Android, and Facebook Platform.
To play a game on Origin, you need to download and install the Origin client. When you don’t need this program, you can uninstall it to free up disk space. If you encounter any problems while using Origin, you might also try uninstalling the program to fix it. Whatever, if you are planning to uninstall Origin, you can try the following methods.
Method 1: How to Uninstall Origin in Control Panel
A common way to uninstall Origin is to use the built-in tool in Windows, Control Panel. You just need to:
Step 1: Press Win + S to open the Windows Search utility. Then search for Control Panel and open it.
Step 2: In Control Panel, select View by: Category and click Uninstall a program.
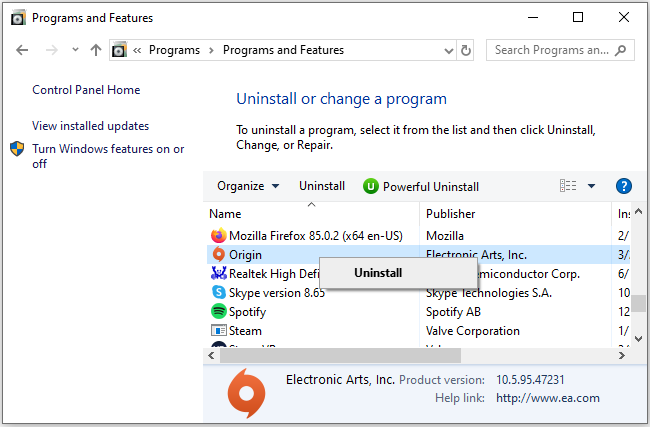
Step 3: When you get the list of your installed programs and features, you can scroll down and right-click Origin. Then select Uninstall.

Step 4: Follow the on-screen instructions to finish the operation.
After uninstalling Origin, there might be leftovers and you need to remove the remnants manually.
Method 2: How to Uninstall Origin with a Third-party Uninstaller
To completely uninstall Origin, it is wise to use a reliable and professional third-party application, such as IObit Uninstaller, Wise Program Uninstaller, etc. For more software that can be used to uninstall Origin, you can refer to this post: Top 5 Free Program Uninstaller Software for Windows 10/8/7.
These applications can uninstall Origin as well as delete leftovers automatically. You can download one to have a try.
Method 3: How to Uninstall Origin on Windows 10 by Editing the Registry
You can also remove Origin by making changes in the Registry Editor. However, you need to pay attention that improper changes to the registry would lead to severe damage to your operating system. Therefore, you need to be careful during the operation and don’t forget to back up the registry in advance. Here are the detailed steps.
Step 1: Completely exit Origin. You can press Ctrl + Shift + Esc to open Task Manager. Then end all the processes related to Origin.
Step 2: Press Win + E to open File Explorer and navigate to the installation folder of Origin. By, default, it’s in C:Program Files (x86).
Step 3: Press Win + R to open the Run window. Then type regedit and click OK to open Registry Editor.
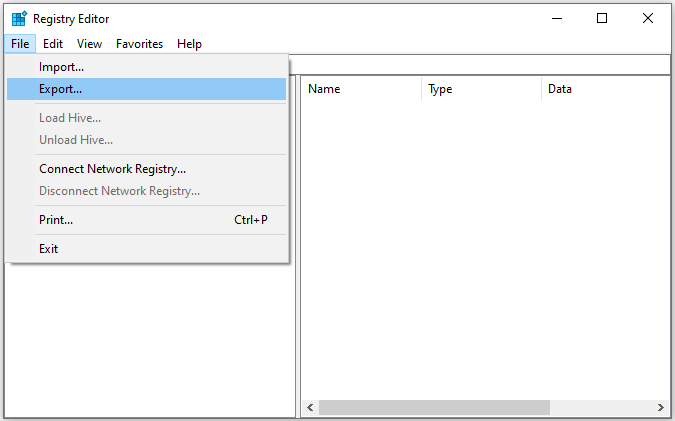
Step 4: In Registry Editor, click File > Export. In the pop-up window, select All under the Export Range. Then choose a location, give a name, and select Save to back up the registry keys.

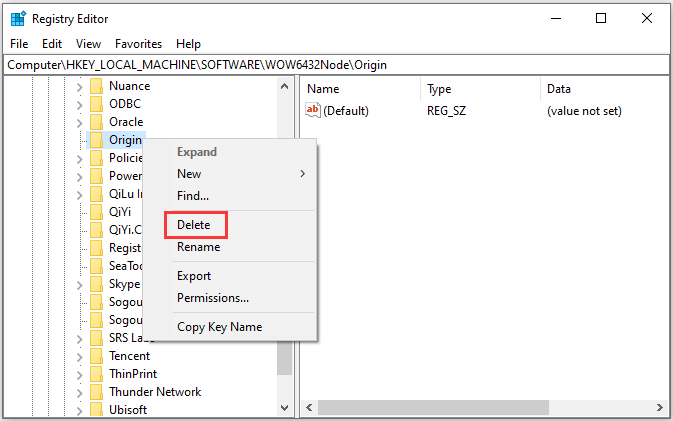
Step 5: Navigate to ComputerHKEY_LOCAL_MACHINESOFTWAREWOW6432Node. Then right-click the Origin folder and select Delete.

Step 6: Delete the Origin folder in the following location: ComputerHKEY_LOCAL_MACHINESOFTWAREMicrosoftWindowsCurrentVersionUninstall.
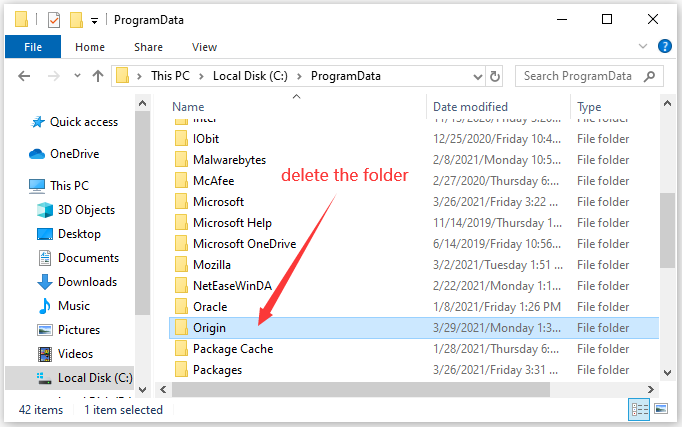
Step 7: Delete the Origin program cache. Open File Explorer and navigate to C:ProgramData. Then delete the Origin folder.

Now you have uninstalled Origin successfully.

User Comments :