Why Microphone Level Keep Changing on Windows 10
A lot of users reported that the microphone levels keep changing on Windows 10. This issue often occurs when using much multiple applications or third-party programs. According to investigating many user reports, there are several situations that can cause Windows 10 microphone level keeps changing.
- It is commonly reported that Skype can cause microphone levels keep changing if it is configured to launch every system startup.
- Steam is also responsible for the automatic microphone adjustments issue. You can change its settings to fix the issue.
- If an application is allowed to take exclusive control of the microphone, it may automatically adjust the microphone levels.
- Outdated or corrupt microphone driver can cause the microphone issue as well.
Now, let’s see how to stop microphone auto adjusting Windows 10.
How to Stop Microphone Auto Adjusting Windows 10
Method 1. Prevent Skype from Auto Adjusting the Microphone
If Skype is configured by default to adjust the microphone levels, you may encounter the problem. So, it is necessary to prevent Skype from auto adjusting the microphone. Here’s how to do that:
Step 1. Open the Skype UWP client, and then click the Action button (three-dot icon) at the upper left corner and select Settings from the context menu.
Step 2. Select the Audio &Video tab from the pane, and then scroll down to the Microphone section and untick the checkbox for Automatically adjust microphone settings.
If you are using the Desktop version, you can go to the Audio Settings and uncheck the box of Automatically adjust microphone settings.
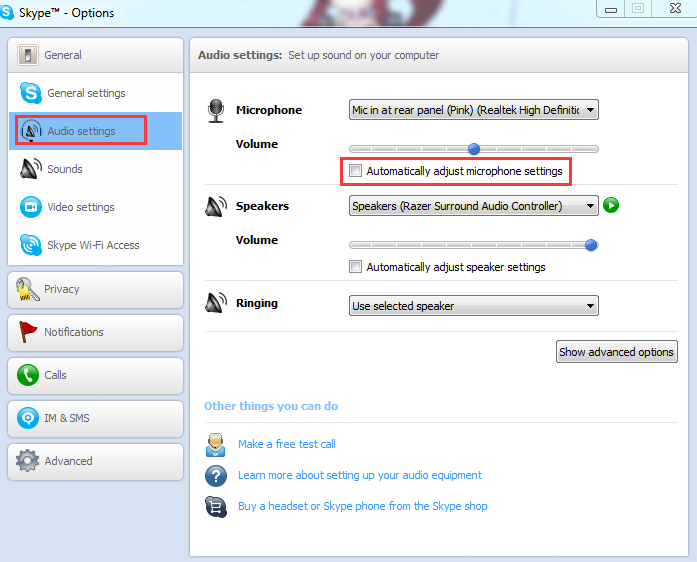
Now, you can start your computer and see if the issue “mic volume keeps changing” still persists.
Method 2. Prevent Steam from Auto Adjusting the Microphone
As mentioned above, Steam is another application that may cause microphone levels keep changing. If you are using the Steam client and configure it to launch automatically at startup, you need to disable the Automatic volume settings. For that:
Step 1. Log in to your Steam client and click on the Friends & Chat icon at the bottom right corner of the window.
Step 2. Click on the Gear icon at the upper right corner and select the Settings menu.
Step 3. In the Friends List settings, click on the Voice tab and scroll down to the bottom of the screen and click on Show Advanced Settings.
Step 4. Toggle off the switch of Automatic volume/gain control.
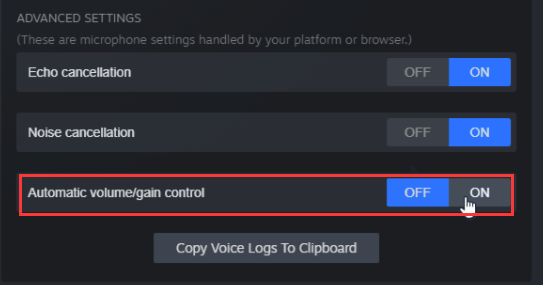
Restart Steam and see if Windows 10 microphone level keeps changing.
Method 3. Reconfigure the Microphone Settings
How to stop microphone auto adjusting Windows 10? Another effective method is to reconfigure the microphone settings. By doing so, no apps are allowed to take exclusive control of the microphone. Here’s how:
Note: This operation might cause some other voice features to function improperly. If this method fails to work, you’d better reverse its settings.
Step 1. Press Win + R keys to open the Run box, and then type mmsys.cpl in it and hit Enter.
Step 2. Go to the Recording tab, and then select the affected microphone and click on Properties.
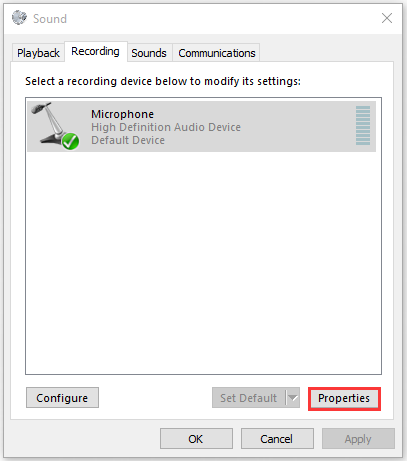
Step 3. Go to the Advanced tab inside the Properties window and then untick the checkbox next to Allow applications to take exclusive control of this device.
Step 4. Click on the Apply button to execute the changes.
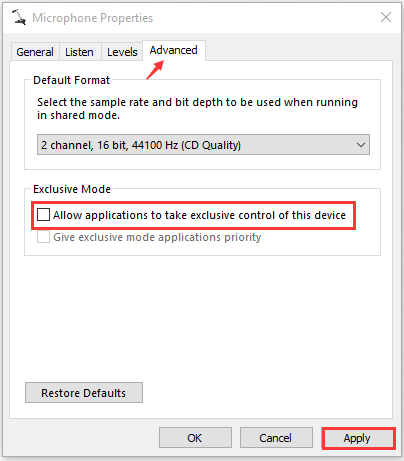
After that, restart your computer and see if it stops microphone auto adjusting Windows 10
Method 4. Change the Microphone Levels Manually
Another quick fix is to set a default value for your microphone manually. This method has been proven to be useful. Try it now.
Step 1. Open the Sound window through the above method and go to the Recording tab. Alternatively, you can right-click the Speaker icon at the bottom of the notification screen and select Sound from the elevated menu.
Step 2. Select the affected microphone/headset and click on Properties.
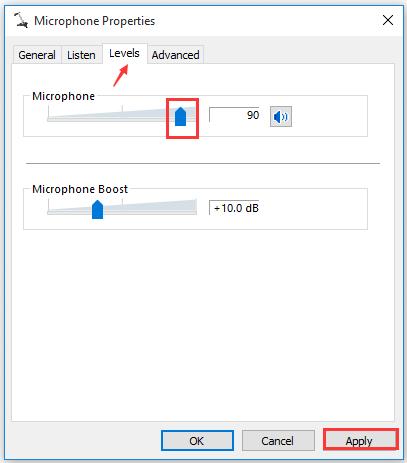
Step 3. Navigate to the Levels tab inside the Microphone Properties window, and then adjust the value of the microphone via the slider and click on Apply to save the changes.
Method 5. Update the Microphone Driver
An outdated or corrupted audio driver is also responsible for the issue. To fix the problem, you can try updating the audio driver to the latest build. Here’s a quick guide:
Step 1. Right-click the Start button and select Device Manager from the context menu.
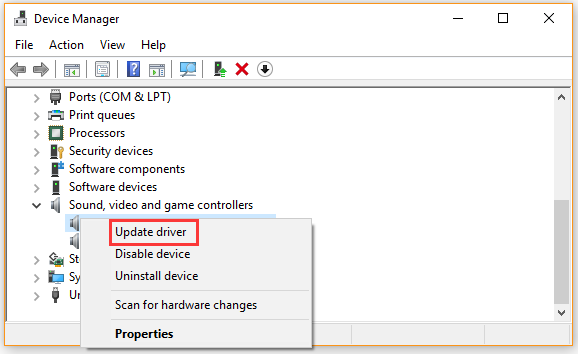
Step 2. Expand the Sound, video and game controllers category, and then right-click the audio device that needs to update and select Update Driver.
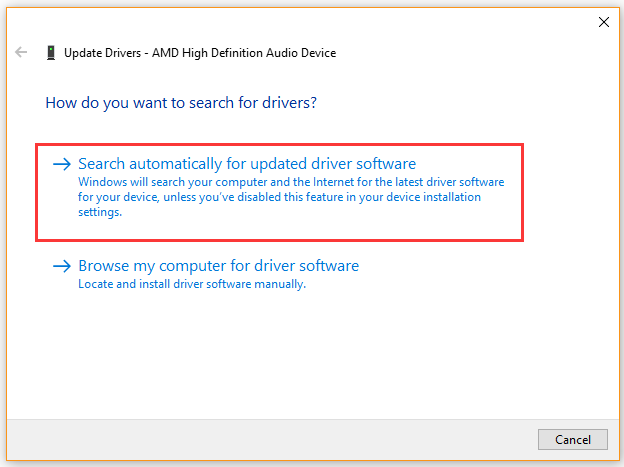
Step 3. Select the Search automatically for updated driver software option. Then follow the on-screen prompts to complete this update. Now, Windows will automatically any available updated driver and install it for you.
Once the update finishes, reboot your computer and see if the auto adjustment issue still persists.
How to stop microphone auto adjusting Windows 10? The top 5 methods have been introduced to you. Now, it’s your turn to have a try.

![Volume Mixer Won’t Open Windows 10 [Full Fix]](https://images.minitool.com/partitionwizard.com/images/uploads/2020/09/volume-mixer-wont-open-thumbnail.jpg)

User Comments :