What is IIS? How to install it on Windows 10? In this post, MiniTool not only explains what it is but also shows the differences between ISS and Apache. Furthermore, MiniTool also offers the tutorial on how to install ISS on Windows 10.
What Is IIS?
IIS, short for Internet Information Services, is an extensible web server developed by Microsoft. The web server supports HTTP, HTTP/2, HTTPS, FTP, FTPS, SMTP, and NNTP. IIS is available on Windows NT family since Windows NT 4.0 and it is not active by default.
The first version of IIS is IIS 1.0 that came with Windows NT 3.51. Along with the development of Windows, IIS has evolved over the past years into IIS 10. This version appeared with Windows Server and Windows 10.
Each version of IIS boasts new features. For example, IIS 3.0 has ASP for dynamic scripting and IIS 6.0 features IPv6 and improved security and reliability.
What’s the function of IIS? An IIS web server accepts requests from remote client computers and then returns the appropriate response. It allows web servers to share and deliver information across LAN.
How about IIS vs. Apache? The main differences between IIS and Apache are listed below.
1. Running on the different operating system:
IIS is integrated with Windows and it only runs on it, while Apache is free and open source and it can run on various operating systems, including macOS, UNIX and Linux.
2. Security:
The security features of IIS make it quite safer than Apache.
3. Others:
IIS has a help desk to deal with most issues, but support for Apache comes from the user community. The former’s underlying technology is compatible with standard web interfaces worldwide.
How to Install IIS on Windows 10
If you want to experience the benefit from IIS on Windows 10, follow the tutorial below to install IIS on Windows 10.
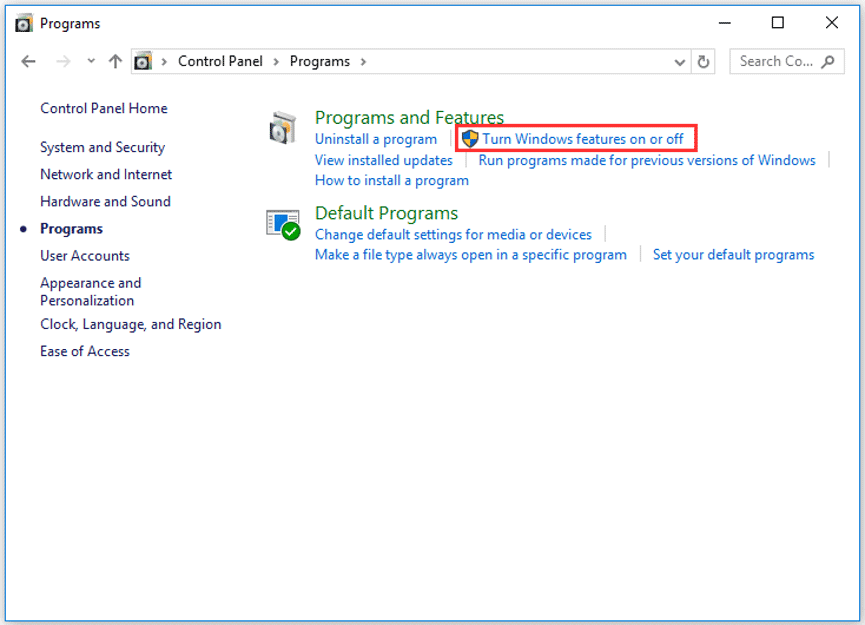
Step 1: Open Control Panel and then click Programs > Turn Windows Features on and off.

Step 2: Scroll down the list on the Windows Features window until you find Internet Information Services. Check this feature and then click the OK button to install it on Windows 10.
Step 3: Close the current window when your system says Windows completed the requested changes.
Step 4: Open your browser, type localhost in the tab and press the Enter key. After that, you should see a default web page is rendered in your browser.
If you do not want to use IIS any more, you can disable it by unchecking Internet Information Services on the Windows Features window.
Harden Windows IIS
To harden Windows IIS, you can try some of the following ways.
Way 1: Ensure Windows 10 is updated with all security patches.
Way 2: Disable any features of IIS you are not using to reduce potential attacks.
Way 3: Enable firewalls to ensure that the server only receives valid packers.
Way 4: Take control of which IP address and domains can access the web server.
Way 5: Take advantage of logging to view the visitors accessing the web server.
Bottom Line
Have you learned IIS better after reading? And have you installed it on Windows 10 successfully? If you have any doubts about IIS and the installing process, please write down your doubts in the following comment zone. We will reply to you as soon as possible.


User Comments :