Sometimes you may need to leave your computer alone for several minutes. Under this circumstance, it’s important to protect any unauthorized person from accessing your computer especially when you are dealing with sensitive and crucial data. To achieve that, you just need to set a lock screen timeout that is most suitable for you. Here comes a new question – how to change lock screen timeout in Windows 11? If you are unclear about that, try the following 4 methods.
Here is a video guide:
Way 1. Change Windows 11 Lock Screen Timeout via Settings
The first and simplest way to change screen timeout to turn off display after in Windows 11 is to use the Settings app. It can save power along with protecting privacy by setting a different timeout when your device is plugged in or running on battery. Here’s how to change Windows 11 lock screen timeout via Settings.
Step 1. Press Win + I keys to open the Settings app. Also, you can right-click the Start menu and select Settings.
Step 2. Select System from the left vertical menu, and then scroll down the right sidebar and click on Power & battery/Power.
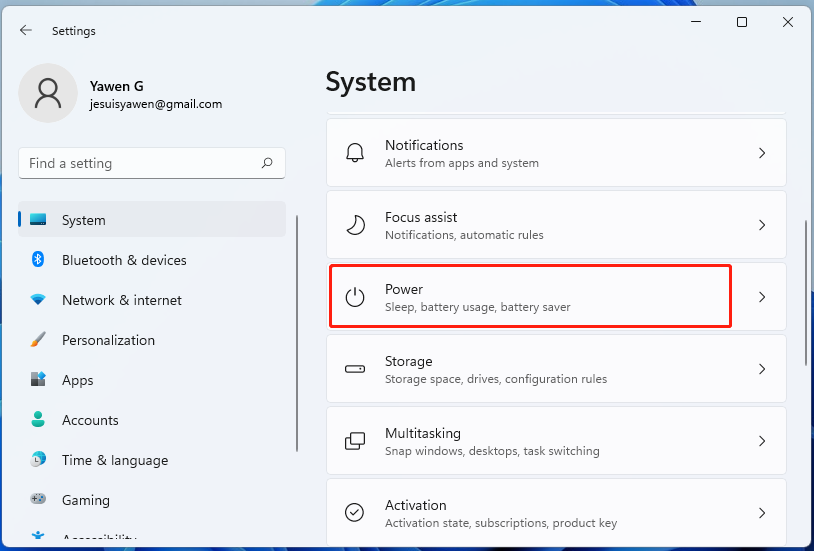
Step 3. Go to the Power section and expand the Screen and sleep category.
Step 4. Click on the drop-down menu next to “On battery power, turn off my screen after” and select a time that’s most suitable for you. Bear in mind that this option only applies when your computer is running on battery power.
Step 5. Also, you can click on the drop-down menu next to “When plugged in, turn off my screen after” and select a lock screen timeout.
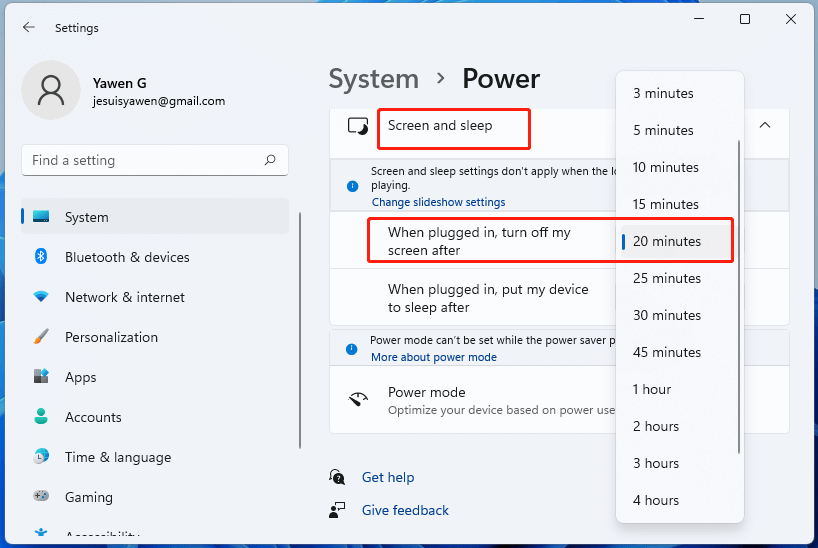
Now, you can close Settings and check if you change screen timeout in Windows 11 successfully.
Way 2. Change Windows 11 Lock Screen Timeout via Control Panel
As you know, Control Panel includes many advanced options that can make changes to your power plan and other settings. Here you can use it to change screen turn off timeout in Windows 11.
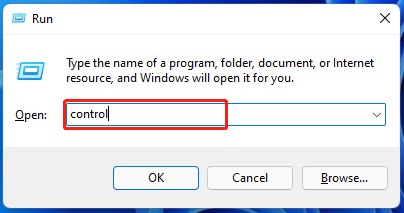
Step 1. Press Win + R keys to open the Run dialog box, and then type control in the box and hit Enter.
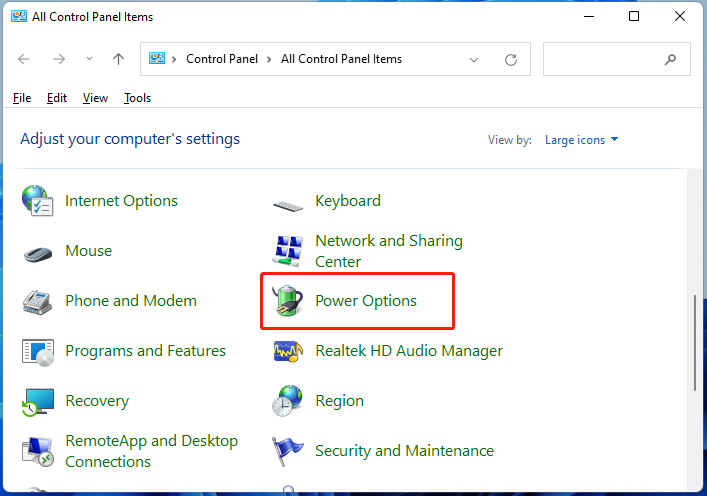
Step 2. In the Control Panel window, change the view by type to Large icons and click on Power Options.
Step 3. Click on the Change plan settings link next to your selected power plan.
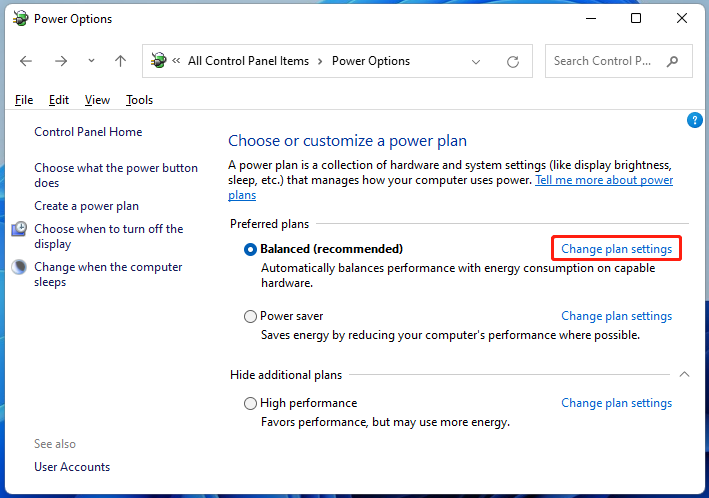
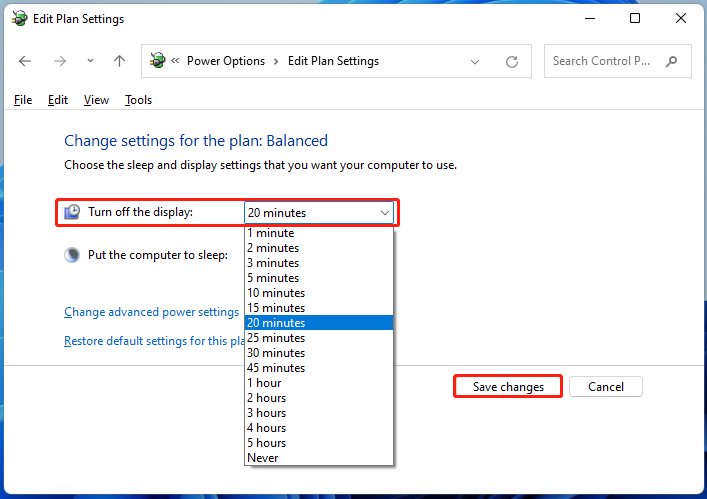
Step 4. Click on the drop-down menu next to Turn off the display and select a time that you want to use when On battery and Plugged in. Also, you can click on Put the computer to sleep and select a time.
Step 5. Click on Save changes to execute the changes. After that, you can see if you change screen timeout in Windows 11.
Way 3. Change Windows 11 Lock Screen Timeout via Registry Editor
Another simple way on “how to change Windows 11 lock screen timeout” is to use the Registry Editor. Now, follow the steps below carefully.
Step 1. Open the Run box by pressing Win + R, and then type regedit in it and hit Enter. Then click on Yes to access this app.
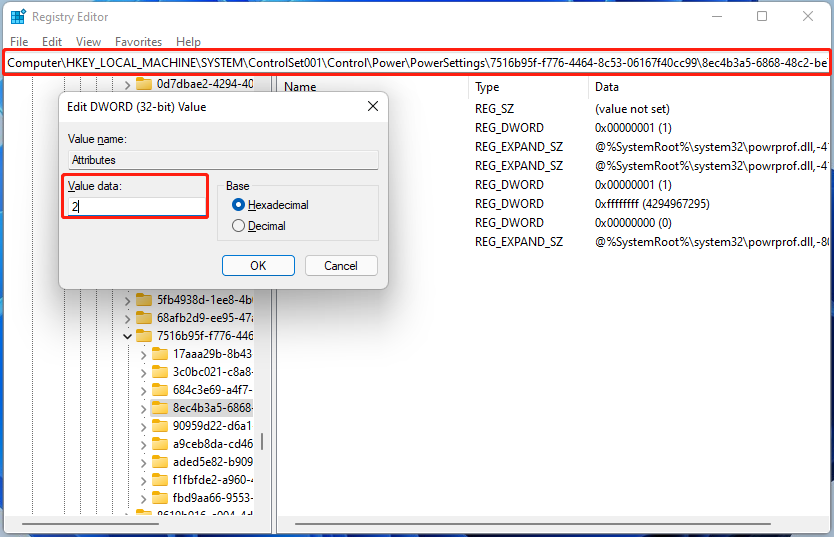
Step 2. In the Registry Editor window, locate the following path from the left navigation bar:
ComputerHKEY_LOCAL_MACHINESYSTEMCurrentControlSetControlPowerPowerSettings7516b95f-f776-4464-8c53-06167f40cc998EC4B3A5-6868-48c2-BE75-4F3044BE88A7
Step 3. Go to the right panel and double-click the Attributes key, change its Value data to 2, and click on OK to save the change. It will enable an option called Console lock display off timeout in Windows 11. To customize this option to change lock display timeout, proceed with the following steps.
Step 4. Open the Control Panel again, select Power Options, and click on Change plan settings next to your power plan.
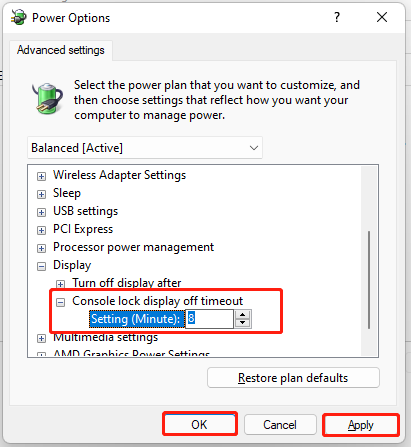
Step 5. Click on Change advanced power settings, and then expand the Display category in the pop-up window.
Step 6. Now, you will see the Console lock display off timeout option, expand it, change the default time to any other lock screen timeout you want.
Step 7. Click on Apply and OK to save changes.
Way 4. Change Windows 11 Lock Screen Timeout via CMD
In addition to the above methods, you can change screen timeout to turn off display after in Windows 11 by applying certain command lines. For that:
Step 1. Type cmd in the search box on the taskbar. And then right-click the Command Prompt app and select Run as administrator. Then click Yes to confirm the operation.
Step 2. In the elevated Command Prompt window, type the following command and hit Enter to set a lock screen timeout when On battery.
powercfg -change -monitor-timeout-dc <minutes>
or
powercfg /SETDCVALUEINDEX SCHEME_CURRENT 7516b95f-f776-4464-8c53-06167f40cc99 3c0bc021-c8a8-4e07-a973-6b14cbcb2b7e <seconds>

Step 3. If you want to set a lock screen timeout when Plugged in, you can run the following command.
powercfg -change -monitor-timeout-ac <minutes>
or
powercfg /SETACVALUEINDEX SCHEME_CURRENT 7516b95f-f776-4464-8c53-06167f40cc99 3c0bc021-c8a8-4e07-a973-6b14cbcb2b7e <seconds>
How to change lock screen timeout in Windows 11? The top 4 ways have been illustrated and you can choose the best one you think.

![How to Install DirectX Graphics Tools Windows 11 [Full Guide]](https://images.minitool.com/partitionwizard.com/images/uploads/2022/01/directx-graphics-tools-windows-11-thumbnail.jpg)
![How to Empty the LCU Folder in Windows 11? [4 Simple Ways]](https://images.minitool.com/partitionwizard.com/images/uploads/2022/01/empty-lcu-folder-in-windows-11-thumbnail.jpg)
User Comments :