You may be facing Google Chrome not saving passwords. But please take it easy, as this article will show you the causes of this issue and its solutions. By the way, you may need a professional partition wizard, and here I recommend MiniTool Partition Wizard that can help you manage your hard drive easily and effectively.
Reasons for Google Chrome Not Saving Passwords
Keeping your passwords saved in Google is a convenient thing when you want to log in your accounts quickly. However, sometimes something goes wrong. You may find that Google Chrome fails to save passwords at all.
Let’s see why this issue occurs. The main causes of this issue are listed below:
- A setting in Google Chrome might be impeding Google from saving data.
- Cache folder for Google Chrome could be corrupt.
- The Google Chrome profile is corrupt.
- Your currently used Google Chrome is outdated.
After seeing the causes above, you may have some idea about fixing Chrome not saving passwords. But please note that it is highly recommended to update your Chrome to its latest version at first. Therefore, please uninstall your current version, download the latest version from the official website and install it.
If you still cannot save your passwords in Google Chrome after updating it to its latest version, you should try the following solutions.
Solution 1: Check the Setting That Serves to Save Passwords
Google Chrome offers to save the password. Therefore, you need to check the setting that serves to save passwords is enabled or not by doing the following operations.
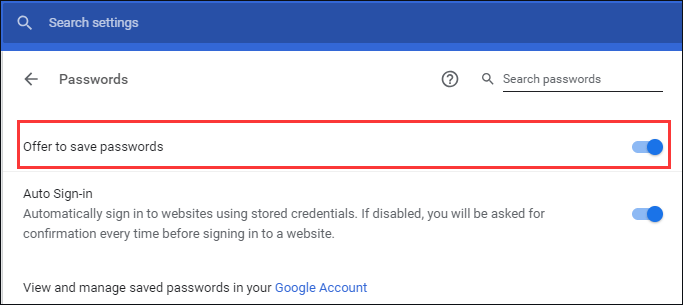
Step 1: Open the address chrome://settings/passwords in the Google Chrome browser.
Step 2: Check the state of Offer to save passwords. Turn the toggle switch ON if the state of the setting is off.
Solution 2: Remove the Cache Files for Google Chrome
The cache files in Google Chrome store information that help load cached webpages faster when you open them. However, if such files are corrupt, you may face that your Google Chrome cannot save passwords.
To fix the issue caused by these the corrupted cache files, you need to delete the cached files for Google Chrome webpages. To do that, please refer to the following steps.
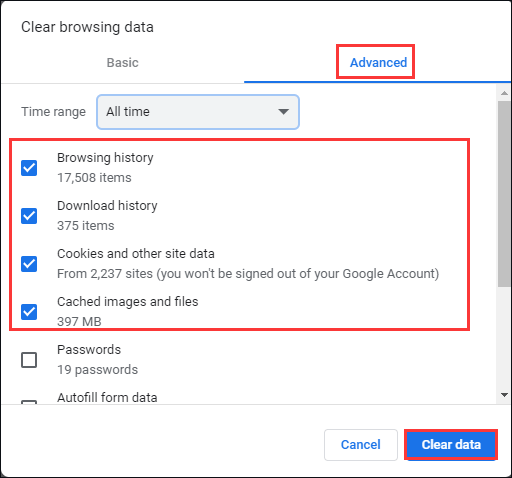
Step 1: Open the address chrome://settings/clearBrowserData in Google Chrome.
Step 2: Move to the Advanced tab, select All time and the first four options listed below and click on Clear data.
Four options:
- Browsing history
- Download History
- Cookies and other site data
- Cached images and files
Step 3: Restart the browser once the cache has been cleared.
Solution 3: Create a New Profile for Google Chrome
This solution can be carried out when your user profile on the Google Chrome browser is corrupt. To create a new user profile in your browser, please follow the steps below.
Step 1: Click on your account icon at the top-right corner of your profile.
Step 2: Navigate to Manage People.
Step 3: Select Add Person > Add.
Step 4: Type the details to add the new account and restart the browser.
Solution 4: Allow Google Chrome to Keep Local Data
Google Chrome will not save local data if the option is disabled in the browser’s settings. Therefore, please enable this option as follows:
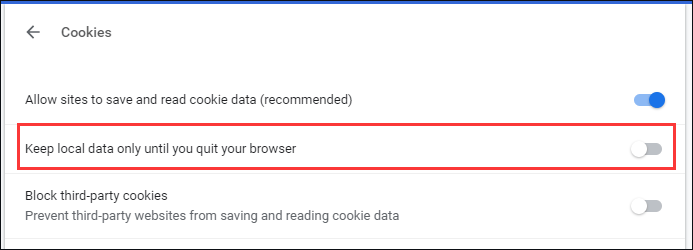
Step 1: Open the address chrome://settings/content/cookies on the Google Chrome browser.
Step 2: Check the state of Keep local data only until you quit your browser. If it is on, please switch OFF the toggle switch.
Step 3: Restart your browser.

User Comments :