If you are seeking for a way to boot a laptop from USB, don’t miss this article. Here, MiniTool Partition Wizard provides a guide to help you get Toshiba laptop to boot from USB step by step.
Could I Boot My Laptop from USB?
There’s no doubt that the laptops and PCs make our work, life and entertainment easier and convenient. Most people should have benefited from them. However, you might be unable to boot your laptop or PC in the normal way due to multiple reasons, including system corruption, hard drive failure and other critical factors.
Luckily, laptops and PCs are produced with the availability to boot from USB peripherals, which means that your can access your data bypassing the installed operating system by booting from a USB drive. The USB drive that can be used to boot a device is commonly known as bootable USB drive.
You can make a bootable USB drive for an operating system or a utility program. In general, you might need to boot your laptop or PC from a USB in the following situations:
- You want to launch a certain program in Windows recovery environment.
- You want to clean reinstall your Windows or upgrade an older Windows OS to a newer one (such as upgrading Windows 7 to Windows 10).
- You want to recover or transfer data from a broken computer.
- You want to fix the corrupted hard drive.
How do I Get My Toshiba Laptop to Boot from USB?
Some users may have no idea on how to boot from USB, and there’re plenty of users asking for help on the forum: How do I get my Toshiba laptop to boot from USB? Actually, it is not so difficult to boot Toshiba laptop from USB as you think. Here’s a detailed tutorial and you can get Toshiba laptop to boot from USB (a normal one) by following the steps below.
Step 1: Prepare a USB drive.
At first, you need to prepare a USB drive that has the enough capacity for the bootable files to be burned. Besides, you had better format the USB drive to FAT32 file system for better compatibility.
Step 2: Create a bootable USB for your Toshiba laptop.
Now, you can connect the prepared USB to your computer and make it bootable. To create a bootable USB of Windows 10, you can use the Media Creation Tool. To create bootable USB for utility programs or other operating systems, you are recommended to download the ISO file from the official website and use a third-party tool to burn it to the USB drive.
Step 3: Boot Toshiba laptop into BIOS setting.
Keep the created bootable USB connected on your computer and turn on your Toshiba laptop. You will quickly receive the first screen which displays that Please press * to enter UEFI BIOS setting (or similar information). Here, * refers to the BIOS key which can be different in different systems.
To enter the BIOS setup, you need to press the displayed key quickly before the screen goes away. For Toshiba laptop, the BIOS key is commonly Del or F2.

Step 4: Change the boot order.
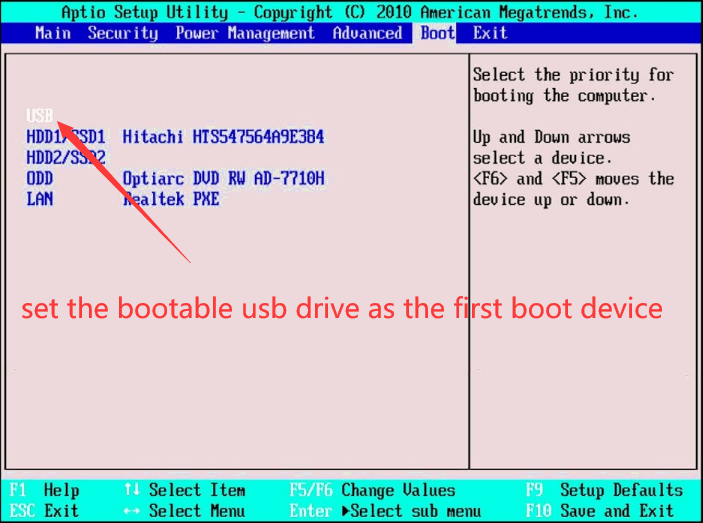
When you enter the BIOS setting, go to the Boot tab and select the bootable USB drive as the first boot device. The USB drive is commonly displayed as USB, USB HDD, or something else that can represent USB drive.
Once it’s done, press the button for Save and Exit to save changes and exit the BIOS setup. The button is commonly F10, and you can find the related operation buttons in the same interface.

Step 5: Boot Toshiba laptop from USB.
After changing the boot order, your Toshiba laptop will automatically boot from the USB. If you want to restore the original boot priority, just shut down your device and remove the bootable USB.
See also: If you cannot get Toshiba laptop to boot from USB, you can read this article to get some effective solutions.

User Comments :