File Explorer, formerly known as Windows Explorer, is a file manager first appeared since Windows 95. It provides a graphical user interface and easy access to the management of files saved on the whole computer, such as the desktop, the library, the system partition, and even change their properties.
Almost all Windows users open File Explorer to manage their files. With this in mind, we feel there is a need to show you Windows 10 file explorer help.
How to Access Windows 10 File Explorer
The first Windows 10 File Explorer help is how to open File Explorer. There are multiple ways to access Windows File Explorer, to summarize:
- From This PC. When your computer is on, you will find an icon named This PC on the desktop. By double-clicking on it, you will get the interface of File Explorer.
- From the Taskbar. Normally, when your PC is turned on, you are able to launch some programs from the taskbar, provided that they are already locked prior to this operation.
- From Cortana. Each Windows 10 edition comes with intelligent assistance Cortana. If you neither have This PC on the desktop or File Explore on the taskbar, you can type File Explorer in the Cortana search box and then find it from the best match. Since you are here, you can pin it to the Windows Start menu or the taskbar.
- From Start menu. By clicking the Windows Start menu, you can easily find an item called File Explorer.
- From Power User Task Menu. Press the Windows logo key and X together to load the Power User menu, then File Explorer should be listed there.
- From Shortcut key. By pressing the Windows logo key and E together, the File Explorer will appear immediately.
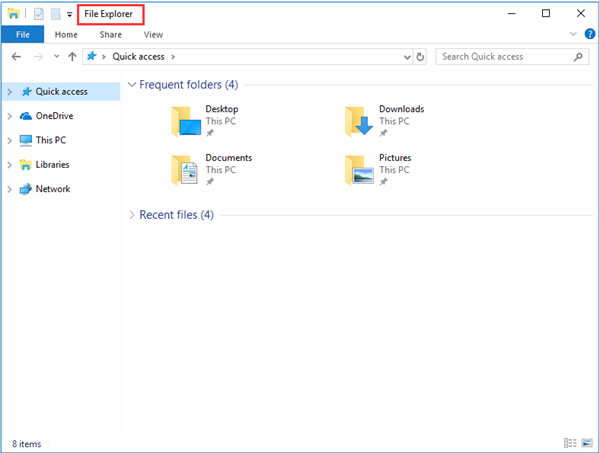
When you are in Windows 10 File Explorer, you will see the five categories from the left action panel, and they are Quick access, OneDrive, This PC, Libraries, and Network.
Check out how to open File Explorer with multiple approaches!Click to Tweet
Best Features in Windows 10 File Explorer
Despite File Explore in Windows 10 provides users with multiple useful features, you might be wondering if there is any Windows 10 file explorer tutorial that helps you go through all the tricks easily. Here are the top features that are popular among the users.
- Home Tab: It located on the top left corner of the file explorer, the new home tab makes most of the tasks and commands easier than before and it copying a file or be it deleting it, and you can perform it via the home tab. In Windows 10, whenever you tap Windows + E, you’ll be taken to the Home tab
- Share Tab: You can find the share tab on the top left corner in the file explorer, and this tab allows you to share plenty of files and folders wherever you want via just one tap. For sharing a file, you can also convert the files into the zip format as well as burn them with the help of the share tab
- View Tab: you can preview the pictures and documents by clicking the Preview pane; you can change the file preview from small icon showing details to large icons showing title
- Quick Access: It is one of the most helpful features of the latest file explorer, and with this feature, you can visit files and folders which you have frequently visited. There are mainly two different sections in this feature of frequent folders and recent files
- OneDrive: Windows Explorer in Windows 8.1 allows you to save files directly to OneDrive but you cannot sync the files in OneDrive with your PC or local system. The new file explorer has overcome this drawback. You can now not only save the files to OneDrive but at the same time sync them with the system
File Explorer Windows 10 Keyboard Shortcuts
Here is the guide for File Explorer Windows 10 Keyboard Shortcuts. If you are much addicted to your keyboard, then it is good for you to keep these keyboard shortcuts in mind. Here we list some useful Windows File Explorer keyboard shortcuts:
| Alt + D | Go to the address bar |
| Alt + Enter | Display the Properties of the selected file or folder. |
| Alt + Left Arrow Key | Go back One Folder in history. |
| Alt + Right Arrow Key | Go forward One Folder in history. |
| Alt + P | Show/Hide the Preview pane. |
| Ctrl + D | Move file or folder to Recycle Bin. |
| Ctrl + E | Go to the search box. |
| Ctrl + E | Activate the Search bar in File Explorer. |
| Ctrl + F | Go to the search box. |
| Ctrl + Mouse Wheel up or Down | Increase or Decrease the size of Icons in File Explorer. |
| Ctrl + N | Open a new File Explorer window. |
| Ctrl + Shift + E | Display all folders above the selected folder. |
| Ctrl + Shift + N: | Create a new folder. |
| Ctrl + W | Close the current File Explorer window. |
| F11 | Maximize or minimize the active window. |
| Home | Display the top item in the active window. |
| Num Lock + Asterisk (*) | Display all subfolders under the selected folder. |
| Num Lock + Minus (-) | Collapse the selected folder. |
| Num Lock + Plus (+) | Display the contents of the selected folder. |
| Shift + Delete | Permanently delete file or folder. |
We hope these keyboard shortcuts let all of you get help with file explorer in Windows 10.
Enable/Disable Quick Access to the Main Screen
As everything has two sides, while many users speak highly of Quick Access, some users feel it is troublesome to switch to This PC each time when they open File Explore. In fact, it is rather to customize what you see at the first sight when you open Windows File Explorer.
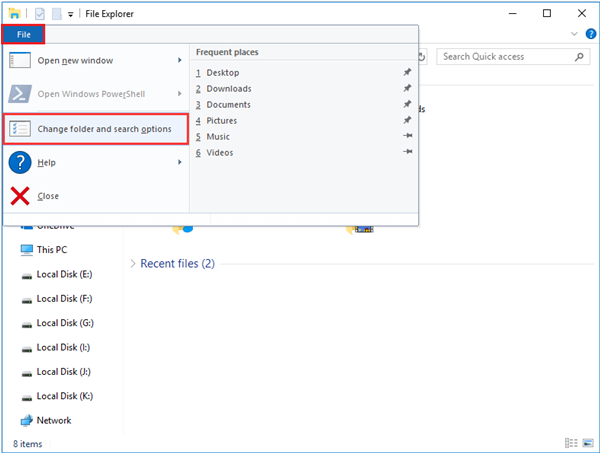
Step 1. Click File and then Change folder and search options.
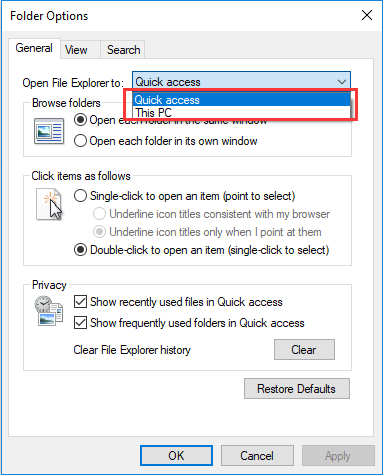
Step 2. In the next pop-up window, drop down the box of Open File Explorer to. Right there you will find two options and they are Quick Access and This PC. Just select the one you prefer and then you will see what you want next time when you open File Explorer.
Pin the Frequently Used to Quick Access
Quick Access is located in the first place of the left panel which shows you the most frequently used folders and the recent files created/modified. For those who have a vast number of files/folders saved on the computer, it is wise to find the target files from Quick Access.
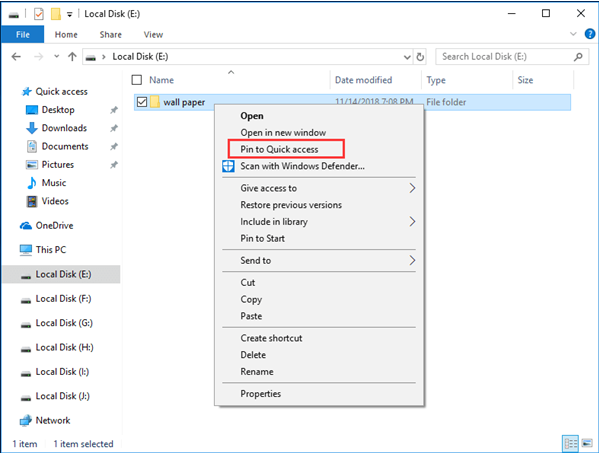
However, if the files you want do not appear, you can pin to Quick Access. Here is how you can do this:
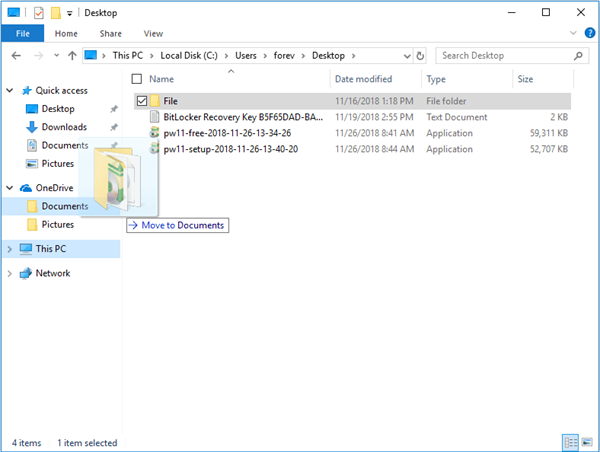
Right-click the target file/folder. From the context menu, select Pin to Quick access as the following picture shows. (Tip: to remove, just select Unpin from Quick Access.)
Manage Hard Drive in This PC
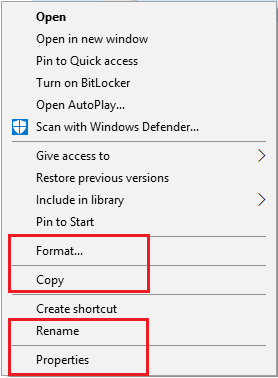
By entering This PC, you are able to view all FAT and NTFS partitions that have drive letters. And it is also possible to perform something basic to manage hard drive partitions. Specifically speaking, you can copy, format, rename the displayed partitions and view its properties.
Usually, when it comes to disk partition management, most Windows users go for Disk Management or they turn to third-party software for help. And in most cases, the latter one such as MiniTool Partition Wizard is deeply trusted.
Simply put, MiniTool Partition Wizard makes it easier to repartition hard drive, to convert file system, to convert partition style, to change cluster size, to manage dynamic disks, and more, which is much powerful than the Windows tools. Till now, more than tens of millions of users get their issue resolved by using this all-in-one partition manager.
Go to the product page to get the details if you are interested or you may just download the free edition to have a try first.
MiniTool Partition Wizard FreeClick to Download100%Clean & Safe
File Explorer Windows 10 Not Working after Right Click
Despite that File Explorer is frequently used every day, sometimes you will find File Explorer Windows 10 not working. One of the most typical issues is that File Explorer crashes/hangs after right click.
If you are bothered by the same issue, you may just follow the simple guideline below to get help with file explorer in Windows 10.
Fix 1 – Using CMD to Fix File Explorer Crash
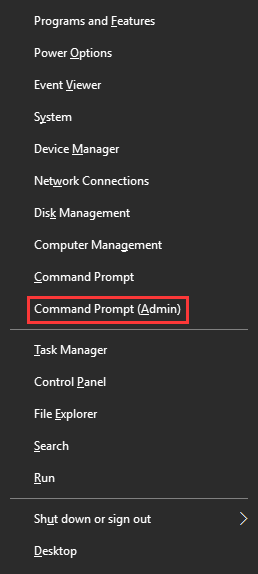
Step 1. Press Windows key and X at the same time to launch the power user menu, then choose Command Prompt (Admin) option from the list of choice. If it does not appear, do this in the Cortana search box.
Step 2. In the command line window, type netsh and hit Enter. Then continually type winstock reset and hit Enter.
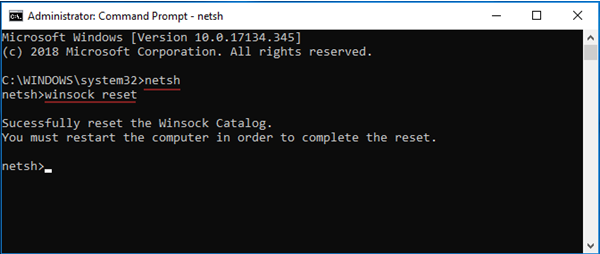
Step 3. Now restart your computer and check if the issue is resolved.
Fix 2 – Uninstall Update
Step 1. Follow the path: Start button -> Settings -> Update & security. Then one the left pane, choose Windows Update, and on the right pane, choose View update history.
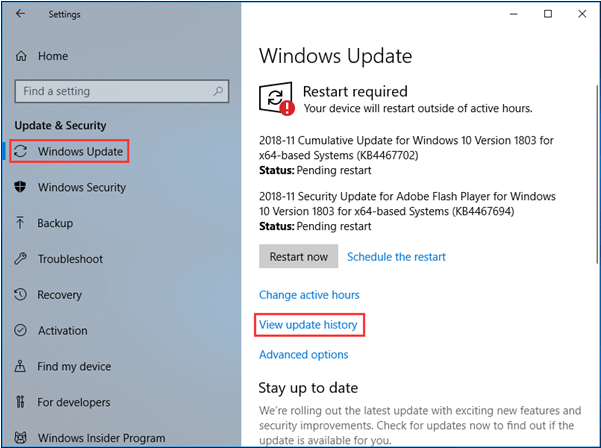
Step 2. Click Uninstall updates. Then in the new window, check if there is an update item named KB3081449 or KB3081448. If you can find one, right-click on it and choose Uninstall.
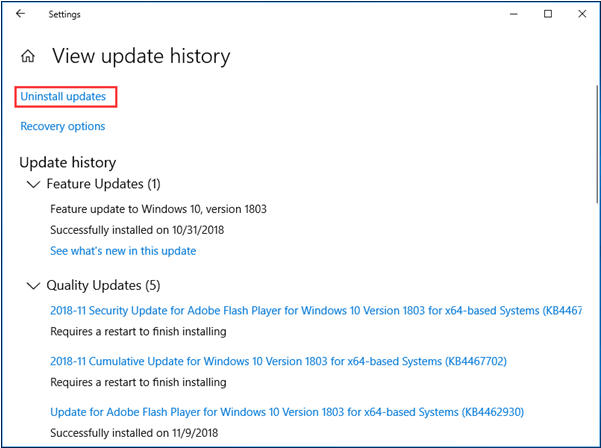
Step 3. Restart your computer and then check out if the File Explorer Windows 10 not working issue has been removed.
Final Words
Reading here, guess you have a better understanding of Windows 10 file explorer tutorial. Hope that your problem with Windows 10 File Explorer is solved. In the coming days, you should find it easier to work with Windows 10.
If you have any suggestions on getting help with File Explorer Windows 10, you can leave us comments or send an email to [email protected] in the following area to help more users. Thanks in advance.

User Comments :