Is your HP printer keeping offline? How to make it online again? In this post, MiniTool shows you how to solve HP printer offline issue with 5 methods in Windows 10. Read on to get these solutions.
Some Windows 10 PC users have been lately reporting that the KP printer is offline. This may happen when:
- The printer and PC connection is unresponsive/slow.
- The printer has been bugged by an internal mistake.
- The printer has several incomplete print tasks up its queue.
Then, how to solve this problem? Please read the following content to get solutions.
Fix 1. Check Printer and Network Connection
When the HP printer is offline, what you should first do is to check the printer and network connection. To do that, you can turn off the printer for 25 to 30 seconds and then turn on it again. In addition, you should make sure the cable is plugged firmly and the router works well.
Fix 2. Use Printer Offline Setting
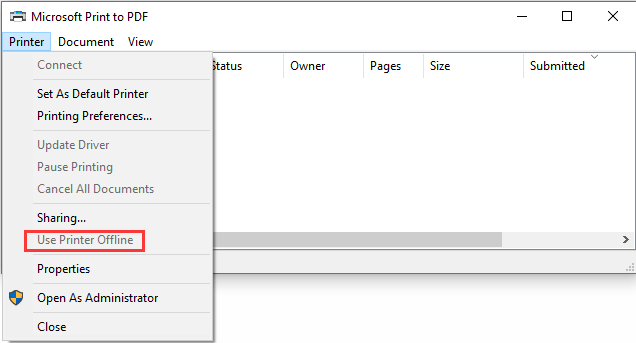
The second method is to close the “Use Printer Offline” setting. If this setting is enabled, your printer is unable to print. Follow the steps below to turn off this selection:
Step 1: Press “Windows + I” keys to open Settings window and then choose Devices.
Step 2: Choose Printers & scanners tab and then select a printer device. Click on this printer device and choose Open queue.
Step 3: In the new window, click Printer and uncheck Use Printer Offline.
Fix 3. Set It as the Default Printer
Step 1: Open Printers & scanners setting again. Click the printer device and choose Open queue.
Step 2: Click Printer and choose Set As Default Printer.
Fix 4. Fix it via Services
This method is only available when your printer uses a WSD port. If it’s not using such a port, you should skip this method.
Here is the tutorial on checking if your printer is using a WSD port:
Step 1: Open Printers & scanners setting again. Click the printer device and choose Open queue.
Step 2: Click Printer to expand it. Then, choose Properties.
Step 3: In the Properties window, skip to the Ports tab. Then, check if your printer uses a WSD port.
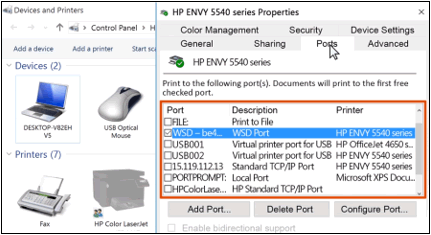
If your printer uses a WSD port, you can then follow the steps below to change Service settings:
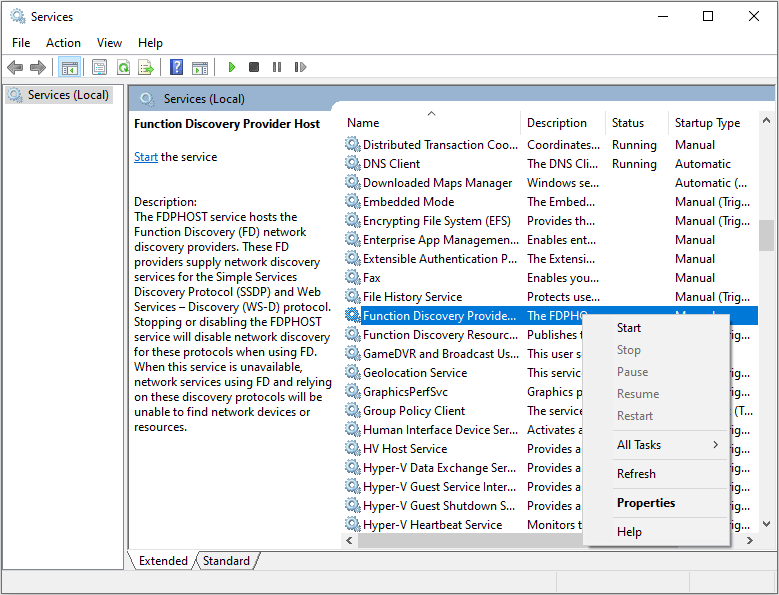
Step 1: Search “Services” in the Start menu and then click the best-matched result to open it.
Step 2: Scroll down the list to locate Function Discovery Provider Host and Function Discovery Resource Publication. Then, check the Status and Startup Type columns. If the Status is not Running, you can right click them and choose Start. If the Startup Type is not Automatic, you can right click them and choose Properties to set them as Automatic.
Then, you can check whether the problem is solved. If not, you can follow the steps below to add a new port:
Step 1: Print a Network Configuration Report from the printer Settings or Wireless menu.
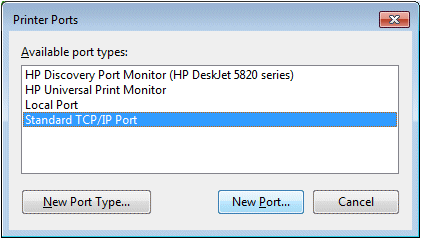
Step 2: Return to the printer’s Ports tab, and then click Add Port. Select Standard TCP/IP Port and click New Port. Then, use the information listed on the Network Configuration Report to add a new port.
Fix 5. Create a Manual IP Connection
Step 1: Print a Network Configuration Page from the network settings or network setup menu. Then, under your network connection type (wired or wireless), check whether the network status is connected or not.

Step 2: If the status is not connected, you should connect the printer to your network first. Then, find the IP Address, Subnet mask, and Default Gateway for your network connection type. If you find different numbers for IPv4 and IPv6, you only need the IPv4 number. Then, find the URL(s) for the Embedded Web Server (EWS).

Here Are Some Information About IPv4 VS IPv6 Addresses
Step 3: Open the EWS URL in a browser with internet connected. In the EWS, click the Network/Networking tab, open the Wired/Wireless menu, and then click IPv4 Configuration. Select Manual IP, click Suggest a Manual IP Address, and then configure the IP Address, Subnet Mask, and Default Gateway number according to the Network Configuration Page.
Step 4: Click Apply, and then wait until the changes are confirmed.
Then, you can check whether the problem is solved. If not, you can then use the IP Address to create a new TCP/IP Port. After that, test printer again to see whether the problem is solved.

![How to Share a Printer in Windows 10 PC [Complete Guides]](https://images.minitool.com/partitionwizard.com/images/uploads/2020/02/share-printer-win10-thumbnail.jpg)
User Comments :