The ffmpeg.dll file is a Dynamic Link Library, an external part of applications that run on the Windows 11/10/8/7 operating system.
However, Windows users have reported encountering the ffmpeg.dll not found error. Basically, this error can appear while an application is being installed, when the system starts up or when visiting certain websites. ffmpeg.dll errors can also occur when the system file is corrupted, which in turn causes the DLL file not to be discovered by the system catalog. This error is also associated with certain applications such as Microsoft Teams, Skype, Discord, WhatsApp for Windows, and Deezer.
The most common error messages are:
- The program can’t start because ffmpeg.dll is missing from your computer. Try reinstalling the program to fix this problem.
- There was a problem starting ffmpeg.dll. The specified module could not be found.
- Error loading ffmpeg.dll. The specified module could not be found.
- The code execution cannot proceed because ffmpeg.dll was not found. Reinstalling the program may fix this problem.
Errors related to ffmpeg.dll can arise for a few different reasons. For example, the wrong application ffmpeg.dll has been deleted or misplaced, corrupted by malware present on your PC or corrupted Windows registry.
Well, how to fix this ffmpeg.dll not found problem? Please keep reading. In this article, we use Microsoft Teams as an example solution to help fix this error. Before proceeding with the repair, check the workarounds mentioned below.
- Make sure your system drivers are updated.
- Use the Task Manager to close all other applications except system processes.
Way 1: Run System File Checker
One of the best ways to get rid of any DLL file missing errors on the Windows Operating System is to run System File Checker. The built-in system file checker will replace missing system files. Here are the steps.
Step 1: In the search bar, type Command Prompt and right-click the results to select the Run as administrator option.
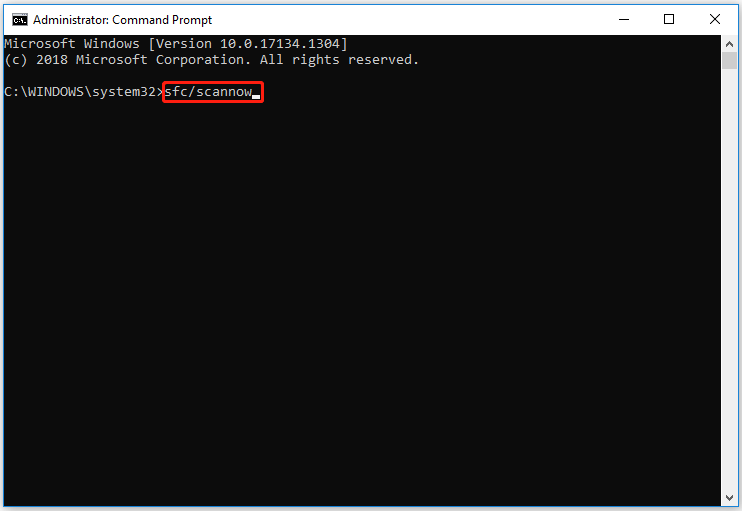
Step 2: In the Command Prompt window, copy-paste the following command and press Enter.
sfc/scannow

Windows can take up to 10 minutes to complete the scanning process. Once done, reboot the system.
Way 2: Copy the Folder to the Application’s Installation Directory
Duplicate application folders may appear if you try to reinstall an application without removing remnants of a previous installation. In this case, simply copy the application’s installation file to the location where it was installed before. To do this, you need to follow these steps:
Note: Make sure there are no Microsoft Teams-related processes running in your system’s Task Manager.
Step 1: Press the Win + R key to open the Run dialog. Then type %localappdata%Microsoft in the box and press Enter.
Step 2: Then open the Teams folder. In Folders, look for any duplicate Teams folders. For example, the new installation folder will be named current-S1. However, default or older installations will be named current. Then copy the contents of current-S1 to the current folder.
Step 3: If asked, click the Replace files option.
Once done, reboot your PC and check if the ffmpeg dll not found problem is fixed.
Way 3: Clear Application Cache
Applications use caching to improve performance and improve user experience. However, if the cache of the application in question is corrupted, you may encounter ffmpeg dll not found error. In this case, clearing the problematic application’s cache may resolve the issue.
Note: Make sure there are no Microsoft Teams and Skype related processes running in your PC’s Task Manager.
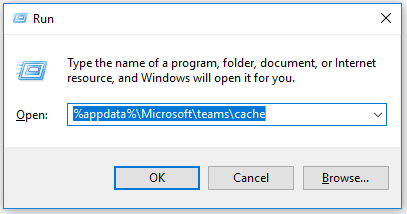
Step 1: Press the Win + R key simultaneously to launch the Run box.
Step 2: Navigate to the following paths one by one and delete any files present there (if Teams pops up during the process, kill it using Task Manager):
%appdata%Microsoftteamscache
%appdata%Microsoftteamsblob_storage
%appdata%Microsoftteamsdatabases
%appdata%MicrosoftteamsGPUcache
%appdata%MicrosoftteamsIndexedDB
%appdata%MicrosoftteamsLocalStorage
%appdata%Microsoftteamstmp

After clearing the above folders, restart your PC, and after restarting, check if the ffmpeg.dll issue is resolved.
If not, repeat step 1 and open the Run box and do the following: %appdata%Microsoft
Open the Microsoft roaming folder, and then right-click on the Teams folder and select Delete. Then confirm the deletion of the folder and restart your computer. After restarting, check to see if the ffmpeg.dll is missing error is cleared from your system.
Way 4: Create New User Account
Your system may show ffmpeg.dll is missing error if your system’s user profile is corrupted. In this case, creating a new user account may resolve the issue.
After creating the account, launch the application that caused the error and check if it still displays the message.
Way 5: Reinstall the App
If none of the above solutions helped you resolve the issue, the last thing you can try is to reinstall the problematic application. Below are the steps you need to follow.
Step 1: Uninstall the application.
Step 2: Open the Run dialog and navigate to %localappdata%. Then delete the folder of the problematic application.
Step 3: Now install the app from its official website.
Then check if the ffmpeg.dll not found error gets fixed.

![How to Fix The Wait Operation Timed Out [A Full Guide]](https://images.minitool.com/partitionwizard.com/images/uploads/2022/11/the-wait-operation-timed-out-thumbnail.png)

User Comments :