If you want to get the most out of your Steam Deck, enable performance overlays on your Steam Deck. This will allow you to view the game's frame rate and other information, so you can tweak settings for optimal performance. So, this article from MiniTool Partition Wizard would show you how to enable the performance overlay on Steam Deck.
Since some games were not specifically designed for Steam Deck, they may not perform well. To see what’s actually going on, you can enable the console’s performance override. Let’s understand what the Steam Deck performance overlay is.
What Is Performance Overlay on Steam Deck
A Performance Overlay is a piece of information that can be activated to be displayed in-game. Much like the desktop version of Steam, you can enable overlays on the Steam Deck that give you insight into settings that affect your console’s performance.
Steam Deck has all the functionality of the desktop version of Valve’s game launcher and marketplace. This means you can enable the performance overlay to see your game’s frame rate. Steam Deck even provides metrics other than frame rate, and this can help you determine if you can flex certain settings on your deck to maximize performance or battery life.
For example, by adjusting Steam Deck’s Adaptive Brightness, you can extend your Steam Deck’s battery life, allowing for more game time. You can also monitor the CPU and GPU temperature of the Steam Deck.
But how do you enable the performance overlay on Steam Deck? Keep reading.
How to Enable Performance Overlay on Steam Deck
Enabling Steam Deck’s Performance Overlay is a simple process. You can launch it using the Quick Access Menu (QAM) button on the console. Here’s how to display game performance metrics:
Step 1: Press the QAM button on the Steam Deck, which is located on the right side of the screen below the touchpad.
Step 2: In QAM, you will see five different tabs. Scroll down to the battery icon representing the performance tab, and press A to enter this menu.
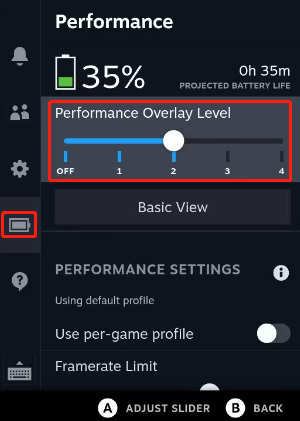
Step 3: You’ll find the performance overlay level below the battery life counter. Go to Performance Overlay Level and press A to enter this submenu.
Step 4: You’ll see four performance overlay levels on the slider. Move the slider right or left to choose a different performance level.
- Level 1: FPS counter (framerate limit includes off, 15, 30, 60 and off).
- Level 2: Battery, GPU and CPU usage, RAM usage and FPS.
- Level 3: GPU and CPU usage and temperature, VRAM usage, RAM usage, battery (including total wattage used), FPS and latency.
- Level 4: GPU and CPU usage and temperature, VRAM usage, RAM usage, battery (including total wattage used), FPS, latency, gan RPM, FSR and Gamescope.

Step 5: You can click Advanced View to view a list of additional settings if desired. You can set Framerate Limit, Refresh Rate, Thermal Power (TDP) Limit, Manual GPU Clock Control, and more. You can even toggle “Use Per Game Profile” on/off so you can set different limits or enable certain options on a per game basis.
Each setting changes how the Steam Deck behaves. If the game you're playing supports per-game profiles, it's worth turning this switch on, as it will optimize the game with the most balanced settings. This provides longer console battery life, less FPS drop, and graphics that fit the screen size.
Step 6: Once done, press the B button a couple of times to hide the QAM screen to exit.
If you’re looking for the perfect mix of performance, graphics, and battery life, these options will let you get the most out of Steam Deck:
- Every game profile is enabled.
- FPS limit set to 60.
- Half-rate shading is on.
- The scale filter is set to linear.
Further reading: If you want to run games smoothly on Windows PC, then sufficient disk space is important. For low disk space, you can try the Extend Partition feature of MiniTool Partition Wizard to fix the problem. Besides, this professional partition manager can help you check hard drive errors and analyze disk space.
MiniTool Partition Wizard FreeClick to Download100%Clean & Safe

![How to Install Xbox Cloud Gaming on Steam Deck [A Few Steps]](https://images.minitool.com/partitionwizard.com/images/uploads/2023/02/install-xbox-cloud-gaming-on-steam-deck-thumbnail.png)
![[Tutorial] How to Install Epic and GoG Games on Steam Deck](https://images.minitool.com/partitionwizard.com/images/uploads/2023/02/install-epic-and-gog-games-on-steam-deck-thumbnail.png)

User Comments :