A great many gamers encounter the Dev error 6034 Xbox One while playing Call of Duty: Warzone or Modern Warfare. How to fix Dev error 6034? In this post, MiniTool provides 9 effective troubleshooting methods.
Both Call of Duty: Warzone and Modern Warfare are widely popular video games for Windows, PlayStation, and Xbox. Sometimes, however, these games also run into various issues and errors such as Modern Warfare Multiplayer not working, error code 6 driver, Dev error 6635, Dev error 6178, and the one discussed here.
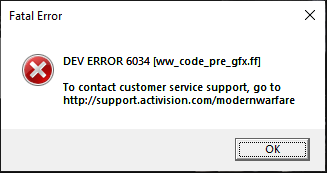
What causes the Warzone/Modern Warfare Dev error 6034 Xbox? There is no official word from the Activision support, but we found some possible causes after analyzing extensive user reports and posts. The main reason for Dev error 6034 Warzone Xbox is related to broken game files. In addition, corrupt cache, conflicting game data packs, outdated GPU drivers, and a temporary glitch are also responsible for Dev error 6034.
So, how to fix Dev error 6034 Xbox? Let’s keep reading.
# 1. Restart the Game (PC/Xbox)
The first and simple fix for Dev error 6034 Xbox One is to restart the game and your console. By doing so, a temporary glitch or cache can be cleared out. Just close the COD Warzone/Modern Warfare game normally and see if the error is fixed. If it still doesn’t work, you can try restarting your PC or Xbox One console.
If a simple restart can’t fix the error, just move down to the following several fixes.
# 2. Clear the Cache (Xbox)
The cache of the Xbox One may get corrupted over time, causing the Dev error 6034 Warzone Xbox. In this case, clearing the cache files on your console may get rid of the error.
Step 1. Press and hold the Power button until your console is completely shut down (All lights are off).
Step 2. Unplug the power cable from your console and wait for at least 30 seconds to give enough time for the cached data to be cleared out.
Step 3. Re-plug the power cable back into your console, and then wait for one minute or more until the white light on the power brick turns orange.
Step 4. Press the Power button to turn on your console and relaunch the game to see if the Modern Warfare Dev error 6034 Xbox gets fixed.
# 3. Clear the Reserved Space (Xbox)
As you might know, the reserved space is used to store updates and patches of the game. Once the game runs into issues when using the reserved space, it may trigger the Dev error 6034 Xbox One. Under this circumstance, you can try clearing the reserved space of the game.
Step 1. Open your Xbox One console, and then go to the Call of Duty: Modern Warfare/Warzone game and press the Options button on your Xbox controller to access the game menu.
Step 2. Select the Manage game & add-ons from the context menu, and go to the Saved Data category, and open Reserved Space from the right panel.
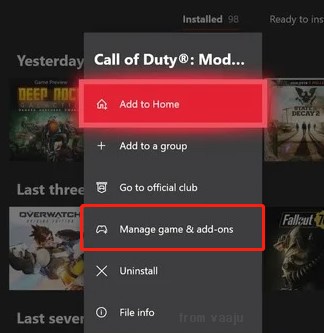
Step 3. Select Clear reserved space and click on Confirm when you’re prompted.
Once done, restart your console and check if the MW Dev error 6034 Xbox is gone.
# 4. Remove Add-ons and Data Packs of the Game (Xbox)
Some users reported that they managed to get the Dev error 6034 Warzone fixed after removing the add-ons and game data packs. Here you may have a try.
Step 1. Follow Step 1 to Step 2 in # 3 and select the Manage Game and Add-ons option.
Step 2. Open the Add-ons and untick the checkboxes of the following data packs, and select Save changes.
- Call of Duty Modern Warfare MP2 Pack (size 9.1 GB)
- Call of Duty Modern Warfare Multiplayer Pack 3 (Size 3.4 GB)

Step 3. After that, reboot your console and see if you can play the game without COD Dev error 6034 Xbox. If the error still occurs, you can try removing the following packs again:
- MP Pack 3 (3.4 GB)
- Data Pack 2 (8.0 GB)
- Campaign and Spec Ops Pack (14.8 GB)
- MP Pack (9.1 GB)
- Data Pack 1 (18.0 GB)
- Survival Pack (5.9 GB)
- High Res Pack 1 (23.6 GB)
- Resolution Pack
# 5. Scan and Repair Game Files (PC)
One of the common reasons for the MW Dev error 6034 is related to broken game files. Here you can follow the steps below to manually clear the broken game files and repair them using Battle.net.
Step 1. Press Win + E keys to open the File Explorer, and then locate the installation folder of Call of Duty Warzone or Modern Warfare and delete the following files if you find them.
- .patch.result
- .product
- vivoxsdk_x64.dll
- Launcher.db
- Launcher.exe (Modern Warfare)
Step 2. Launch your Battle.net client and log in to your account.
Step 3. Go to the Call of Duty: MW or Warzone from the left vertical menu, and then click Options and select Scan and Repair from the drop-down menu.
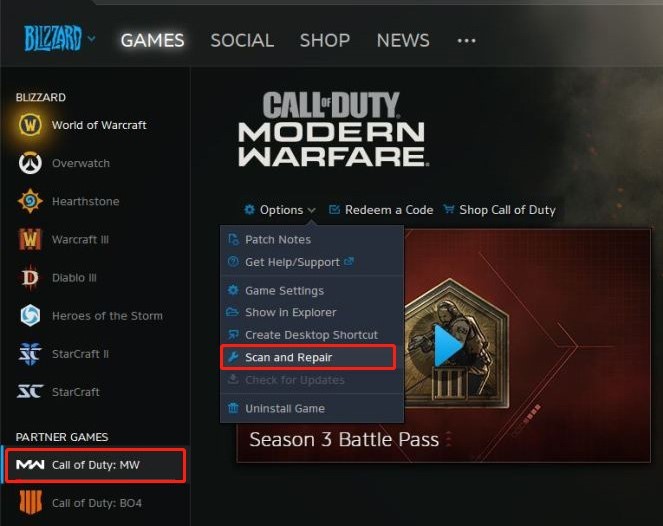
–image from Reddit
Step 3. Click on Begin Scan to start repairing the game. Once repaired, you can restart the game and check if the error disappears.
# 6. Change the DNS Settings (PC/Xbox)
Sometimes the COD Dev error 6034 Xbox can be caused by improper or non-optimal DNS settings of your device. Here you can try using a DNS server like OpenDNS or Google DNS to solve the error.
Change DNS Settings on Xbox One:
- Press the Xbox button on your Xbox controller to open the Home screen and select the Settings
- Open All Settings and select Network.
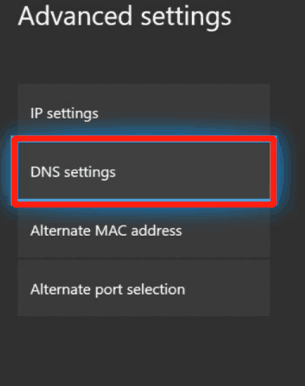
- Navigate to the Advanced Settings tab and select DNS Settings.
- Select Manual from the drop-down menu, and then set the Primary DNS value to 67.222.222 and Secondary DNS to 208.67.220.220 (OpenDNS), or 8.8.8.8/8.8.4.4 for Google DNS.
- Save the changes and click on Continue to check if the DNS server works well.
Change DNS Settings on PC:
- Open your Control Panel, and then change the View by type to Category and navigate to Network and Internet > Network and Sharing Centre > Change adapter settings.
- Right-click your current network and select Properties.
- Navigate to the Networking tab and select Internet Protocol Version 4 (TCP/IPv4), and then click on Properties.
- Select the Use the following DNS server addresses option, and then set the Preferred DNS server to 67.222.222and set Alternative DNS server to 208.67.220.220. After that, click on OK to save the changes.
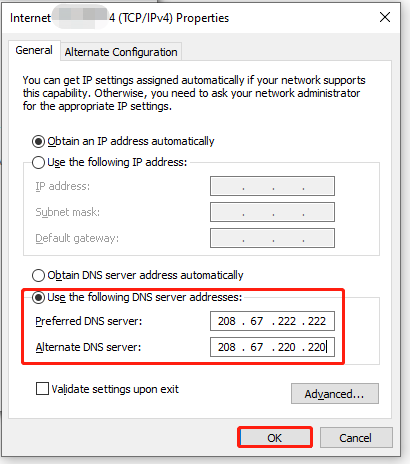
Once completed, relaunch the game and see if the Modern Warfare Dev error 6034 Xbox gets fixed.
# 7. Update Your Device Driver (PC)
As discussed above, outdated graphics card drivers are also responsible for Dev error 6034. If your GPU driver is not the latest version, you can follow the steps below to update it.
Step 1. Right-click the Start menu and select Device Manager from the context menu.
Step 2. Expand the Display adapters category, and then right-click the graphics card driver and select Update Driver.
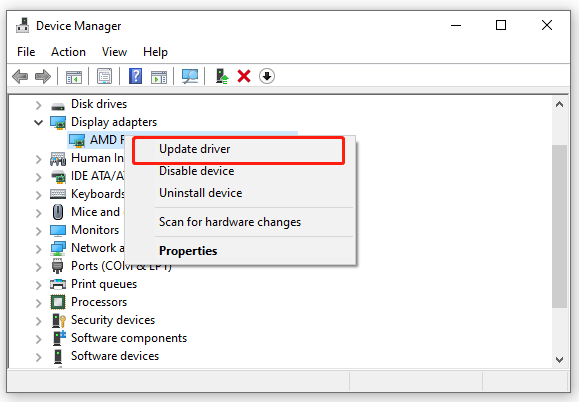
Step 3. Then you can select Search automatically for driver and follow the on-screen prompts to complete the update. Alternatively, you can download the graphics card driver from its manufacturer’s website and install it on your computer.
# 8. Reinstall the Game
If the Dev error 6034 Xbox One persists after trying all the above solutions, the game installation may get broken or corrupted. In this case, you can consider reinstalling the game completely.
Step 1. Open the Settings menu of your Xbox, and then go to the Games tab and select Call of Duty: Modern Warfare/Warzone.
Step 2. Press the Menu button on your controller and select Uninstall.
Step 3. Select Uninstall All and confirm this uninstallation. Then wait for it to complete.
Step 4. Once uninstalled, reboot your console and reinstall the game. Here make sure you only install the following packs:
- Modern Warfare Base Game
- Multiplayer pack 2 (22.1 GB)
- Multiplayer pack (6.0 GB)
- Multiplayer and Special Ops pack (6.7 GB)
Now, you can launch the game and see if the Dev error 6034 gets resolved.
# 9. Reset the Xbox One Console
If the Warzone Dev error still appears, you may consider performing a factory reset of your console. Since this operation will delete all files from Xbox, we highly recommend making a full backup of your Xbox.
Step 1. Press the Xbox Guide button on the controller, and then navigate to Settings > All Settings.
Step 2. Select System and go to the Console info & updates and select Reset console option.
Step 3. Then select Reset and keep my games & apps and confirm it.
Step 4. After the console is reset, you can reinstall the game as we explained above. If it still doesn’t work, then you may have to select Reset and remove everything to fix the error.

![How to Fix Warzone Memory Error 0-1766 on PC & Xbox? [8 Ways]](https://images.minitool.com/partitionwizard.com/images/uploads/2022/03/warzone-memory-error-0-1766-thumbnail.jpg)
User Comments :