Destiny 2 is a popular first-person shooter video game that was developed by Bungie. You can play this game for free to get much fun in your spare time. It’s really a fantastic game that is worth playing. However, sometimes you may be prevented from playing this game by the Destiny 2 beaver error.
Other issues like Destiny 2 error code Currant and Destiny 2 CAT error may also happen when you are trying to play the game.
The Destiny 2 error code beaver mainly occurs due to network configuration problems. To solve this error and play the game smoothly, here are some possible solutions you can try.
Solution 1: Renew the IP Address
Resetting your IP address may help you solve the Destiny error code beaver. Here are the detailed steps for the operation.
Step 1: Right-click the Start icon and then select Run.
Step 2: Type cmd in the Run dialog. Then press Shift + Ctrl + Enter to open Command Prompt as an administrator.
Step 3: In the elevated Command Prompt window, type the following commands one by one and press Enter after each to execute both of them.
- ipconfig /release
- ipconfig /renew
Solution 2: Change the DNS Settings
It’s also possible for you to fix the error code beaver Destiny 2 by editing DNS settings. To do this, follow the steps below.
Step 1: Open Windows Settings by pressing the Windows and I keys. Then select Network & Internet.
Step 2: Go to Status and then click Change adapter options from the right side.
Step 3: Right-click the network you are using and select Properties.
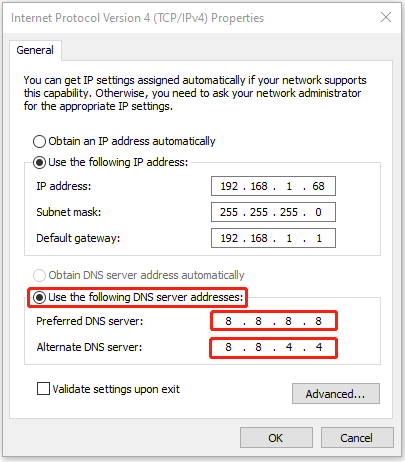
Step 4: In the prompted window, highlight Internet Protocol Version 4 (TCP/IPv4) and select Properties.
Step 5: Select Use the following DNS server addresses. Then set Preferred DNS server as 8.8.8.8 and Alternate DNS server as 8.8.4.4.

Step 6: Finally, click OK to save the changes.
Solution 3: Reset Your Router to Default
Another effective solution to the Destiny 2 beaver error is resetting the router to factory defaults.
Before this operation, you can try restarting your router first to see if the Destiny 2 error code beaver will be fixed.
Step 1: Make sure your router is powered on.
Step 2: Press and hold the Reset button at the back of your router with a paperclip for about 10 seconds.
Step 3: After seeing the power light flash, release the Reset button. Then wait for your router to reset and power on again.
Solution 4: Switch to Another Network
If there is another network that can work perfectly, it’s recommended that you try the other network to see if the Destiny 2 beaver error persists. For instance, you can switch to a wired network connection if you are using a wireless network currently. Furthermore, you can also try using the hotspot of your mobile phone.
If the Destiny error code beaver is still here with a different network connection, you should go on with the next solution.
Solution 5: Enable the Beta Version of Steam
Regularly, the developers will release a beta version with new updates to repair possible bugs or add some new features. Therefore, when you are experiencing the Destiny 2 beaver error, you can try using the Steam Beta version.
Step 1: Launch the Steam client on your PC.
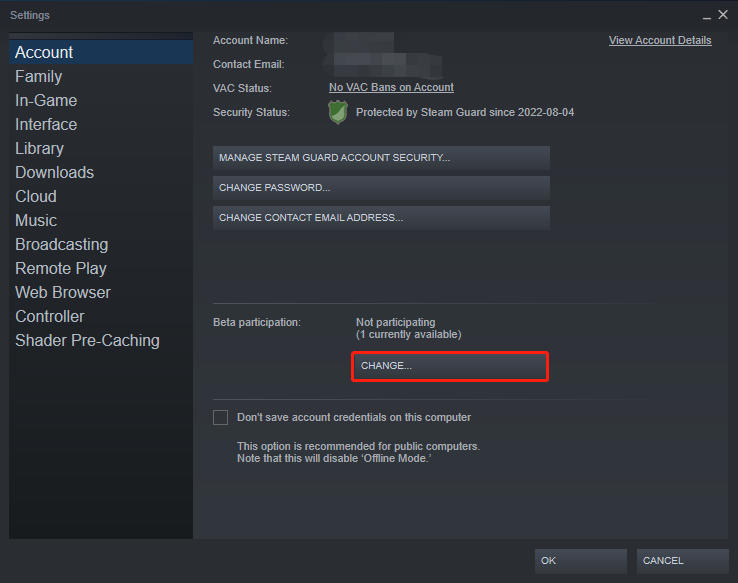
Step 2: Click the Steam option at the top-left corner and then select Settings.
Step 3: Go to Account and then click the CHANGE button from the right side.

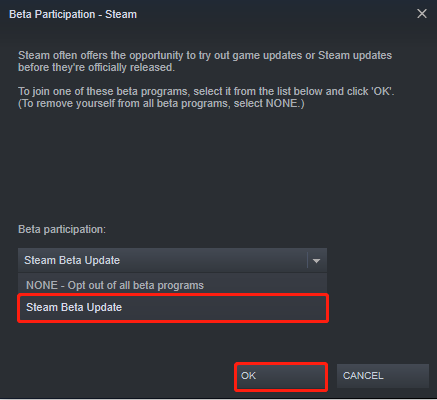
Step 4: Select Steam Beta Update from the drop-down menu. Then click OK.

Step 5: After that, restart your Steam to check if the error code beaver Destiny 2 is resolved.
All these methods mentioned in this post are available. When you are facing the Destiny 2 beaver, you can follow these methods to fix it. If you have any problems with the Destiny 2 beaver, you can leave a message in our comment part below.
If you are used to managing your partitions and disks regularly, we’d like to recommend MiniTool Partition Wizard to you. It is a professional partition manager with a wide range of functions. To obtain more information on this program, you can visit its official website.


User Comments :