A lot of users noticed the CSM support in BIOS. They don’t know if it should be enabled or disabled while installing Windows 10 on a new SSD or reinstalling OS. In addition, some of them can’t boot into Windows anymore due to the CSM boot issue. Here is a true example from tomshardware forum:
I’ve recently installed Windows 10 on my NVMe SSD. While installing, I disabled my CSM. Do I need to enable it after installation or can I leave it? What advantage or disadvantage does an enabled CSM have over a disabled one?https://forums.tomshardware.com/threads/csm-enable-or-disable.3415336/
What Is CSM in BIOS
Do you know why many UEFI firmware implementations can boot from the MBR-partitioned disks? The answer is CSM support. It provides the support of legacy BIOS backward compatibility with UEFI systems.
When you are running on a PC with UEFI firmware, the UEFI boot can switch to the legacy BIOS boot based on the CSM support. It can prevent UEFI boot to be performed from the EFI system partition on MBR-partitioned disks. To put it simply, CSM BIOS is something that allows you to boot in legacy BIOS mode on a UEFI system.
If you are still confused about CSM support, you can refer to the authoritative explanation from Wikipedia. CSM, also known as Compatibility Support Module, is a component of the UEFI firmware, which provides legacy BIOS compatibility by emulating a BIOS environment, allowing legacy operating systems and some option ROMs that do not support UEFI to still be used.
Now, you should have an overall understanding of the CSM support BIOS. Here comes a new question – should you enable or disable CSM BIOS? Please keep reading.
Should You Enable or Disable CSM Support
Should you enable or disable CSM BIOS? The answer depends on your Windows versions. If your computer is fairly new and comes with Windows OS pre-installed, the BIOS CSM is usually disabled by default. For example, if you are ready to install/reinstall Windows 10 on a new SSD, you don’t have to enable CSM support while installing.
However, if you must install an older Windows OS that doesn’t support UEFI, you need to enable it manually. How to do that? Let’s read the following context.
How to Enable or Disable CSM Support
If you need to enable or disable CSM support BIOS, you can refer to the simple guide below. Here we will show you how to do that on ASUS, Gigabyte, ASRock, and MSI.
Steps for Asus Motherboard:
Step 1. Start your computer, and then hold the F2 and Delete hotkey before the computer is booted. By doing so, you will enter BIOS.
Step 2. Navigate to the Boot tab using the left or right arrow key.
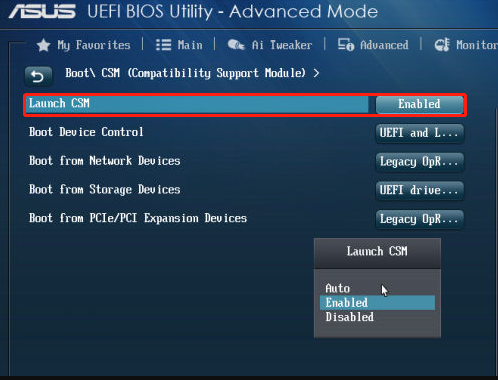
Step 3. Scroll down to the CSM (Compatibility Support Module) category.
Step 4. Now, set the Launch CSM option to Enabled/Disabled.

–image from the Asus com
Step 5. Scroll down to the last and select Save and Exit. Then your computer will reboot.
Steps for Gigabyte Motherboard:
Step 1. Enter BIOS like the above guide we just explained.
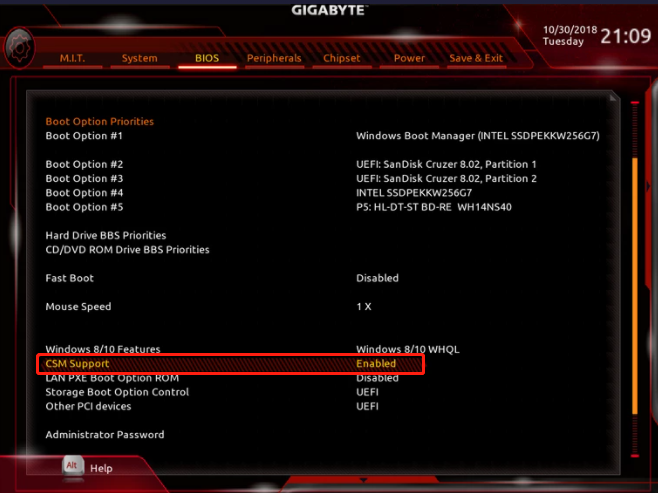
Step 2. Navigate to the BIOS or Security tab and double-click the CSM Support category under it.
Step 3. Set the CSM Support option to Enabled or Disabled based on your situation.

–image from the gigabyte forum
Step 4. Navigate to the Power tab and select the Save & Exit Setup option. Then your computer will exit BIOS CSM and restart.
Steps for ASRock Motherboard:
Step 1. Restart your system, and then press the F2 key at the startup screen to enter BIOS.
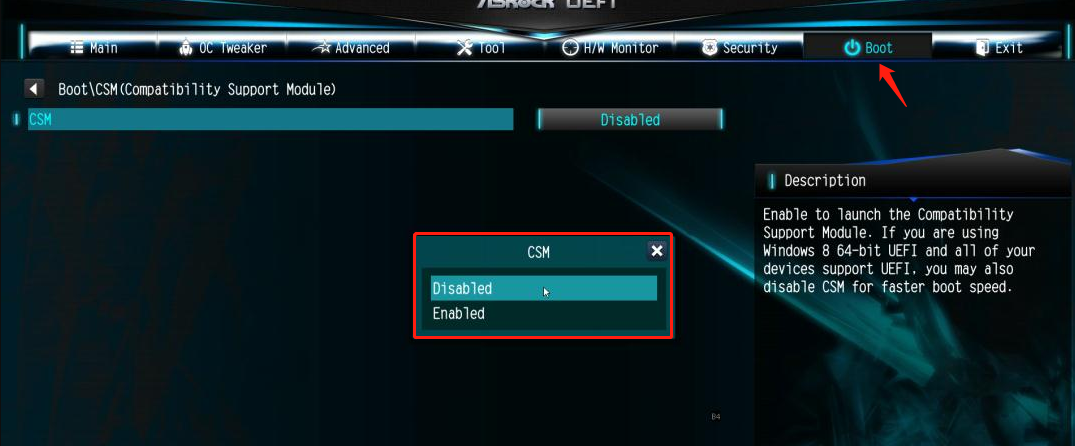
Step 2. Switch to the Boot tab at the top of your BIOS menu.
Step 3. Scroll down to the CSM option, and then set it to Enabled or Disabled.

–image from the asrock com
Step 4. Navigate to the Exit tab and select Save and Exit to let your computer restart with the applied changes.
Steps for MSI Motherboard:
Step 1. Restart your system and press the Delete key to enter the BIOS menu.
Step 2. Navigate to the Boot tab at the top menu, and then go to the Boot mode select section and select UEFI only. This option is equal to disabling CSM boot.
Step 3. Press the F10 key to save the changes and exit BIOS. Then your computer will automatically reboot.
What’s the Difference Between UEFI and CSM Boot
Many users are still confused about the difference between the UEFI and CSM boots. CSM boot mode offers the compatibility for legacy BIOS that can support a bootable disk up to 2 TB, while UEFI boot mode can support up to 9 ZB.
In addition, the two boot modes have different support for Disk Partition Type. CSM boot requires a hard disk with MBR partition type, while UEFI boot mode requires a disk with the GPT partition table. If you set the boot mode improperly when installing/reinstalling OS on a new disk, your Windows may be unbootable.
Here we summarize the differences between CSM vs UEFI boot modes in a form of a table:
| Boot Mode | CSM | UEFI |
| Disk Bootable Support | Up to 2 TB | Up to 9 ZB |
| Disk Partition Type | MBR | GPT |
| System Firmware Speed | Works in 32-bit speed | Works in 64-bit speed |
| TPM compatibility | Not support | Supports TPM in a secured way |
| Security System | Less secured | More secured |
Many users posted the CSM boot-related issues in forums. The most common problem is that the Windows system can’t boot after installing/reinstalling Windows 10. Why? This can occur if the CSM boot is set up improperly or the partition type is not supported.
How to Fix the CSM Boot Related Issues
Many users posted the CSM boot-related issues in forums. The most common problem is that the Windows system can’t boot after installing/reinstalling Windows 10. Why? This can occur if the CSM boot is set up improperly or the partition type is not supported.
What is the CSM option in BIOS? I can’t boot into Windows anymore, is it because CSM is disabled? Would an ASUS K55 come with CSM disabled?https://superuser.com/questions/857117/what-is-csm-option
The UEFI and CSM boot mode go hand in hand. If either one is disabled, the other one will be automatically enabled. For example, if you set the CSM disabled, it means that UEFI supports will be enabled on your motherboard.
However, the UEFI boot mode is only compatible with GPT partition tables. That’s to say, you need to convert your hard drive to GPT if you want to disable CSM. Similarly, if you enable CSM and can’t boot into Windows, you need to convert the partition table to MBR.
How to convert MBR to GPT or convert GPT to MBR without data loss? MiniTool Partition Wizard can help you do that easily. It is a multifunctional partition expert that can rebuild MRB, convert NTFS to FAT without OS, migrate OS to SSD, extend partition, and so forth. If your computer can’t boot normally, you can use the MiniTool Partition Wizard Bootable Edition to convert the system disk to MBR or GPT. To do so, follow the details steps below:
MiniTool Partition Wizard DemoClick to Download100%Clean & Safe
Step 1. Create a bootable CD/DVD/USB drive with MiniTool Partition Wizard media builder.
Step 2. Insert the MiniTool bootable media into your computer, and then enter BIOS just we explain above, set the media as the first boot order, and press F10 and Enter to save the change. Then your computer will reboot with the media.
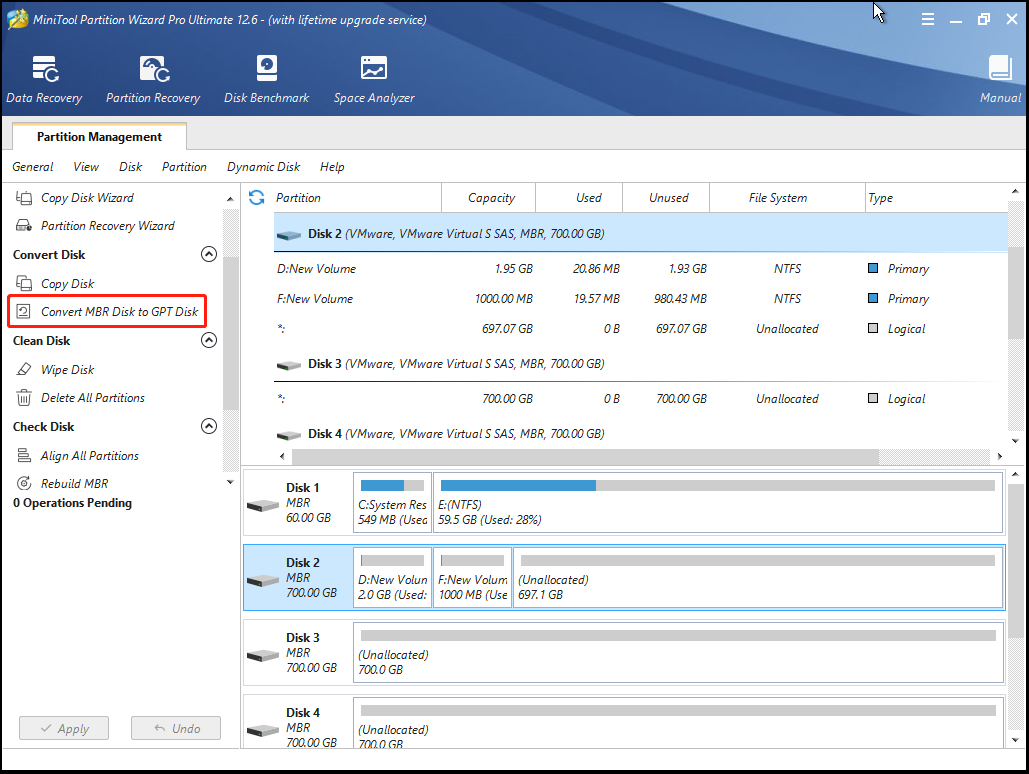
Step 3. In the main interface of the MiniTool software, select that system disk and click on Convert MBR Disk to GPT Disk from the left action panel.

Step 4. Click on Apply to execute the pending operation. Then your hard disk will be converted to GPT.
Step 5. Exit the MiniTool software, and then restart your system and press the F2 or Delete key at the startup screen to enter BIOS again, set your hard drive to the first boot order, and press F10 and Enter to save the change. Then your computer should restart from the system disk normally.
What’s Your Opinion
What is CSM in BIOS? Should you enable or disable CSM support? After reading the above information, I believe that you already have cleared the answers. If you are troubled by the CSM boot issue, you also can use the troubleshooting method we explained.
Have you any opinions about the CSM support object? If you have, please leave them in the following comment area. Well, you can send us an email to [email protected] if you have any difficulties in using the MiniTool software.

User Comments :