Do you want to create a guest account on Windows 11? This post from MiniTool Partition Wizard shows you how to do that. It also tells you how to delete a guest account and how to disable the guest account feature on Windows 11.
How to Create a Guest Account on Windows 11
If you need to share your PC with others, it’s a good choice to create a dedicated guest account on your Windows 11 PC. The Guest Account lets other people use your computer without being able to change PC settings, install apps, or access your private files.
To create a guest account on Windows 11, you can use the following way:
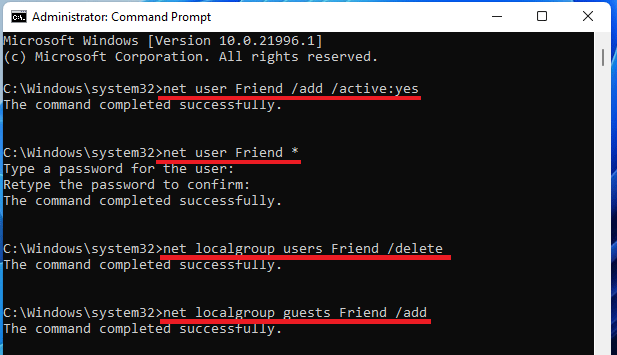
Run the Command Prompt as administrator and then enter the following commands one by one:
- net user Friend /add /active:yes (This will create a standard local user account.)
- net user Friend * (This will set a password for the account.)
- net localgroup users Friend /delete (This will delete the account from the localgroup > users.)
- net localgroup guests Friend /add (This will add the account to the localgroup > guests.)

How to Add or Remove a User/Microsoft Account on Windows 11?
How to Delete a Guest Account on Windows 11
To delete the guest account, you can use the following 3 ways:
Way 1. Use Settings
- Press Windows key + I to open Settings.
- Go to Accounts > Family & other users.
- Select the guest account and click Remove.
- Select Delete account and data.
Way 2. Use Commands
- net user
- net user guest account name /delete
Please remember to replace the guest account name accordingly.
Way 3. Use Control Panel
- Open Control Panel.
- Click User Accounts. Make sure that your View by is set to Categories.
- Now, click Remove user accounts.
- Select the account you want to remove and then click Delete the account.
- Finally, click Delete files.
How to Disable the Guest Account on Windows 11
If you don’t want to use the Guest Account feature, you can disable it. Here is the guide:
- Press Windows key + R to open the Run box.
- In the Run box, type “msc” and hit Enter.
- In the Local Group Policy Editor, go to Computer Configuration > Windows Settings > Security Settings > Local Policies > Security Options.
- In the right panel, find Accounts: Guest account status. Right-click it and choose Properties.
- Check Disabled and click OK. If you want enable it again, you should navigate to here and check Enabled.
Bottom Line
Is this post helpful to you? Do you have other ideas about guest account Windows 11? Please leave your comments in the following zone. I will appreciate that very much!


User Comments :