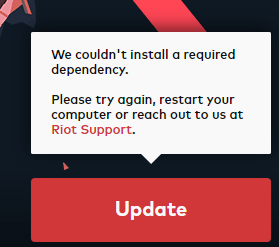
Valorant We Couldn’t Install a Required Dependency
Valorant is a free-to-play first-person hero shooter officially released in 2020. This game is very popular and many people have installed it. However, just like other software, this game also has some errors, for example “We couldn’t install a required dependency.”
When I hit update, it’ll patch partial then this message will pop up (We couldn’t install a required dependency). Tried rebooting the PC or turning it off and on, still the same. Any help please. (I’ve been playing for almost 2 days then I suddenly got this error). I tried uninstalling and re-downloading the client and still I’m getting this message. — valorantforums.com

Many people report that they have encountered the “Valorant we couldn’t install a required dependency” issue when updating the game. And usually, restarting PC or reinstalling the game cannot fix this issue. Then, how to fix the problem? You can try the following methods.
Method 1. Re-enable Vanguard
In most cases, the reason why you get this error is that the Vanguard is disabled. In this case, you should re-enable it. Please refer to the following steps:
Step 1: Press Windows key + R to open the Run box. In the Run box, type “services.msc” and press Enter. This will open the Services window.
Step 2: In the Services window, scroll down to find the vgc service. Right-click this service and choose Properties. Change the Startup type to Automatic. Then, click the Apply button and the OK button.
Step 3: Update the game again. This time, the update should be downloaded successfully. After the update download is completed, please restart your PC and then you can play the game.
Method 2. Reinstall Vanguard
Another reason of the error “We couldn’t install a required dependency” is that the Vanguard installation is broken or incomplete. In this case, you should reinstall the Vanguard. Here is the guide:
Step 1: Press “Windows key + I” to open the Settings window. Then, navigate to Apps > Apps & features.
Step 2: In the right panel, scroll down to find the Riot Vanguard app. Click it and choose Uninstall. Then, click Yes to confirm the uninstallation.
Step 3: Relaunch the game to reinstall Vanguard.
Sometimes, you are unable to uninstall the Vanguard through the above way when the issue “We couldn’t install a required dependency” happens. In this case, you can uninstall it through the following steps:
- Open Command Prompt in Administrator
- Type command “sc delete vgc” and press Enter.
- Type command “sc delete vgk” and press Enter.
- Close the Command Prompt and then restart your PC.
- Go to the C:/ProgramFiles/ and delete the Riot Vanguard
- Relaunch Valorant and it will say that you need to relaunch for Vanguard to install.
- Relaunch a second time and everything will be fine.
1. Some people report that they have encountered the error “OpenService FAILED 1060: The specified service does not exist as an installed service”. It’s possible that name of the service is type wrongly.
2. If the above ways can’t help you solve the issue, you can try update the graphics drivers, disable antivirus, and add Valorant into the whitelist of Window Firewall.

![How to Download and Install Valorant on PC [A Complete Guide]](https://images.minitool.com/partitionwizard.com/images/uploads/2021/11/how-to-download-valorant-thumbnail.jpg)


User Comments :