Windows 10 Security Issues
What makes this latest Microsoft OS that popular? Undoubtedly, the biggest reason is that Microsoft promises qualified Windows 7 and Windows 8.1 devices can upgrade for free. After all, it is worth trying the up-to-date things without costing any money. But actually there are many other factors that jointly create the popularity. For example, Microsoft claims Windows 10 is the most secure Windows ever.
Well, is Windows 10 really safe enough to protect our privacy?
I’m afraid not, and the private information, such as photos, messages, account information (your age, location, address, phone number, email address, etc.), and different types of passwords (bank card password, Wifi password, social-media account password, and so on), might suffer unauthorized access coming from local environment, network as well as Windows 10 itself. Considering this situation, we wrote this post and hope it can help some Windows 10 users to set their system to protect private information.
Configure Windows 10 to Protect Your Privacy in 4 Aspects
- Prevent Unauthorized Access from Local Environment
- Stop Unauthorized Access from Network
- Disable Windows 10 Settings That May Leak Your Privacy
- Install Necessary Programs on Your Windows 10
1. Prevent Unauthorized Access from Local Environment in 3 Ways
Way 1: Set Account Password and BIOS Password
Without being asked to type a password (either account or BIOS), anyone can enter your computer and access your visible private files or sensitive information. Therefore, it is very necessary to set a password for both BIOS and your account or account at least, which is the most basic protection. But how?
Set password for your account
When installing Windows, users will be given a chance to set password for their account.
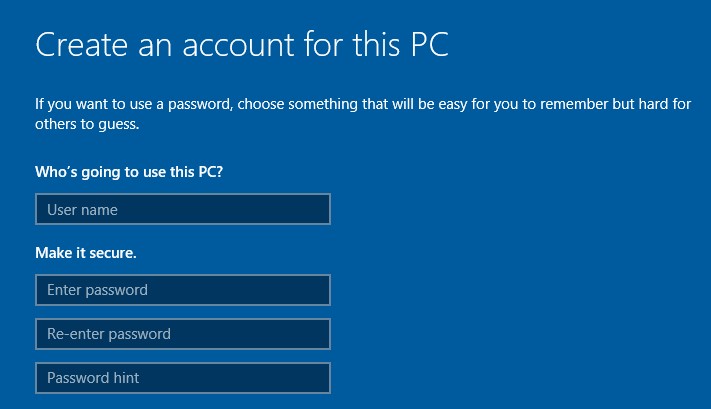
Once the password is set, typing password is required every time users are booting or arousing the computer. In addition, it doesn’t matter even if you did not make such a setting during installation, because there is still a chance. Just do it like this: go to Start > Settings > Accounts > Sign-in options > Add.
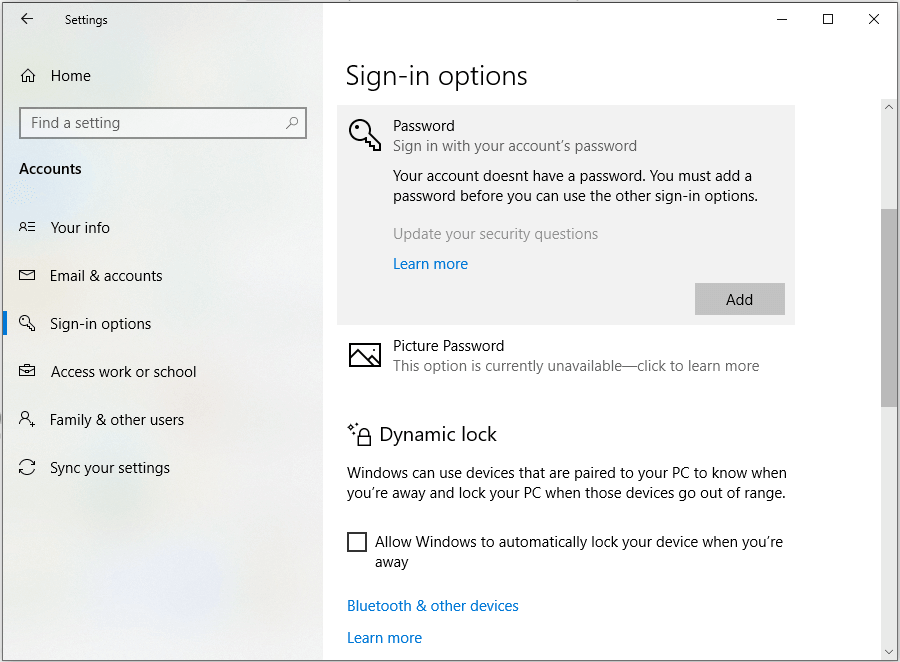
However, account password is easier to be cracked compared with BIOS password. If you want to better protect the privacy, set a BIOS password.
Set password for BIOS
Different BIOS requires different operations, and here we take Phoenix for example.
- Firstly, type Delete key to enter BIOS (different motherboards require different keys) when booting computer, and then highlight the option “Advanced BIOS Features” via ↓ and press Enter.
- Then, highlight “Security Option” and press on Enter.
- Next, highlight System and press on Enter.
- Then, press on Esc to go back to the main window, highlight Set Supervisor Password via↓ and →, and press on Enter to set password.
- Type the desired password and press on Enter, and then repeat the operation again.
- Finally, click F10 to save all previous changes and quit from BIOS.
Once this password is set, anyone cannot enter your PC unless they input correct BIOS password.
Actually, Windows 10 introduces a much more secure feature (compare with using a password) to protect our privacy, which is called Windows Hello. Let’s see details.
Way 2: Set up Windows Hello
Windows Hello is a more personal way to sign in to your Windows 10 devices with just a look or a touch. Compared with using a password, using Windows Hello is much secure since it uses “biometric authentication” – sign in with your face, iris, or fingerprint (or a PIN).
To set up the feature, please do like this: go to Start, and then select Settings > Accounts > Sign-in options to get the interface below:
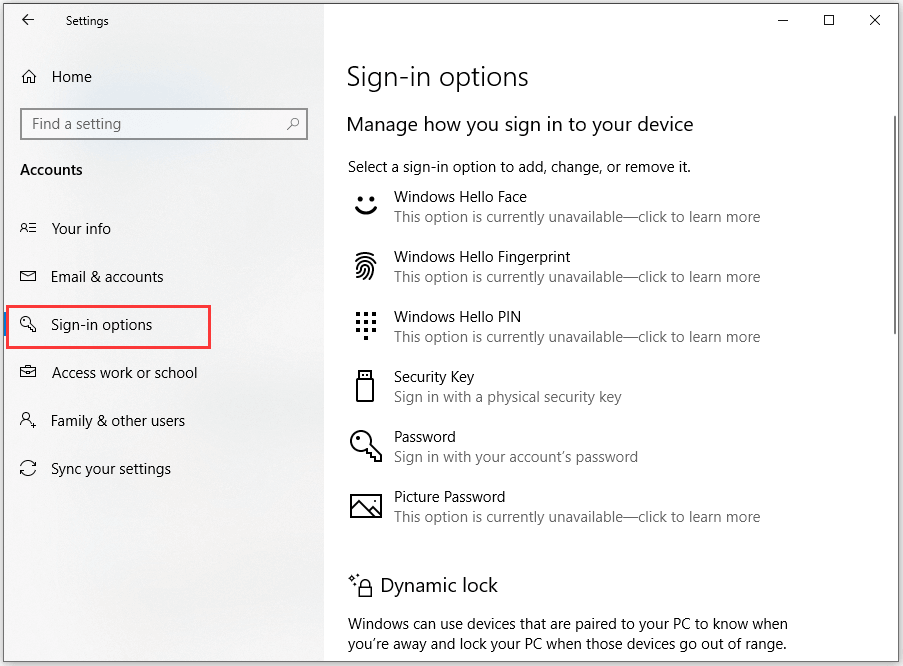
Then, set up Windows Hello in accordance with your actual demands.
Actually, even if others enter your computer by cracking your passwords or Windows Hello, you can also do some configurations to protect the privacy saved in Windows 10. For example, you can hide the partition which saves private information.
Way 3: Hide Partition to Protect Privacy
When there are lots of private files saved in one partition, we strongly recommend hiding the entire partition to protect privacy.
Generally, we can enter Windows Disk Management to remove the letter of the very partition so as to make it invisible from Windows Explorer, but users who have a basic understanding of Windows Disk Management can easily make the partition visible again by reallocating a drive letter. However, if we hide the partition via special technology, it will be much difficult for non-professionals to do the unhide.
For more details, please see Hide Partition.
Of course, there are many other ways to protect our private information from unauthorized access coming from local environment. For more measures, don’t miss our previous post 5 Ways to Protect Our Important and Valuable Data in Windows.
Next, let’s deal with threats coming from network.
2. Stop Unauthorized Access from Network in 2 Ways
As we know, virus, Trojan, spyware, backdoors, hacker attack, fishing attack, and so on all come from the internet, and all of them bring threats to our privacy. In order to protect our private information from being stolen by malware and malicious attack, we need to take some security measures, including:
Way 1: Enable Necessary Security Settings Built-in Windows 10
Enable Windows Defender
When you start up Windows 10 for the first time, Windows Defender is on and working to protect your PC by scanning for malicious software. It will turn itself off if you install another antivirus app.— from Microsoft
That is to say the Windows Defender might be disabled due to installing antivirus software. In addition, our mistaken operation might make the data protection feature turned off, too. To check whether it is enabled, please do like this: Click Start icon, and then select Settings > Update & security > Windows Defender. If not, turn it on.
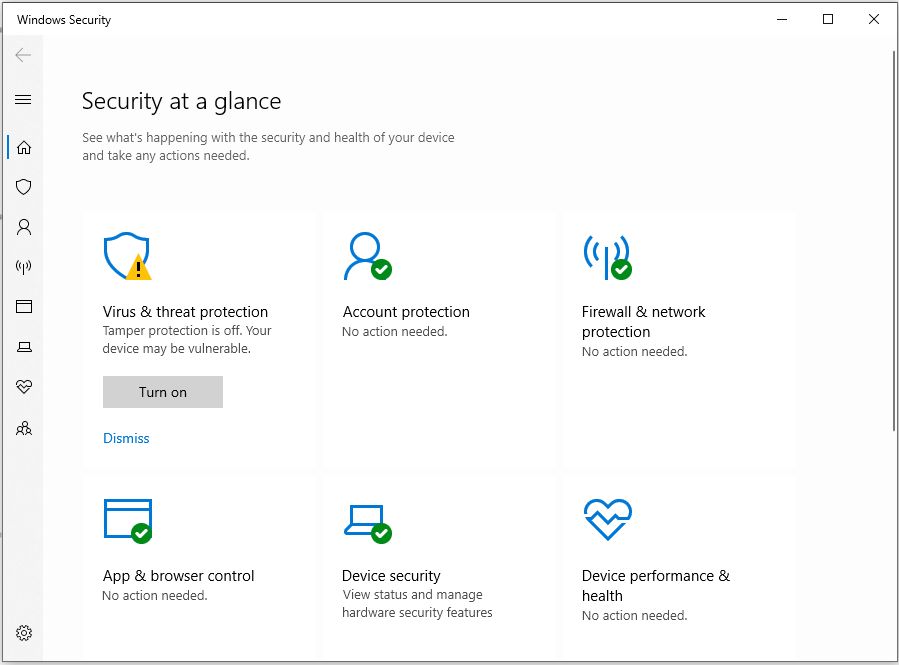
Enable Windows Firewall
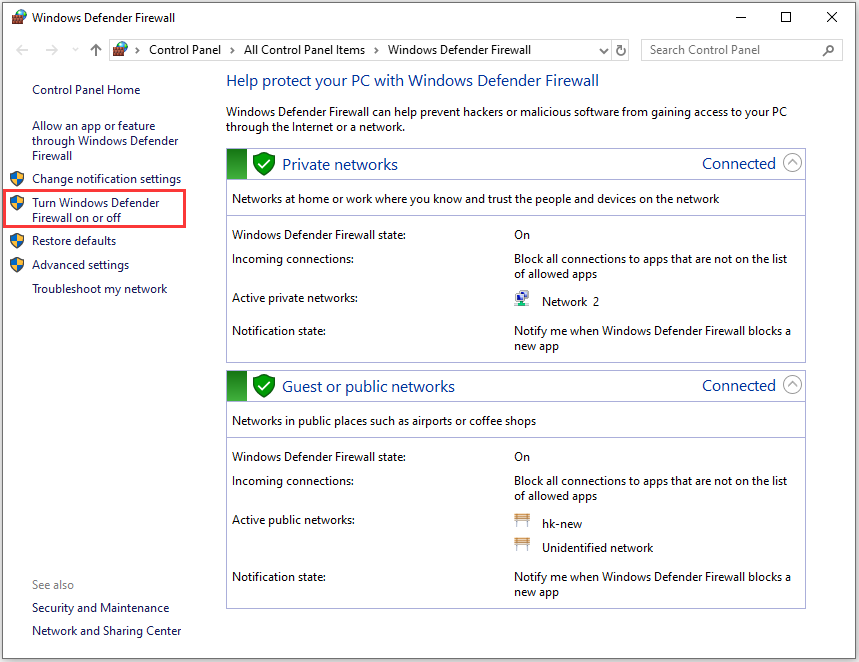
Windows Firewall filters information coming into your PC from the Internet and blocks potentially harmful programs. It is also turned on by default, but you cal also check whether it is working by following these steps: go to the search box and type firewall, and then select Windows Firewall. If it is disabled, please turn it on from the option Turn Windows Firewall on or off.
Enable Secure Boot If Necessary
Secure Boot is a security standard developed by members of the PC industry to help make sure that your PC boots only using software that is trusted by the PC manufacturer. If the program is not trusted, your PC will not start. To see whether this security feature is enabled, please enter UEFI BIOS.
In addition, there is another feature in Windows 10 which is similar with Secure Boot, and it is the so-called Device Guard. Device Guard is a combination of enterprise-related hardware and software security features that, when configured together, will lock a device down so that it can only run trusted applications. However, this feature is specially designed for Windows 10 Enterprise, and it is relatively complex to configure, so here we just simply mention it.
Now settings which are good for protecting our privacy have been enabled in Windows 10, so next it’s necessary to install third party security programs.
Way 2: Install Necessary Security Software
As long as your PC is connected with the network, there is a big necessity to install security software for the system, no matter how safe its manufacturer claims, and anti-virus software as well as anti-spyware are the basic ones. Download those which are with high scores or good reputation, like Kaspersky and McAfee.
Actually, in addition to threats coming from local environment and network, Windows 10 itself may steal or leak our private information. And we have to take corresponding measures to prevent this from happening. Let’s see the third section.
3. Disable Windows 10 Settings That May Leak Your Privacy
In Windows 10, there are lots of settings giving Microsoft chances to collect our private information. If you do not believe me, please see how Microsoft says:
The data we collect include name and contact data, credentials, demographic data, interests and favorites, payment data, usage data, contacts and relationships, location data, and content of files and communications when necessary. — From Microsoft
For more details, please see Microsoft Privacy Statement. That is to say Windows 10 is always spying on nearly everything we do. But fortunately, Windows 10 users still have chances to be opted out.
Disable Anything That Can Leak Your Private Information in Privacy Settings
Go to Settings > Privacy, and you will find 13 tabs from the left side that are related to security issues, and under each tab there are multiple privacy options you can set:
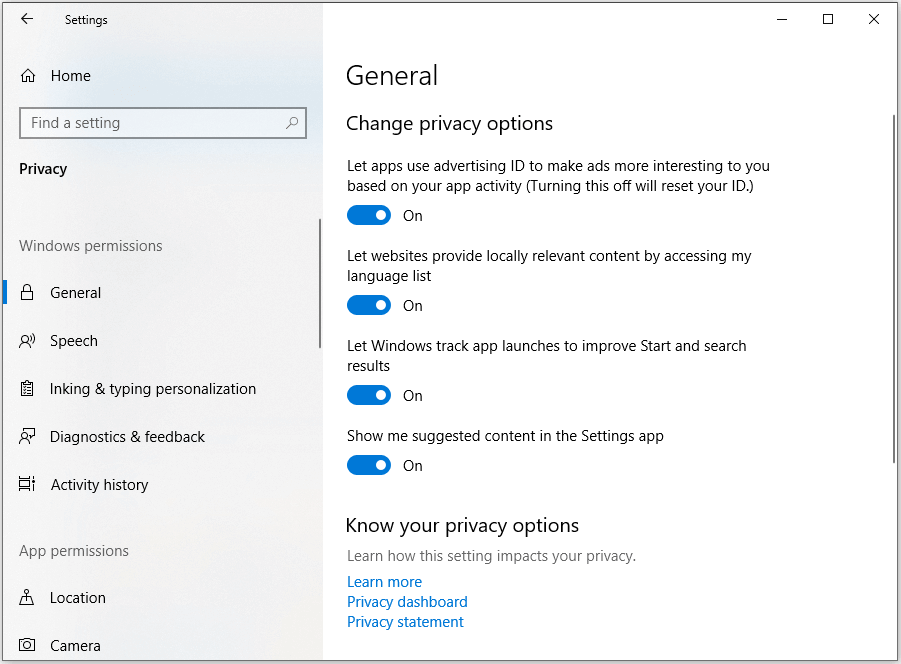
Among all these 13 tabs, it might be more difficult to set options under General tab, because users need to read the description of each privacy option carefully and then make a choice. But to set options under other tabs, users only need to choose which apps can access their location, calendar, messages, camera, etc.
It is suggested that users turn on options when they are required and turn off when unnecessary. For example, you’d better allow a map to get your location when you are searching route lines, and then turn it off when the search is finished.
Disable Cortana When You Think It Unnecessary
Microsoft says Cortana will help you find things on your PC, manage your calendar, track packages, find files, chat with you, and tell jokes, and the more you use Cortana, the more personalized your experience will be.
It seems Cortana is indeed an intelligent personal assistant. However, from Microsoft’s privacy statement we know Microsoft will collect and use our private information by default, including location, location history, contacts, voice input, search history, calendar details, content and communication history from message and apps, and other information on the device.
If you want to prevent these kinds of information from being collected, please turn Cortana off like this:
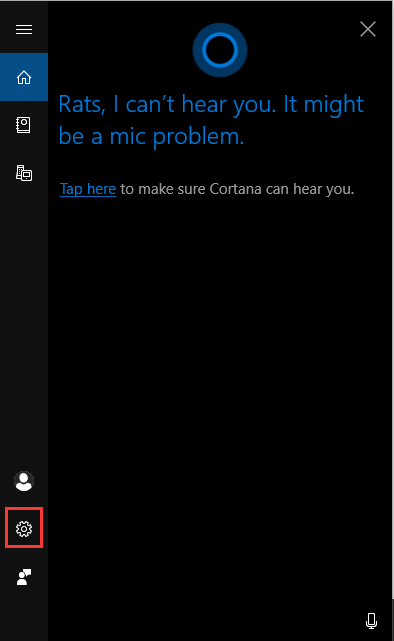
Open Cortana, and tap on Settings.
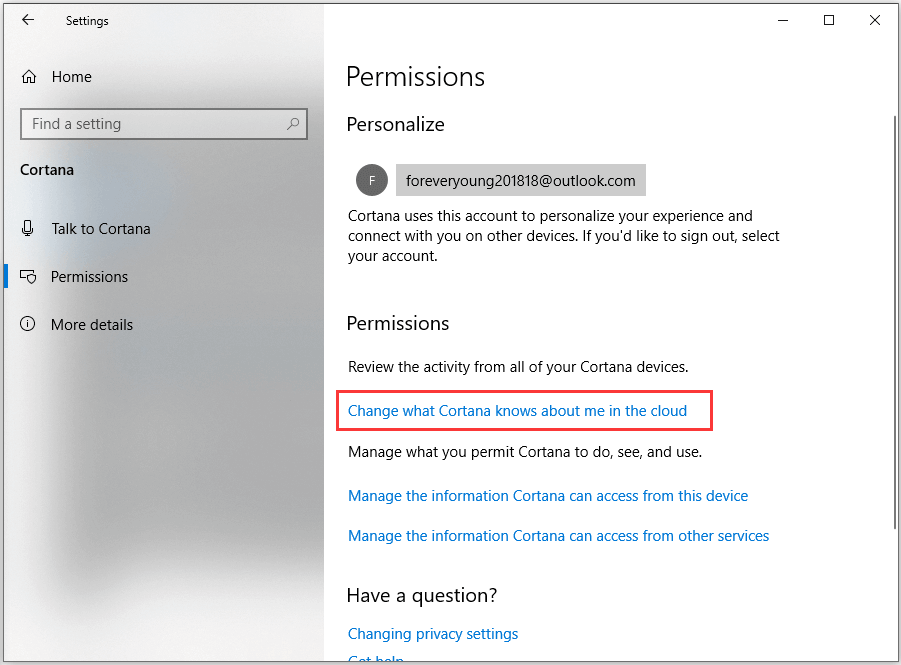
When you get the window below, go to “Manage what Cortana knows about me in the cloud” to navigate to the personalization page, and then clear corresponding private information. This will clear private information collected by Cortana.
Remove Microsoft Account from Windows 10
When installing Windows 10, users will be encouraged o sign in with Microsoft account to get more personalized experience. For example, settings, address book, documents, and other information could be synchronized to any devices that use the same account. But at the same time, Windows 10 itself has it spyglasses on and may spy apps or pages that you’re signed into with your Microsoft account.
As a result, information like phone number and email address about you could be gathered and sold.
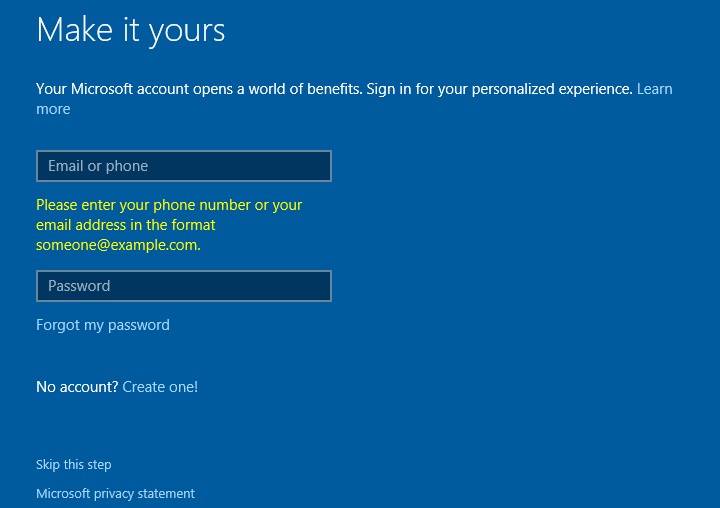
Instead, users can remove their Microsoft account from Windows 10 completely or use a newly made local account. To remove the account, please go to Settings -> Accounts, then select the account you want to delete, and finally confirm to remove the account.
Now all our suggestions on configuring Windows 10 to protect privacy have been given and we hope they are useful. At the end of this post, we would like to introduce 2 programs that are related to Windows 10 privacy security, too.
4. Install Necessary Programs on Your Windows 10
Install Partitioning Program (Freeware is recommended)
Partitioning program is a kind of computer software that can help manage hard disks as well as partitions, with which we can solve different kinds of problems. For example, we can extend Windows 10 partition to be larger when it is running in low disk space or wipe a drive to erase private information completely or hide a partition to protect private information (we have said this function just now).
For freeware, please see free partition manager.
MiniTool Partition Wizard FreeClick to Download100%Clean & Safe
Install PC Backup Software
Backup software is a kind of computer software that help back up and restore files (mo matter missing, deleted or corrupted), and restore data to the state when the backup took place.
MiniTool ShadowMaker is such a tool aiming to back up your Windows systems, files, disks and partitions to another safe location automatically. That way, you will be able to restore your PC to a normal state when an accident occurs. For more details, please see free backup software.
Should you have any questions or doubts using MiniTool software, please let us know. Much appreciated!

User Comments :