Why wont my Chromebook connect to WiFi? What Can I do when Chromebook won’t connect to WiFi? If you are struggling to fix the issue, you come to the right place. This post of MiniTool explores several effective troubleshooting methods.
Chromebook is a new type of computer designed by Google to help users do things faster and easier. Sometimes, however, you may encounter some issues like Chromebook black screen, Chromebook freezing, Chromebook Recovery Utility not working, and the one discussed here. Why is my Chromebook not connecting to WiFi? How to fix it? Let’s start exploring.
Why Wont My Chromebook Connect to WiFi
According to a survey, there are some possible reasons for Chromebooks won’t connect to WiFi. The issue is often related to the communication between your Chromebook and the router. If the WiFi adapter is disabled accidentally, you will encounter the issue. In addition, outdated Chrome OS, preferred wireless networks, and faulty internal hardware are responsible for Chromebook not connecting to WiFi.
How Do I Fix When Chromebook Won’t Connect to WiFi
There are 8 accessible solutions to the “Chromebook wont connect to WiFi” issue. We recommend you try them in order until the issue gets resolved.
# 1. Check Your WiFi Connection
The first thing you should do is to check the potential issues with the WiFi connection. To do so, you can refer to the following points:
- Check your password: If your WiFi connection is encrypted, make sure you enter the correct password.
- Make sure your WiFi is enabled: Open the Quick Settings panel, and then go to the Network section and check if the switch next to WiFi is turned on. Also, you can click the WiFi icon at the bottom right corner to view your connections.
- Check the WiFi switch: Certain WiFi adapters come with a physical switch that allows you to toggle the WiFi connectivity on and off. So, check if the switch is moved to the Off position.
- Disconnect and reconnect to WiFi: If your Chromebook is connected to WiFi but there’s no network access, you can try reconnecting to WiFi. To do so, locate your WiFi settings, and select your WiFi and click on Disconnect, and then reconnect it.
If these preliminary fixes can’t work, you can move down to the following solutions.
# 2. Restart Your Chromebook and Router
Some users reported that the Chromebook WiFi issues can be solved simply by performing a restart. By doing so, those connectivity glitches can be solved. Let’s have a try:
Step 1. Hold the Power button for about 2 seconds until your Chromebook is completely down. After several minutes, press the Power button again to boot your Chromebook.
Step 2. Unplug the internet router from the wall socket.
Step 3. Hold the Power button at the back of your router for about 15 seconds until the router is turned off completely.
Step 4. Then wait for about 5 minutes, and plug the router into the socket again and press the Power button to restart it.
# 3. Disable All Preferred Networks
Sometimes the preferred networks can cause conflicts when you are trying to connect to WiFi. So, we recommend you disable all preferred networks temporarily.
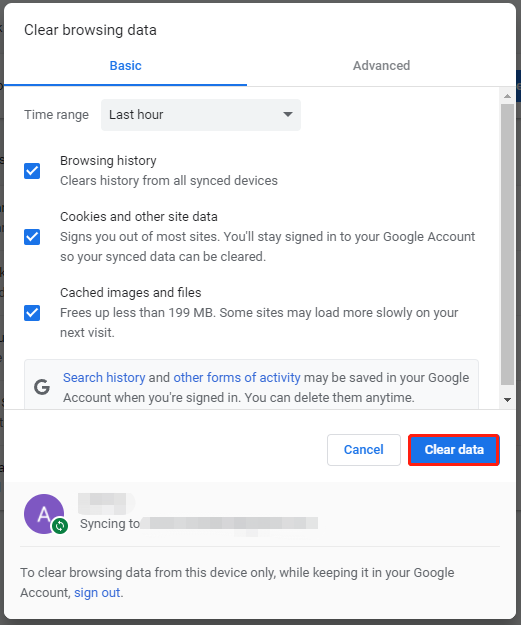
Step 1. Open your Chrome browser, and then type chrome://settings/clearBrowserData in the search bar and click on Clear data in the pop-up window to remove all cookies and cached data.

Step 2. Type chrome://settings in the search bar and select the network that appears here.
Step 3. Select all Preferred Networks and click on Done to delete all available networks.
# 4. Run Chrome Connectivity Diagnostics
Chrome Connectivity Diagnostics app is a Google expansion that can quickly troubleshoot networks issues on Chromebook. It can help you detect the Chromebook WiFi issues and provide remedies for them.
# 5. Update Your Chrome OS
An outdated Chrome OS can trigger various issues inducing “Chromebook won t connect to WiFi”. So, if possible, you can install the latest version of Chrome OS. For that:
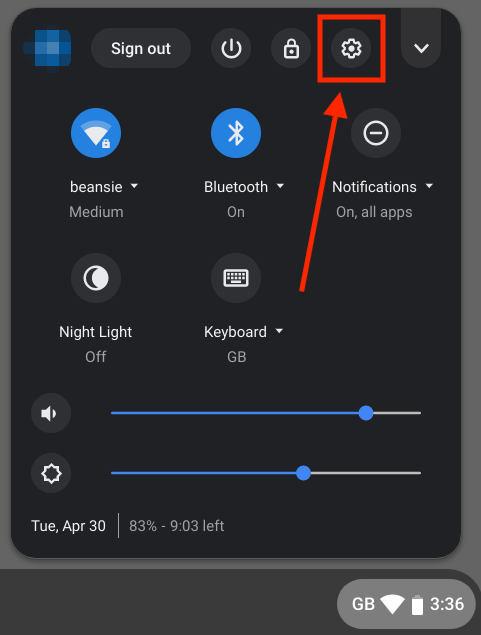
Step 1. Sign in to your Chromebook and click on the Time indicator at the bottom right corner of your screen.
Step 2. Click the Gear icon in the pop-up interface to open the Settings window.

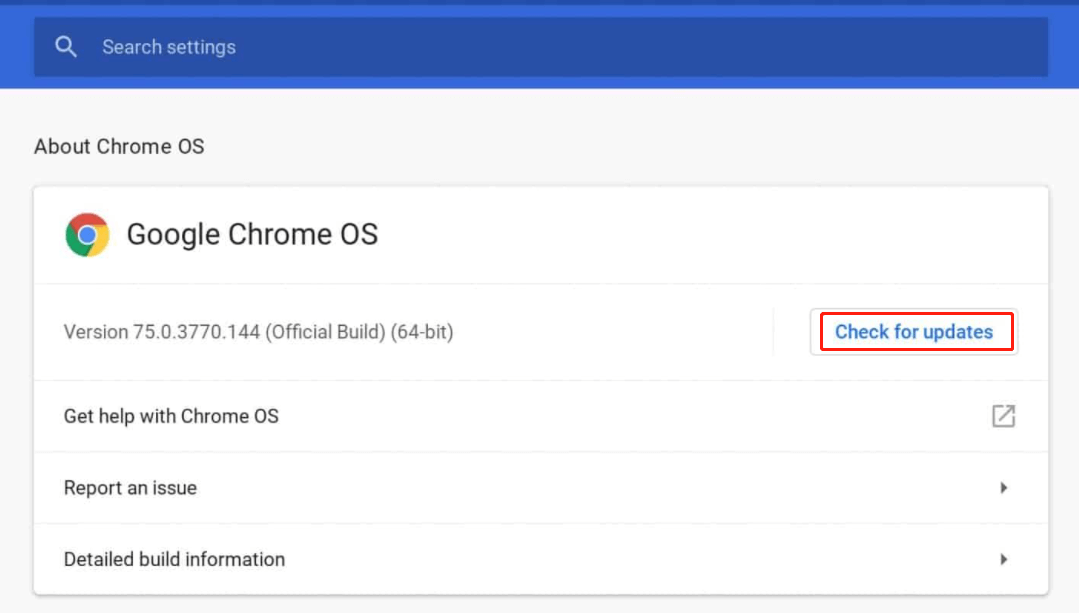
Step 3. Select About Chrome OS from the left pane and click on Check for updates in the new interface. If any updates are available, download and install them. If an update is downloaded, click on Restart to complete it.

Once updated, restart your machine and see if the “Chromebook wont connect to WiFi” issue gets fixed.
# 6. Refresh Your Chromebook
In addition, you can try performing a hard reset of your Chromebook. Press and hold the Refresh + Powers keys at the same time, and then release the Refresh key when your Chromebook reboots. By doing so, the glitched files and cache that may cause Chromebook won’t connect to WiFi will be removed.
# 7. Connect to a USB WiFi Adapter or Ethernet
As you know, the WiFi connection will be influenced by many factors. Sometimes, it may get unstable and even can’t connect. So, you can consider switching to an Ethernet cable to avoid WiFi issues. If you have confirmed the Chromebook WiFi issues are caused by faulty internal hardware, you can use a USB WiFi adapter instead.
# 8. Powerwash Your Chromebook
You can also try resetting your Chromebook to its factory settings. By doing so, those incorrect configurations, software conflicts, or system files errors that can trigger the “network not available Chromebook” issue will be removed.
Step 1. Press Ctrl + Alt + Shift + R keys at the same time.
Step 2. Select Restart and click on Powerwash > continue. Then follow the on-screen instructions to complete the process.
Well, you can contact your Chromebook manufacturer to get help if you still have problems.


User Comments :