A great many users report that CCleaner won’t open after installing Windows 10 updates. Are you also troubled by CCleaner not opening Windows 10? If you are trying to fix it, you come to the right place. This post of MiniTool summarizes 4 effective troubleshooting methods.
CCleaner is a popular junk file cleaner that’s capable of deleting unwanted files left by uninstalled programs and clean system caches, browsing history, log files, problematic registry keys, and so forth. However, a lot of users complain about CCleaner not opening Windows 10.
After analyzing extensive user reports and posts, we summarize several tried-and-tested solutions for CCleaner not working Windows 10. Now, let’s explore them one by one.
Fix 1. Disable Any Third-Party Antivirus Program and Windows Firewall Temporarily
According to a survey, some certain antivirus software is one of the most common reasons why CCleaner won’t open Windows 10. In order to run this program smoothly, you can temporarily disable your third-party antivirus software like Avast and even Windows Defender.
Here we take Windows Defender Firewall for example:
Step 1. Type firewall in the search box and select Windows Defender Firewall from the best match.
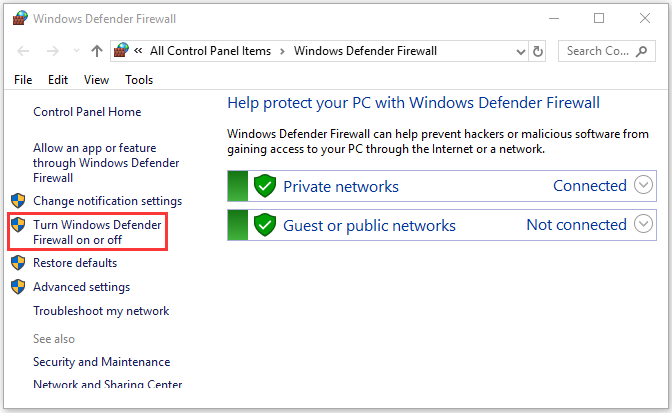
Step 2. Click on Turn Windows Defender Firewall on or off at the left side.

Step 3. Tick the checkbox next to Turn off Windows Defender Firewall (not recommended) for both private and public network settings. Then click on OK to save the changes.
Now, you can restart Windows and check if the “CCleaner wont open” issue still persists.
Fix 2. Remove the CCleaner Entry Keys from Registry Editor
CCleaner not opening Windows 10 can be caused by issues with the registry files of certain applications. To fix the problem, you can try deleting the affected CCleaner entries from Registry Editor. Here’s how to do that:
Step 1. Press Win + R keys to open the Run dialog box, and then type regedit in the box and hit Enter.
Step 2. In the Registry Editor window, navigate to the following path from the left side menu:
HKEY_LOCALMACHINESOFTWAREMicrosoftWindows NTCurrentVersionImage File Execution Options
Step 3. Right-click the CCleaner entry key from the list of entries and select Delete.
After you exit the Regedit Editor, you can check if the “CCleaner wont open” issue has been resolved.
Fix 3. Run the Program as an Administrator
In some cases, CCleaner won’t open on Windows 10 if you don’t have the necessary privileges on your computer. To fix this issue, you can run the setup file as an administrator. For that:
Step 1. Right-click the CCleaner shortcut on your desktop and select Properties.
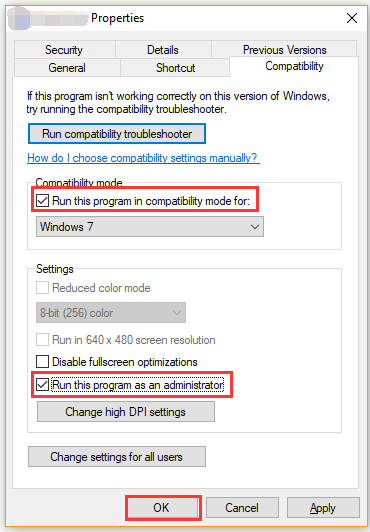
Step 2. In the Properties window, navigate to the Compatibility tab and tick the checkbox next to Run this program as an administrator.
Step 3. Select the checkbox for Run this program in compatibility mode for and click on OK to save the changes.

Now, you can restart your system and see if CCleaner not opening Windows 10 is resolved.
Fix 4. Check the File Permissions
Some users reported that they fixed CCleaner not opening Windows 10 just by changing the file permissions to full control. Perhaps you may have a try.
Step 1. Right-click the CCleaner setup file and select Properties.
Step 2. In the Properties window, navigate to the Security tab and click on Edit.
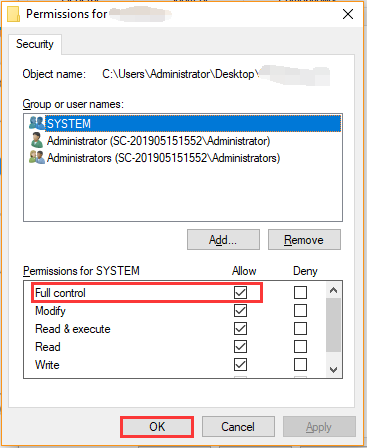
Step 3. Tick the checkbox for Full control under the Allow section. Then click on the OK button to save the change.


![How to Fix Blue Snowball Not Working Windows 10 [5 Solutions]](https://images.minitool.com/partitionwizard.com/images/uploads/2020/12/blue-snowball-not-working-thumbnail.jpg)
![How to Stop Fallout New Vegas Crashing [5 Methods]](https://images.minitool.com/partitionwizard.com/images/uploads/2021/01/fallout-new-vegas-crashing-thumbnail.jpg)
User Comments :