Some users notice that the audiodg.exe process consumes much CPU usage sometimes. This is not normal, and you should take actions to resolve the audiodg.exe high CPU when you are facing the problem. In this article from MiniTool Partition Wizard, you will get top 4 feasible solutions.
Audiodg.exe is a process of Windows Audio Device Graph Isolation, functioning as an audio engine for your operating system. As a component of Windows file system, it enables the sound driver to run independently of the user profile.
Recently, high CPU usage issue has been reported with the audiodg.exe Windows process. The possible reasons for this problem could be various, such as outdated sound driver and certain sounds settings.
As the audiodg.exe is a critical system component, you should not kill or disable it to fix the high CPU usage issue. Fortunately, here are some effective solutions that you can have a try. let’s see the details.
Fix 1: Modify the Sounds Settings
Actually, some audio settings might push the audiodg.exe process and thus make it use more system resources. So, you can try modify your sounds settings and disable certain features. To do that, you can refer to the guided below.
Disable Audio Effects
The audio effects can make your experience more enjoyable, but it definitely requires much CPU usage. Just disable it step by step.
Step 1: Right-click the speaker-like icon at the bottom right corner of the taskbar and choose Sounds.
Step 2: Under Playback tab, right-click your audio device and choose Properties.
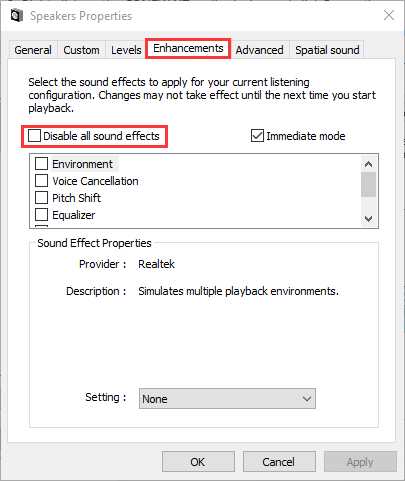
Step 3; Go to Enhancements tab, check Disable all sound effects option, and click Apply and OK to save the changes.
Disable Volume Adjustment
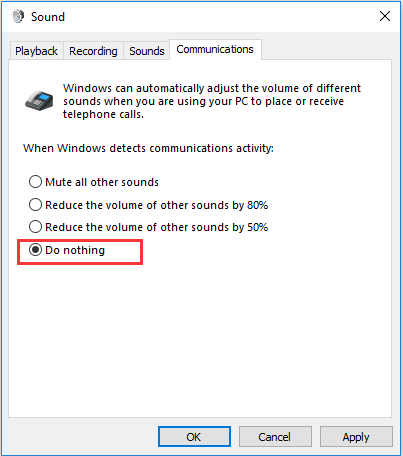
Windows can automatically adjust the volume of different sounds when you are using your computer to place or receive telephone calls. This feature is also proven to be a factor to cause audiodg.exe high CPU usage issue. So, you can also try disabling it.
Step 1: Open the Sounds window as displayed above.
Step 2: Switch to Communications tab and choose Do nothing option.
Step 3: Click Apply and OK to save the changes you’ve made.
Change Audio Sample Rate
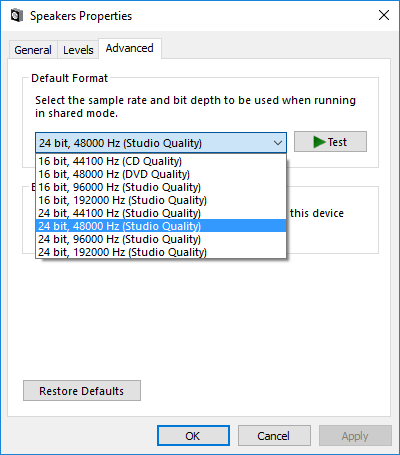
In addition, some users successfully resolved audiodg.exe high CPU by changing the audio sample rate. You can also have a try.
Just open Sounds window and go to the Properties of your audio device. Under Advanced tab, select another sample rate from the drop-down list, and then click Apply and OK to confirm the operation.
Fix 2: Run Audio Troubleshooter
If the audiodg.exe is taking up much CPU usage, perhaps your audio device runs into certain problems. In this case, you can use the built-in tool to troubleshoot the problems with audio.
Step 1: Press Windows + I to open Settings.
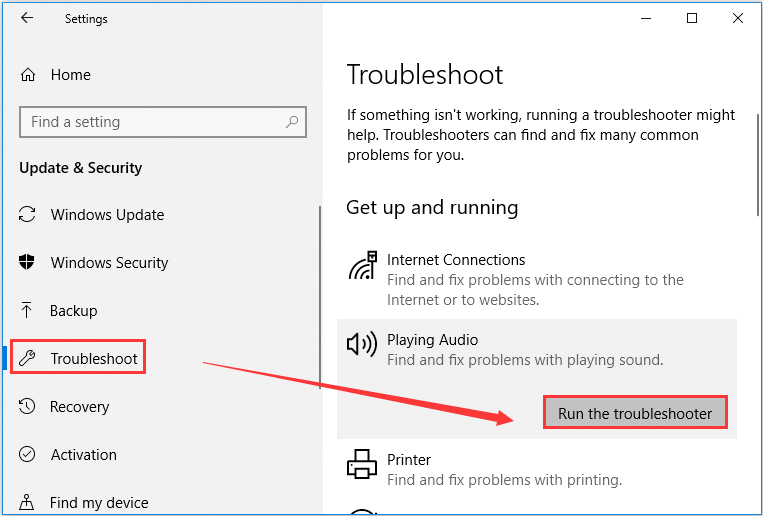
Step 2: Go to Update & Security and choose Troubleshoot.
Step 3: Select Playing Audio in the right pane and click Run the troubleshooter button.
Then, just wait! If there are any fixes available, apply them. Once it’s done, check if this helps lower down the CPU usage of audiodg.exe. If needed, you can also run Recording Audio and Speech troubleshooters.
Fix 3: Update the Driver for You Sound Card
As mentioned before, outdated audio drivers could also lead to audiodg.exe high CPU issue. So, you can try updating the driver for you sound card to fix the problem.
To do that, you should right-click the Start button and choose Device Manager to open it. Keep in mind that you need to update drivers under both Audio inputs and outputs and Sound, video and game controllers categories. Then, right-click the target driver, choose Update driver, and follow the onscreen instruction to complete the process.
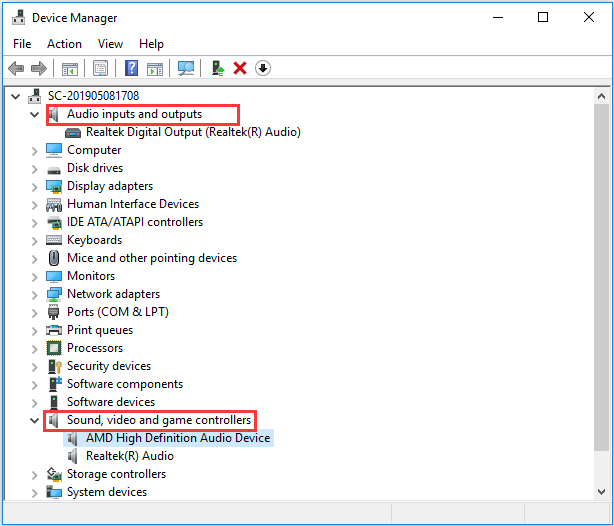
After updating all the related drivers, the high CPU usage caused by audiodg.exe Windows 10 should have been resolved.
Fix 4: Update Your Game and Related Software
If you have installed some games on your computer, the game or its related software like Logitech gaming software could also be a factor that cause the audiodg.exe high CPU issue. In this case, you need to update your game and related gaming software.
You can achieve that in Control Panel. Just go to Programs > Programs and Features, right-click the game or software and choose Change or Repair. In a few cases, you may need to reinstall your game to get rid of the issue.

![Windows 10 High Memory Usage [Causes and Solutions]](https://images.minitool.com/partitionwizard.com/images/uploads/2019/06/windows-10-high-memory-usage-thumbnail.jpg)

User Comments :