Sometimes, you should update PC BIOS to fix bugs, improve security, performance, and hardware compatibility. If you use ASRock PCs or motherboards, you should know how to perform ASRock BIOS update. This post from MiniTool Partition Wizard shows you how to do that.
ASRock Inc. was established in 2002. At the beginning of its establishment, it was one of the subsidiaries of ASUS. Since 2008, it has belonged to Pegatron Corporation. The main products of ASRock include personal computer motherboards, mini-computers, and barebones. But how to update ASRock BIOS? You can refer to the following guide.
Download a Proper BISO Update File
Before you start ASRock BIOS update, you should check the model of your motherboard and the BIOS version. Then, you can determine what BIOS you should download.
To check the motherboard model and BIOS version, you can press Windows key + R key, type “msinfo32“, and press Enter to open System Information tool. In this tool, you can check the system model and BIOS version information.
Apart from the above method, you can also use other methods to check the motherboard model and BIOS version. For example, you can enter firmware (BIOS/UEFI) to check BIOS Version information (the name is composed of motherboard model + version number); or you can use CPU-Z to check these information.
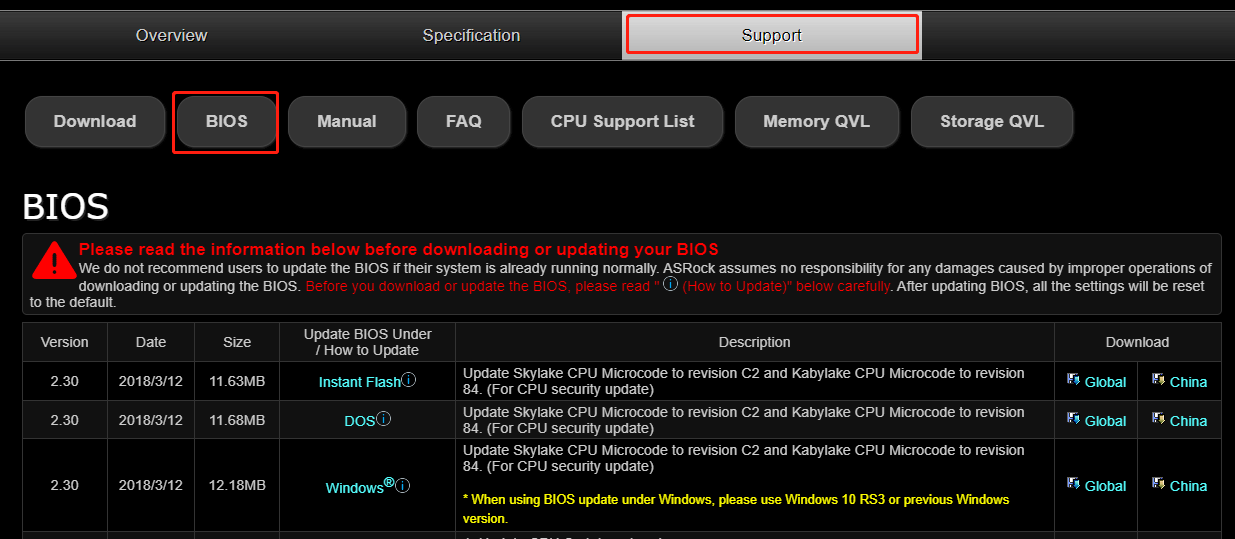
Then, go to ASRock’s website, find the motherboard according to the model, choose Support > BIOS. ASRock BIOS update files are there.

How to Update ASRock BIOS
ASRock offers 2 or 3 types of BIOS update files. This is very user-friendly. But in most cases, you just need to download the ASRock BIOS update file of Windows version. Then, perform the ASRock BIOS update as follows:
- Close all programs.
- Unzip the downloaded BIOS file and you will see BIOSfilename.exe file.
- Right-click the BIOSfilename.exe file and choose Run as administrator.
- It shows a dialog icon to remind that “You need to restart the system before updating BIOS, do you want to restart now”. Click “Yes“.
- Wait until the BIOS update process is finished. It will show “Press Enter”. Please press “Enter” to reboot.
- After system restart, press F2 to enter the BIOS setup utility during boot up. In Exit menu, please select Load Default Settings and press Enter to continue.
- Select Exit Saving Changes and press Enter to exit the BIOS setup utility.
- Now, system is booting up with new BIOS.
How to Enter BIOS Windows 10/8/7 (HP/Asus/Dell/Lenovo, any PC)
If your PC becomes unbootable, you can use the Instant Flash version or the DOS version to update ASRock BIOS. To update BIOS with the Instant Flash version, please follow the steps below:
- On a normal running PC, download and extract the ASRock BIOS update file of Instant Flash version.
- Save the BIOS files on a FAT32 formatted USB disk.
- Insert the USB drive to the PC needing BIOS update.
- Press F2 during POST to get into BIOS setup menu.
- Select the Instant Flash utility under Tool menu to execute it.
- ASRock Instant Flash will automatically detect all devices and only list those BIOS versions which are suitable for your motherboard. Please select the suitable BIOS version and click “Yes” to flash the BIOS.
- Restart PC and load default settings.
If you want to update ASRock BIOS through the DOS version, you should:
- Create a bootable system USB pen drive.
- Download and extract the ASRock BIOS update file and then place it into the bootable pen drive.
- Boot the PC from the pen drive.
- At the “A:” prompt, type BIOSfile.exe, then press Enter. You will see program is finding model name. After finish, please press any key to reboot.
- After system restart, it will auto update BIOS. After BIOS update, please load default settings.


User Comments :