The “Cast to Device” is a practical feature in Windows PC, but a lot of users don’t know how to add or remove it. Now, this post of MiniTool will guide you on how to add or remove Cast to Device context menu in Windows 11.
Windows 11 is a fully new operating system compared with other Windows operating systems. This version brings many new features and changes. Compared with Windows 10, one of the biggest changes is the Windows 11 context menu.
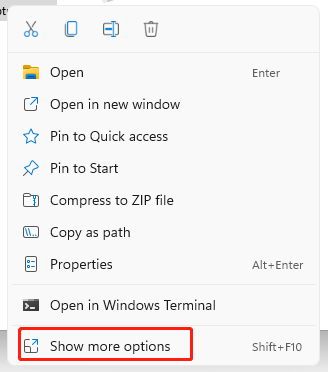
When right-clicking an item in File Explorer Windows 11, you will find a modern condensed context menu with Show more options, instead of a full context menu. So, many users want to add some new context menus in Windows 11 like “Copy to Folder and Move to Folder”, “Pin to quick access”, and the one discussed here.
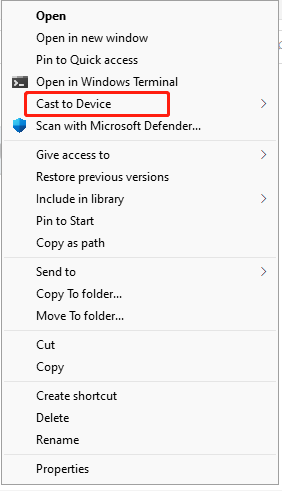
Cast to Device is a Windows feature that allows you to stream media content to your Miracast/DLNA devices directly, for example, smart TVs, Xbox, multimedia hardware, etc. However, in Windows 11, this context menu is not available on media files and folders that are supported for this feature. How to add or remove Cast to Device context menu in Windows 11? Let’s keep reading.
How to Add or Remove Cast to Device Context Menu in Windows 11
There are 2 simple ways on how to turn on or off Cast to Device context menu in Windows 11. Before you start the following steps, make sure you sign in as an administrator to add or remove the context menu smoothly.
Method 1. Use “Cast to Device” Bat File
The first and simplest method to turn on or off Cast to Device context menu in Windows 11 is to download the registry hacker file of this context menu. For that:
Step 1. Click here to download the Add_Cast_to_Device_context_menu.bat file and save it on your desktop.
Step 2. Right-click the downloaded .bat file and select Run as administrator.
Step 3. Click on Yes in the UAC confirmation window. After that, you will see that a Command Prompt window opens and closes as the explorer process is restarted to execute the registry changes successfully.
Step 4. To use the Cast to Device context menu, you can right-click the media file you want to cast in File Explorer and select Show more options. Then select Cast to Device in the full context menu.
Once completed, you can delete the .bat file if you like.
Method 2. Use Registry Editor
Another method on how to turn on or off Cast to Device context menu in Windows 11 is to manually change some value keys in Registry Editor. To do so, follow the steps below carefully.
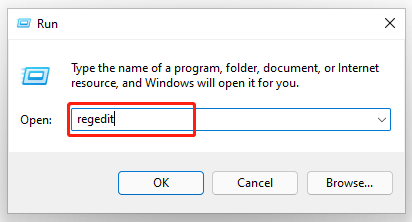
Step 1. Press Win + R keys to open the Run dialog box, and then type regedit in it and hit Enter. Click on Yes in the pop-up UAC window to confirm the operation.
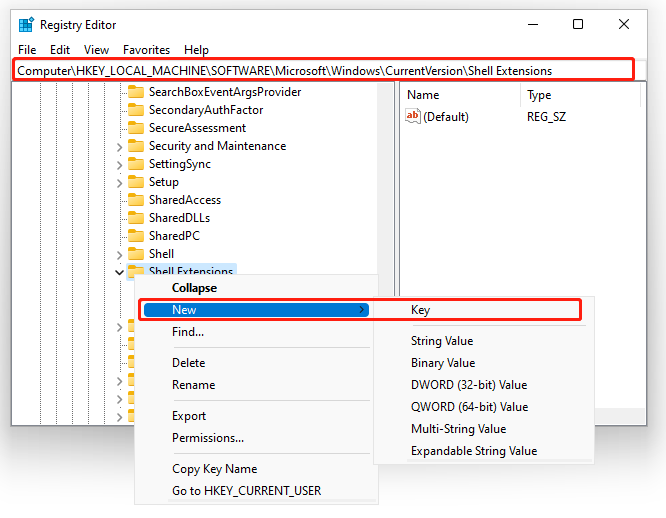
Step 2. In the Registry Editor window, locate the following path via the left navigation bar.
HKEY_LOCAL_MACHINESOFTWAREMicrosoftWindowsCurrentVersionShell Extensions
Step 3. Right-click the Shell Extensions folder and select New > Key from the context menu to add a new key. Then name the new key Blocked.
Step 4. With the Blocked key selected, right-click the blank area in the right pane and select New > String Value from the context menu.
Step 5. When the string value appears in the list, copy and paste the following name to it.
{7AD84985-87B4-4a16-BE58-8B72A5B390F7}
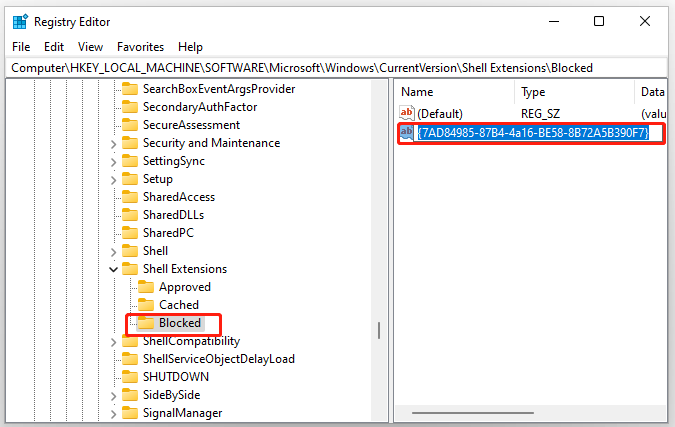
Step 6. After that, close your registry editor and reboot your computer or Explorer.exe to make the changes take into effect.
Once done, you should remove Cast to Device context menu in Windows 11. To re-add the Cast to Device context menu, you can delete the Blocked registry key in the same location as Step 5 and restart the Explorer.exe.

![Add or Remove Thumbnail Previews Windows 11 [3 Ways]](https://images.minitool.com/partitionwizard.com/images/uploads/2021/11/add-or-remove-thumbnail-previews-win11-thumbnail.jpg)
User Comments :