“The ADB is not recognized” error is common for people trying to set up ADB for the first time. This problem indicates that for some reason you cannot execute ADB commands in the command prompt on a Windows 11, and when you try to execute, you receive the following error message.
“‘adb’ is not recognized as an internal or external command, operable program or batch file.”
Why Is ADB Not Recognized in Windows 11?
If you are getting this “ADB is not recognized” error on Windows 11. There are many possible causes of this error. Some common reasons include:
- ADB driver not installed
- Corrupted/missing files in ADB installation folder
- ADB driver misconfigured
- Outdated ADB driver
- ADB command not found
- Faulty USB cable
How to Fix ADB Is Not Recognized Windows 11?
If you get an error saying “ABD is not recognized”, following the solutions we mentioned is the better way. However, before that, you’d better update your Windows system. Then, we recommend you try them in order until the issue gets solved.
Solution 1: Add ADB to Environmental Variables
ABD must be an environment variable to execute the command. To do this, first, you need to copy the path of the ABD. So, go to the location where the kit was installed and copy the location of ADB.exe. Typically, it is installed in the following locations:
C:Program Files (x86)Androidandroid-sdkplatform-tools
Second, you should add ADB to Environmental Variable. Here is the guide:
Step 1: Type Environment Variables in the Windows Search box, and then click the best-matched result.
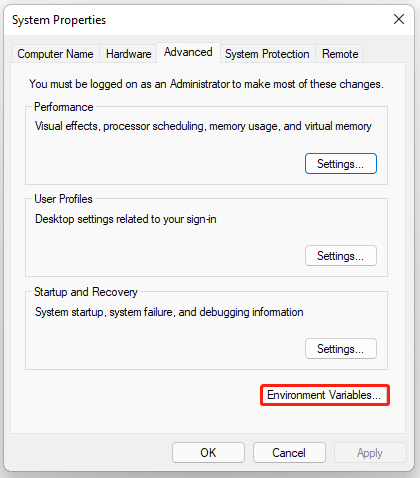
Step 2: In the System Properties window, click the Environment Variables button.

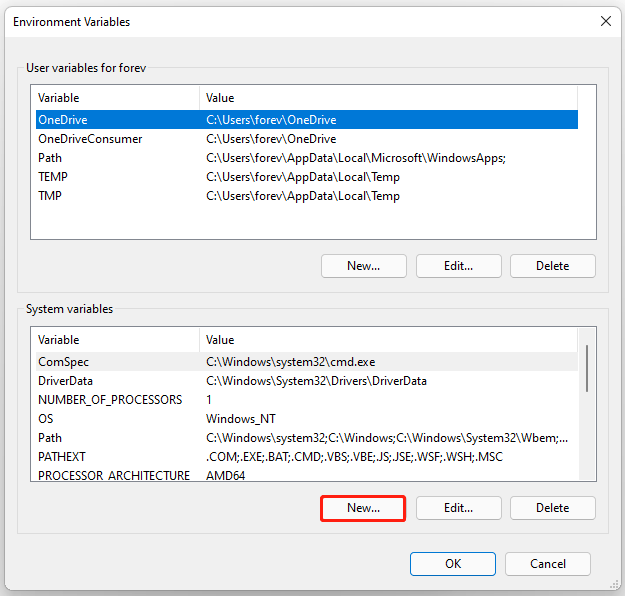
Step 3: In the next window, under the System variables section, click any item and click New.

Step 4: Next to the Variable name, type Path. Then next to Variable value, paste the copied address and then click OK.

After that, restart your computer and see if the “ADB is not recognized” error exists.
Solution 2: Execute the ADB Command from the Installation Folder
If you still get the error message, you can try executing the command from the path itself. Here is the guide:
Step 1: Open the folder containing the ADB files, and then type CMD in the address bar and press Enter.
Step 2: Right-click on an empty and select the Open PowerShell window here option.
Solution 3: Install or Update ADB Driver
If the ABD driver is missing from your computer, you will most likely see the “ADB is not recognized” error. Therefore, you need to visit this website and download the latest version of the driver.
Solution 4: Enable USB Debugging
USB debugging is a feature that should be enabled before your Android phone is connected to the computer. This “ADB is not recognized” issue may occur if the USB debugging option is not enabled in the Android phone connected to the computer.
To do so, you need to do this:
Step 1: On your Android phone, go to Settings > About Phone and select Software Information.
Step 2: Tap Build Number 7 times to enable Developer Mode, and then go back to Developer option to enable USB debugging.
Bottom Line
To sum up, this article is all about how to fix the “ADB is not recognized” error in Windows 11. If you have the same problems, try these methods. Or if you have any problems, you can leave them in the following comment zone.


![Here Is How to Convert WOFF to TTF [A Full Guide]](https://images.minitool.com/partitionwizard.com/images/uploads/2022/07/woff-to-ttf-thumbnail.png)
User Comments :