When you are trying to install Windows OS on another hard drive instead of the system partition, you are likely to get the Windows installation error 0x80300001. This error often comes out with either of the following error messages:
- Windows is unable to install to the selected location
- we couldn’t install Windows in the location you chose
If you receive the “we couldn't install Windows in the location you chose 0x80300001” error message, just click here to find out some solutions.
Once you run into Windows error 0x80300001, you will be prevented from completing the Windows installation process successfully. Therefore, you’d better work this error out as soon as possible. Here, we summarize several useful methods for fixing the error 0x80300001. Just keep reading and figure out how to solve it.
Method 1: Remove All the Unnecessary Hard Drives
If you have other hard drives connected to your PC, certain conflicts between hard drives will be caused. That’s why you get stuck in the Windows installation error 0x80300001. To solve this error, you ought to disconnect all the hard drives (except the one you determine to install the OS) including the HHDs, SSDs, SATA DVD-ROM drives as well as any removable USB devices (other than your mouse and keyboard).
Once done, restart your PC to see if the installation can be finished. If the “Windows is unable to install to the selected location error 0x80300001” persists, then you should go on with other solutions.
Method 2: Use Another USB Port
If you receive the Windows installation error 0x80300001 while attempting to install Windows with a Windows installation USB drive, it may indicate that you use the wrong USB port. In this case, you can try fixing this error by inserting the USB drive into a different USB port.
Method 3: Modify the Boot Order
It’s possible for you to experience the “Windows is unable to install to the selected location error 0x80300001” if the hard drive where you are trying to install the Windows OS is not at the top of the system’s boot order. To fix this error, you should get into BIOS and change the boot order. The following is a step-by-step guide for this operation.
Step 1: Reboot your computer and enter BIOS.
Step 2: Go to the Boot tab. Then locate the destination hard drive and set it as the first boot order with the on-screen instructions.
Step 3: After that, press F10 to save the changes and exit BIOS.
Step 4: Restart your PC and try the Windows installation again to see if the Windows error 0x80300001 disappears.
Method 4: Change Your BIOS Settings
The Windows installation error 0x80300001 may appear due to incorrect BIOS settings as well. Therefore, to solve this error, you need to modify certain settings in the BIOS setup.
- Enable the AHCI or RAID mode: This error will happen if the SATA controller mode is misconfigured. So, you can try fixing it easily by changing the mode to AHCI or RAID. To figure out the difference between AHCI and RAID, read this post: AHCI VS RAID: Which One Should I Choose for Better Performance?
- Disable CSM support: The CSM (Compatibility Support Module) support is not required while installing a new Windows OS. Hence, you’d better disable it to avoid unnecessary issues.
- Enable Secure Boot: By doing so, you are likely to fix the Windows installation error too.
After you apply the above changes, reboot your system and try the installation once more. The operation may finish smoothly this time.
Method 5: Format the Partition
If the partition you choose to install the Windows OS contains some data, the Windows installation process will be disrupted and shows you an error message like “we couldn’t install Windows in the location you chose 0x80300001” or “Windows is unable to install to the selected location error 0x80300001”.
On this occasion, you should format the target partition to solve this annoying error. To do this, follow the steps below.
Step 1: Start your computer normally to make a backup of the destination partition. This will help you avoid data loss.
Step 2: Insert the Windows installation media and boot your system into the Windows Setup screen.
Step 3: Follow the on-screen instructions to advance the installation process.
Step 4: When you reach the screen asking you “Where do you want to install Windows?”, select the partition you want to format and then click Format.
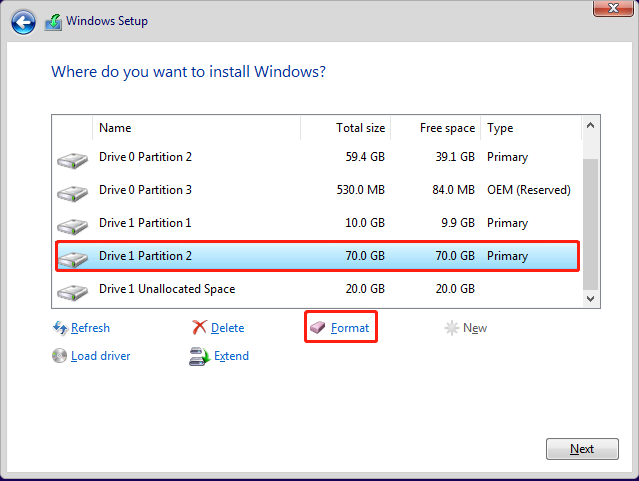
Step 5: Click OK to confirm the operation when a warning window pops up.
Step 6: Wait for the end of the formatting process. Then click Next to continue installing Windows to see if the error is resolved.
Method 6: Recreate the Partition
Be faced with the Windows error 0x80300001, you can also try deleting the destination partition and recreating a new partition. In case of data loss, you need to back up the partition in advance. After that, follow the guide below.
Step 1: Go to the Where do you want to install Windows? screen and select the partition you want to delete.
Step 2: Click Delete and then OK to remove this partition.
Step 3: The partition will become the unallocated space after it is deleted. Select the unallocated space and then click New.
You can try selecting the unallocated space to install Windows to see if the error 0x80300001 disappears.
Step 4: Decide the size of the partition. Then click Apply to execute the operation. 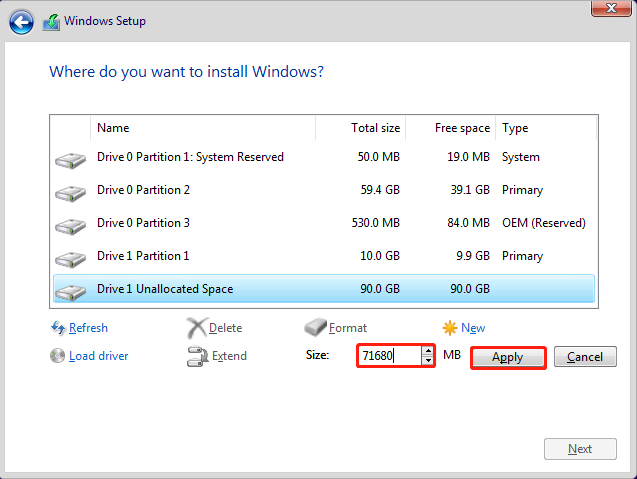
Step 5: Once the new partition is created, perform a format for it. Then select the partition and click Next to carry out the Windows installation.
Method 7: Delete All Partitions
After the “Windows is unable to install to the selected location error 0x80300001” happens, another method you can try is to delete all partitions on the disk where the selected Windows installation partition is located. To ensure you can finish this operation, there are two ways available.
Note: This operation will clean your disk. So, you’d better make a backup too before the process begins.
Way 1: Use Diskpart
Diskpart is a Windows built-in utility that allows you to manage your hard drives using command lines. Here is how to delete all partitions with diskpart.
Step 1: On the Windows Setup screen, press Shift + F10 to open Command Prompt.
Step 2: Once the Command Prompt window prompts, type diskpart to open this utility.
Step 3: Type the following commands and then press Enter after each to execute them:
- list disk
- select disk * (* is the number of the disk you select to install Windows)
- clean
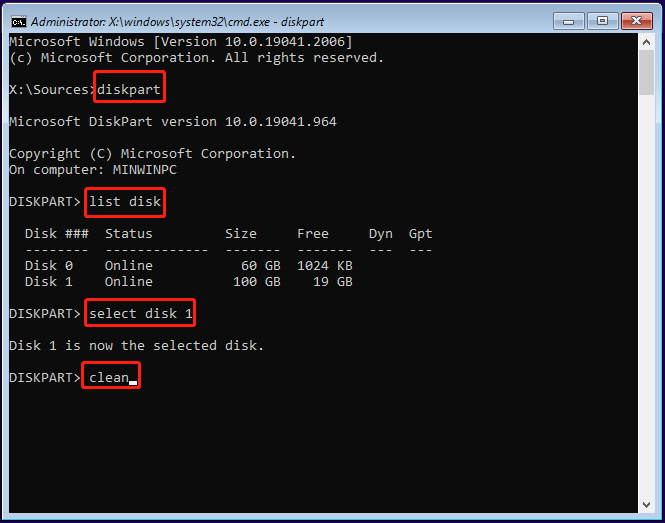
Step 4: After the process ends, exit Command Prompt. You will see the whole disk is shown as unallocated space.
Way 2: Use MiniTool Partition Wizard
Diskpart is a convenient tool to perform operations on your partitions and disks. However, sometimes it may trouble you with certain issues like Diskpart Clean not working. In such cases, maybe you should consider using an easy-to-use third-party partition manager. Here, we’d like to recommend MiniTool Partition Wizard to you.
MiniTool Partition Wizard is a professional partition managing program that enables you to create/format/delete partitions, copy/wipe disks, migrate OS to SSD/HD, and more. With this program, you are able to delete all partitions on the disk with a few clicks. The following are detailed steps.
Delete All Partitions
Step 1: Download and install MiniTool Partition Wizard. Then launch it to enter the main interface.
MiniTool Partition Wizard FreeClick to Download100%Clean & Safe
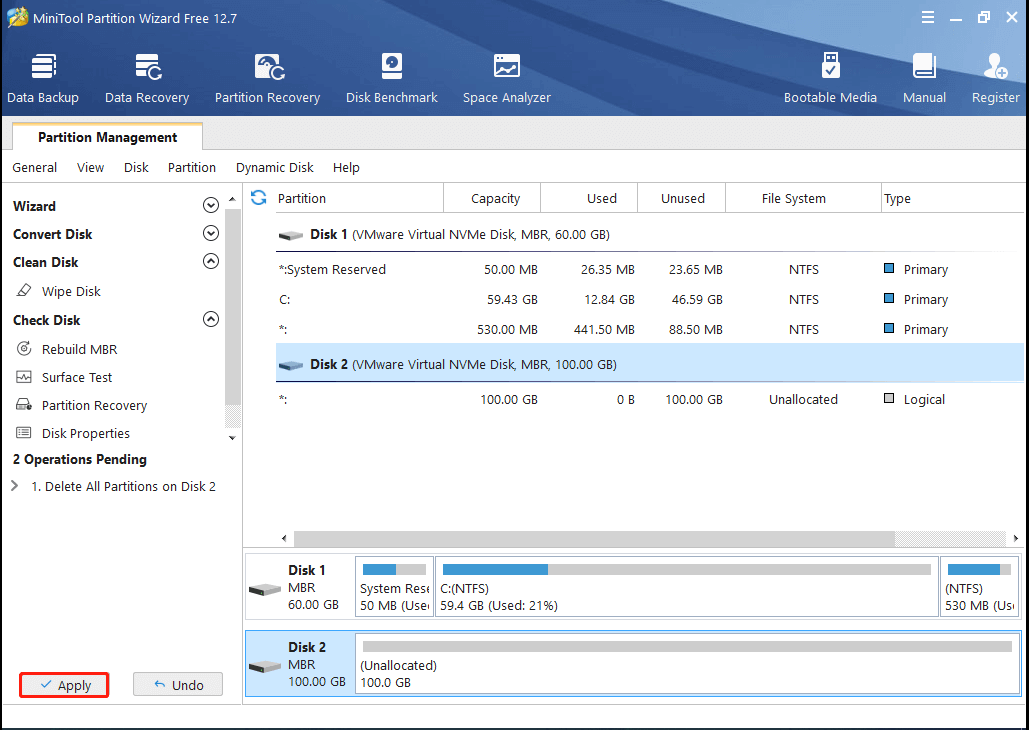
Step 2: Highlight the target disk and then select Delete All Partitions from the left action panel. Alternatively, just right-click the target disk and select Delete All Partitions.
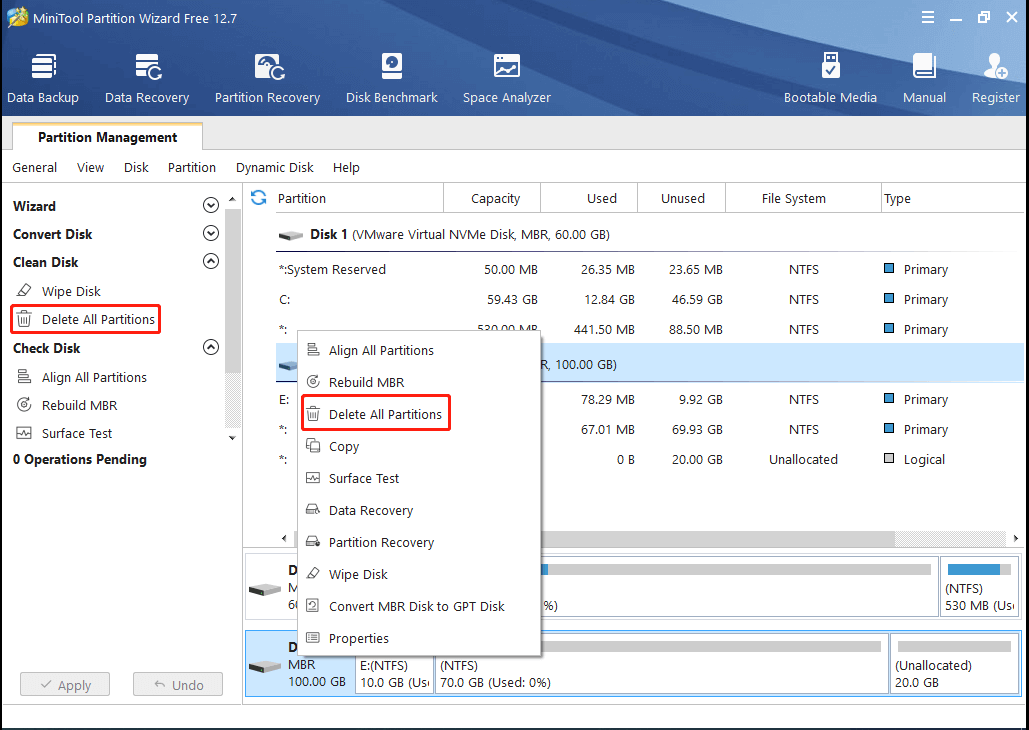
Step 3: Click Yes in the pop-up window to continue.
Step 4: Finally, click Apply to carry out the operation.
Wipe Disk
Step 1: Launch MiniTool Partition Wizard to get into its main interface.
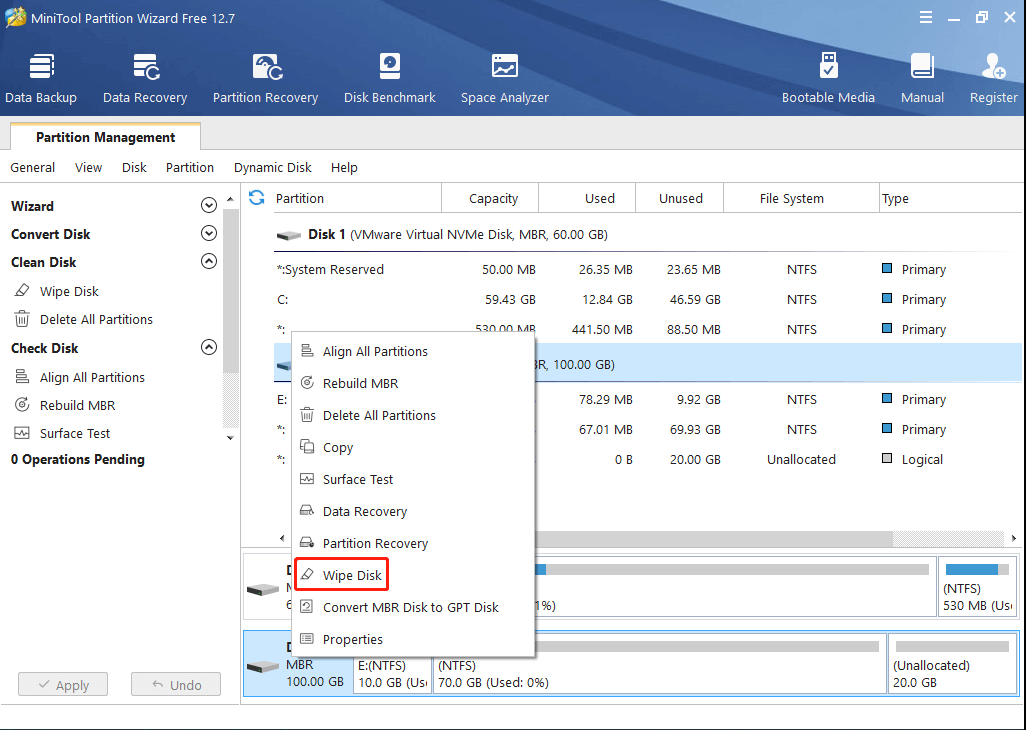
Step 2: Right-click the disk where you want to install Windows. Then select Wipe Disk from the list.
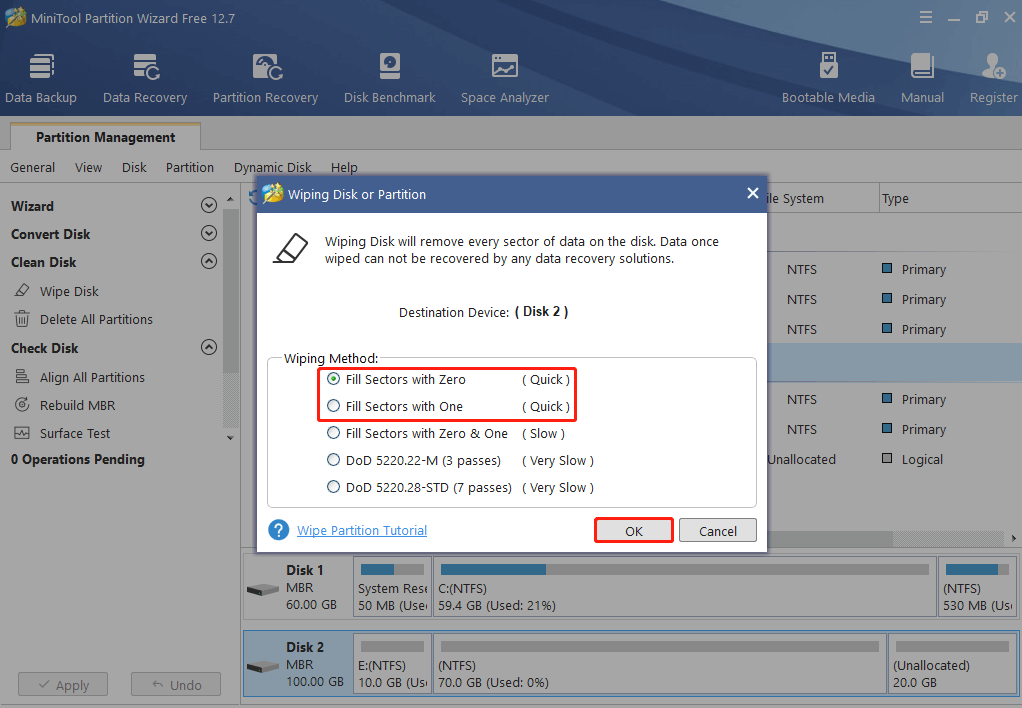
Step 3: In the next window, select a wiping method and then click OK.
You are suggested to choose the former two options because they will take less time.
Step 4: You can see the target disk is presented as unallocated space. Click Apply to perform the changes.
Method 8: Re-insert the Windows DVD
During the Windows installation process, you may be required to insert another disk to install the needed drivers. If you forget to connect the Windows installation DVD back, you will probably experience the Windows error 0x80300001. On this occasion, you can fix this error simply by reinserting the Windows installation media.
Step 1: After loading and installing the required drivers from the driver CD, remove it.
Step 2: Re-insert the Windows installation DVD and then click Refresh.
Step 3: After that, click New to create a new partition for the Windows installation.
Step 4: Select the newly created partition and click Next to go ahead and process the Windows installation.
Bottom Line
Are you bothered by the Windows installation error 0x80300001? If so, you can find out some workable solutions in this post. If you have any problems with this error, you can leave a message in the following comment part.
With anything confused while using MiniTool Partition Wizard, you can contact us via [email protected]. We will make reply to you as soon as possible.

User Comments :