Have you encountered the Windows update error 0x8024A004 when you try to install the 22H2 Windows update? In this post, MiniTool Partition Wizard provides you with several solutions to fix the Windows update error 0x8024A004.
Error code 0x8024A004 mainly occurs when you try to upgrade from the 21H1 Windows 11 build to the 22H2 build. The bug prevents you from enjoying some of the best features of the Windows 11 22H2 update. This error can appear due to various reasons:
- The Windows Update service is not running in the background.
- Your computer does not have enough space to download the update.
- There is corruption in the SoftwareDistribution folder.
- Your computer is not compatible with the 22H2 update.
Luckily, there are a few methods you can try to get rid of it.
Solution 1. Restart Your Computer
If you receive Windows update error 0x8024A004 when trying to update Windows, a corrupt or missing file is most likely causing the problem. In this case, the solution is to restart the computer and try updating Windows again.
Solution 2. Make Sure Your PC Is compatible with Windows 11 22H2
If you installed Windows 11 bypassing the minimum requirements, you may experience issues downloading upcoming Windows 11 updates. To check if your computer is compatible with the Windows 11 21H2 update, follow these instructions:
Step 1: Press the Win + R to open the Run dialog. Then type regedit in the box and press Enter.
Step 2: In the Registry Editor, navigate to the following path:
ComputerHKEY_LOCAL_MACHINESOFTWAREMicrosoftWindows NTCurrentVersionAppCompatFlagsTargetVersionUpgradeExperienceIndicatorsNI22H2
Step 3: In the right panel, locate and double-click on the RedReason key.
Step 4: In the pop-up new window, check the Value data. If the Value data is NONE, it means your computer can install Windows 11 22H2. If it shows other values like TPM UEFISecureBoot, your PC will not be upgraded to Windows 11 22H2.
Solution 3. Run the Windows Update Troubleshooter
The Windows Update Troubleshooter is a Windows built-in utility that can repair issues related to Windows updates. You can run the Windows Update Troubleshooter by following the below steps:
Step 1: Press the Win + I key to open Settings, and navigate to the System > Troubleshoot option.
Step 2: Click on Other troubleshooters.
Step 3: Click on the Run button next to Windows Update.
Then the troubleshooter will start scanning your PC for problems. If it finds any problems, it will fix them automatically.
Solution 4. Clean Up Disk Drive
The Windows update error 0x8024A004 may appear if your PC doesn’t have enough disk space. In this case, you should free up disk space to create more space. Here are two options you can choose from. One is to remove unnecessary files, and the other is to directly expand the partition size.
Option 1: Use Disk Cleanup
Step 1: Open the Run dialog and type cleanmgr, and then press Enter.
Step 2: A small box will pop up and ask you to select a drive to run the cleanup on. Then click OK.
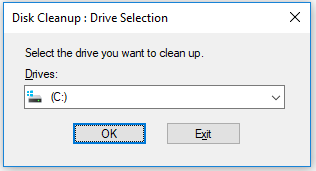
Step 3: In a new window, select the files you want to delete and then click OK.
If you delete important files by mistake, you can recover deleted/lost files by using MiniTool Partition Wizard.
Option 2: Use MiniTool Partition Wizard
If your disk is filled with important files, using the Extend Partition feature of MiniTool Partition Wizard is a better option. MiniTool Partition Wizard is a professional partition manager, which can help you recover missing data, scan bad sectors, fix file system errors, etc.
To free up space, here is the guide:
A partition cannot be extended without additional partitions or unallocated space. To resize a system partition, please use MiniTool Partition Wizard Bootable in case of boot issues. And it’s recommended to back up your data before it.
Step 1: Download and install MiniTool Partition Wizard. Then launch it to enter its main interface.
MiniTool Partition Wizard FreeClick to Download100%Clean & Safe
Step 2: Select the drive you want to extend and click Extend Partition on the left operation panel.
Step 3: In the drop-down menu, select where to take free space. Then drag the light blue block to decide how much free space you want to take. Finally, click the OK button.
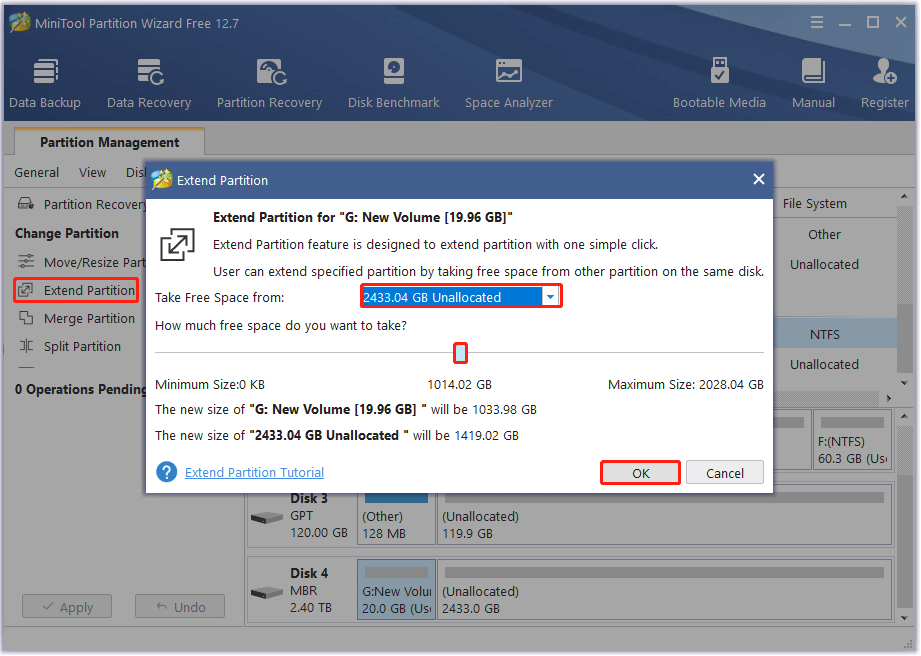
Step 4: Click the Apply button to execute the operation.
Solution 5. Clear the SoftwareDistribution Folder
The SoftwareDistribution folder contains all Windows Update temporary files. But sometimes, this folder can become corrupted and interfere with the Windows update process. Therefore, you need to clear the contents of the SoftwareDistribution folder to resolve this issue.
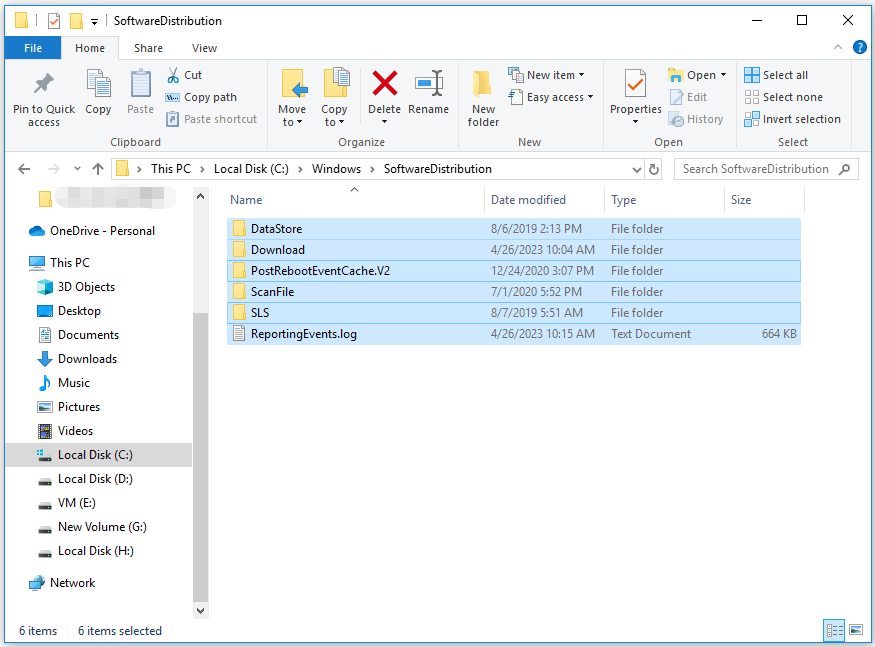
Step 1: Open File Explorer. Copy and paste the following path to the address bar.
C:WindowsSoftwareDistribution
Step 2: After opening the SoftwareDistribution folder, select all the sub-folders in the folder and choose Delete to delete all.
Sometimes, installed third-party utilities can mistakenly interfere with the update process and cause the issue at hand. To prevent this from happening, disable real-time scanning by third-party antivirus applications.

![Here Is How to Fix Windows Update Error 0x80070308 [Solved]](https://images.minitool.com/partitionwizard.com/images/uploads/2023/03/0x80070308-thumbnail.png)
User Comments :