Recently, some game users have reported that using the Xbox wireless adapter has caused a Windows Blue Screen of Death (BSOD). Do you encounter the same problem? Then you come to the right place. This article from Partition Magic will introduce you to several ways to solve this Xbox wireless adapter BSOD problem.
What Is Blue Screen of Death?
Recently, some game enthusiasts have reported that when their Xbox controllers use a wireless adapter, the system occasionally crashes and displays a blue screen. So, what is a blue screen of death?
A Blue Screen of Death is an error screen that Microsoft Windows displays when the operating system encounters a serious problem from which it cannot recover, often abbreviated as a BSOD error. It is also known as a “Stop Error” and its appearance is usually due to a fatal system error.
When a Blue Screen of Death appears, Windows stops all operations and displays a blue screen with an error message, and all data stored on the computer becomes inaccessible.
Here are the common reasons for BSOD:
- Hardware failure: RAM failure, overheating, or hard drive failure and corruption, etc.
- Problems with computer drivers: Incompatible or corrupted drivers, etc.
- Software problems: Errors in the operating system or conflicts with installed software.
- System overload: When the system cannot cope with many processes or software opened at the same time.
What Causes Xbox Wireless Adapter BSOD?
The Xbox wireless adapter is a wireless device that wirelessly connects your Xbox controller to your Windows PC. This enhances your gaming experience by eliminating the need for a wired connection.
While this is convenient and useful, there are situations where using the Xbox wireless adapter can cause a Blue Screen of Death. This can be frustrating because it can cause you to lose everything you were running.
Xbox wireless adapter blue screen can be caused by a variety of reasons, such as problems with the adapter itself, outdated or incompatible drivers, or it may be due to a corrupted file system. These can lead to occasional blue screens of death when using the Xbox wireless adapter.
The following will describe how to fix Xbox wireless adapter BSOD in Windows. Please see the detailed guide below.
![How to Solve Xbox Wireless Adapter Not Working [3 Solutions]](https://images.minitool.com/partitionwizard.com/images/uploads/2020/08/xbox-wireless-adapter-not-working-thumbnail.jpg)
How to Fix Xbox Wireless Adapter BSOD In Windows
How to fix Xbox wireless adapter BSOD in Windows? Here are 7 solutions below. Let’s take a look.
Method 1: Update the Xbox Wireless Adapter Driver
Outdated Xbox wireless adapter drivers may cause a BSOD in Xbox wireless adapter. You can try to fix this by updating your graphics card driver.
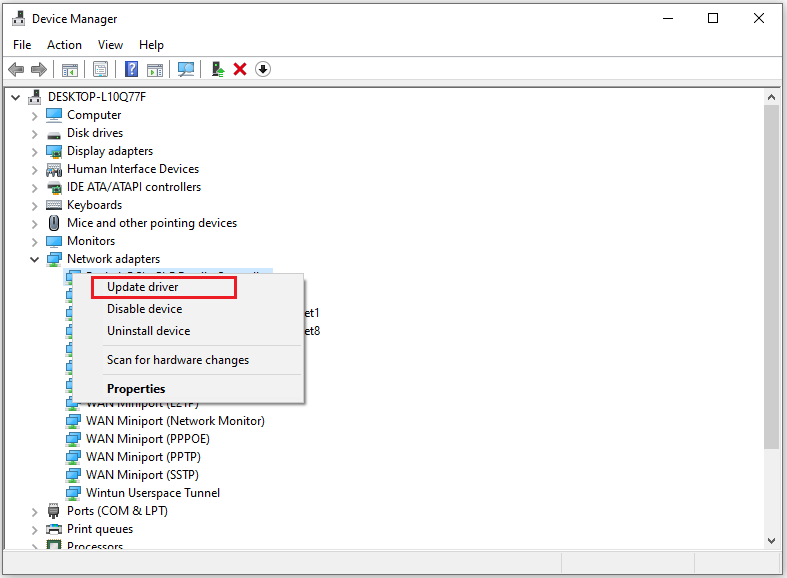
Step 1: Input device manager in the Search box, find and open the Device Manager.
Step 2: Expand the Network adapters category, and then find the Xbox wireless adapter and right-click it to select Update driver.
Step 3: Choose the Search automatically for drivers option. Then, your Windows will search your computer and the Internet for the latest driver software for your device.
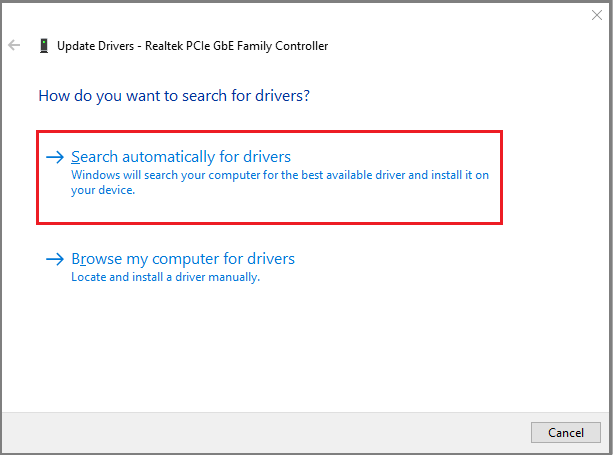
After that, follow the on-screen instructions and restart your computer.
Method 2: Check for Windows Updates
You can try to fix the Xbox wireless adapter BSOD by updating Windows. Updating Windows may solve some of the problems. Here are the steps below.
Step 1: Click the Start icon and choose Settings to open. In the new interface, scroll down to find Update & Security and click it to open.
Step 2: Click Windows Update on the left side and choose Check for updates in the right panel.
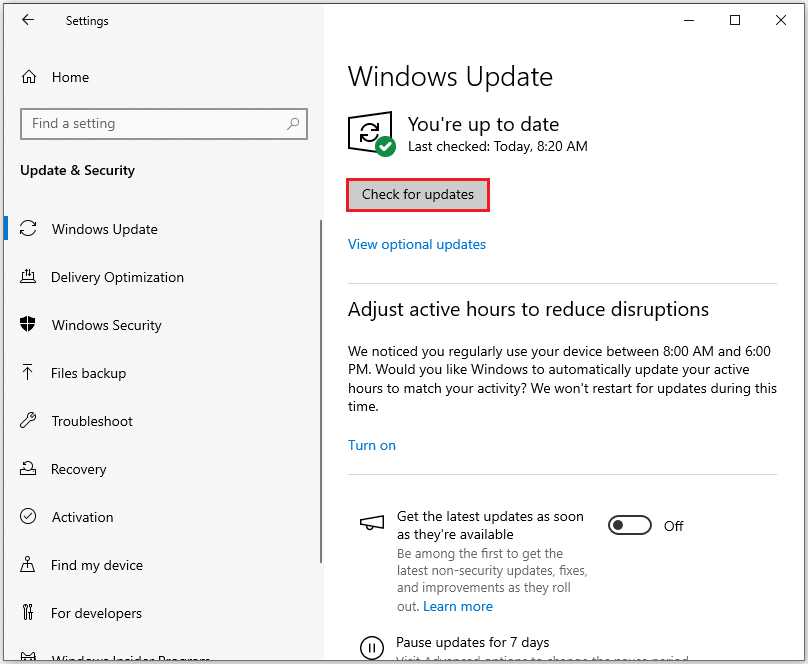
Step 3: If there are optional updates available, you can install them as well. Finally, restart your computer to implement the changes.
Method 3: Repair Corrupted System Files
The Xbox wireless adapter BSOD in Windows issue may also be caused by corrupted system files. DISM and SFC scans are often used to repair certain corrupted system files. Here are the steps below:
Step 1: Type cmd in the Run dialog box and then press Ctrl + Shift + Enter to open Command Prompt as administrator.
Step 2: Type the sfc /scannow command to scan for corruption in files and press Enter. Wait till the scan is finished. If Windows finds system file integrity violations, it will attempt to fix them.
Step 3: After it finishes, type the following commands one by one, pressing Enter after each.
- DISM /Online /Cleanup-Image /CheckHealth – this command is to perform a quick check for the DISM scan.
- DISM /Online /Cleanup-Image /ScanHealth – this command is to check your OS image with a more advanced scan.
- DISM /Online /Cleanup-Image /RestoreHealth – this command is to fix any problems it finds automatically.
Step 4: After finishing the scan, restart your computer.
Method 4: Uninstall and Reinstall the Xbox Wireless Adapter Driver
To solve the BSOD in Xbox wireless adapter problem in this case, you can try updating or reinstalling the driver software. Here is the detailed tutorial.
Step 1: Right-click the Start button and select Device Manager.
Step 2: In Device Manager, double-click the Network adapters category to expand it. Then right-click your Xbox wireless adapter and select Uninstall device.
Step 3: After uninstalling the driver, restart your computer and the driver will be reinstalled automatically.
Method 5: Update BIOS with USB
BIOS prompts hardware initialization during PC startup, and an outdated BIOS may cause system instability. Therefore, updating BIOS may be a good way to solve the Xbox wireless adapter BSOD in Windows issue.
How to update BIOS using USB? You can continue reading below, which will provide you with a detailed guide.
If you want to install BIOS by using USB, you need to prepare a suitable USB drive. USB BIOS update requires USB to support the FAT32 file system. Therefore, you should format the USB drive to FAT32 first. Here are two methods below.
#1. Use DiskPart
When your USB drive is smaller than 32GB, you can use this method.
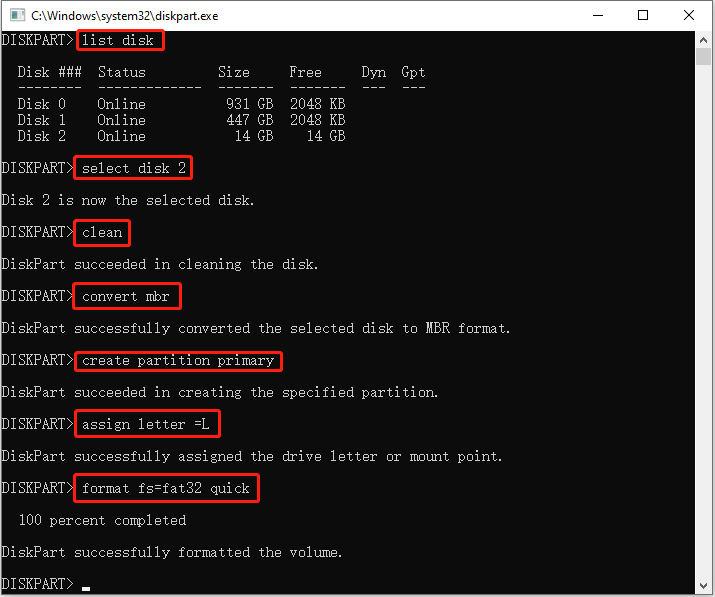
Step 1: Press the Win + R keys to open the Run dialog. In the new pop-up window, type “diskpart” and press Enter to open it.
Step 2: Type the following commands in order and press Enter:
- list disk (Executing this command will list all the disks present on your computer.)
- select disk 2 (2 is the number of the USB drive)
- clean (This step will delete all partitions on the USB drive)
- convert mbr (It will convert the USB drive to MBR)
- create partition primary (This will use all the space on the USB drive to create a primary partition)
- assign letter =L (The letter L should not be used by other partitions)
- format fs-fat32 quick (format the partition to FAT32 in the quick format way)
#2. Use MiniTool Partition Wizard
If the USB drive is larger than 32GB, you need to use MiniTool Partition Wizard. This method is free to use.
MiniTool Partition Wizard is a professional partition manager. With this tool, you can manage your disks well. It not only can help you create/format/split/wipe/delete/merge partitions, but also can help you clone a hard drive, hard drive recovery, convert MBR to GPT, etc.
Formatting your USB drive to FAST32 with MiniTool Partition Wizard is very easy, safe, and fast. First, click the button below to get this free partition manager on your PC. You can have a try.
MiniTool Partition Wizard FreeClick to Download100%Clean & Safe
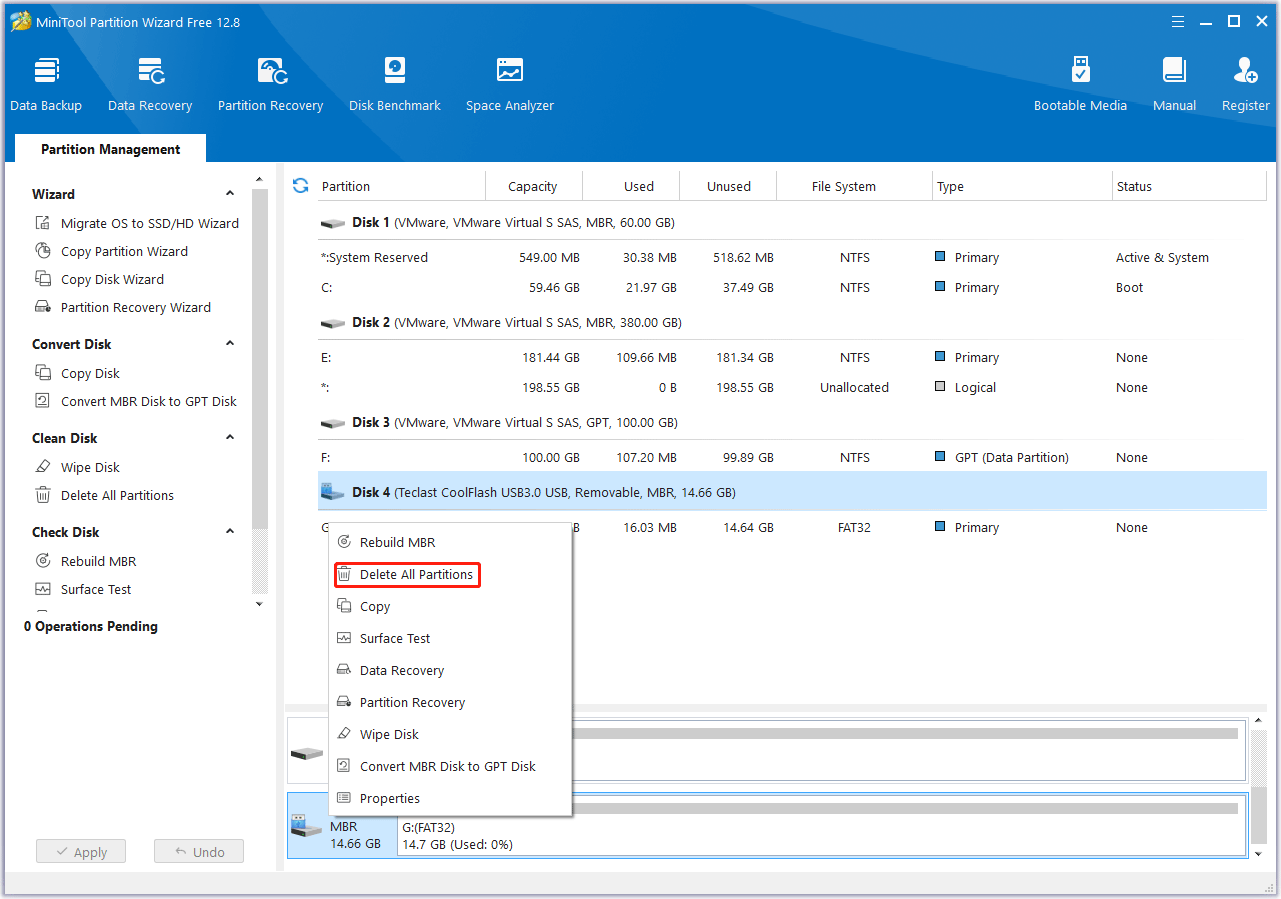
Step 1: Launch MiniTool Partition Wizard to its main interface. If there are partitions on your USB drive, you need to right-click on the USB drive. Then, choose Delete All Partitions. Click Yes to confirm this action.
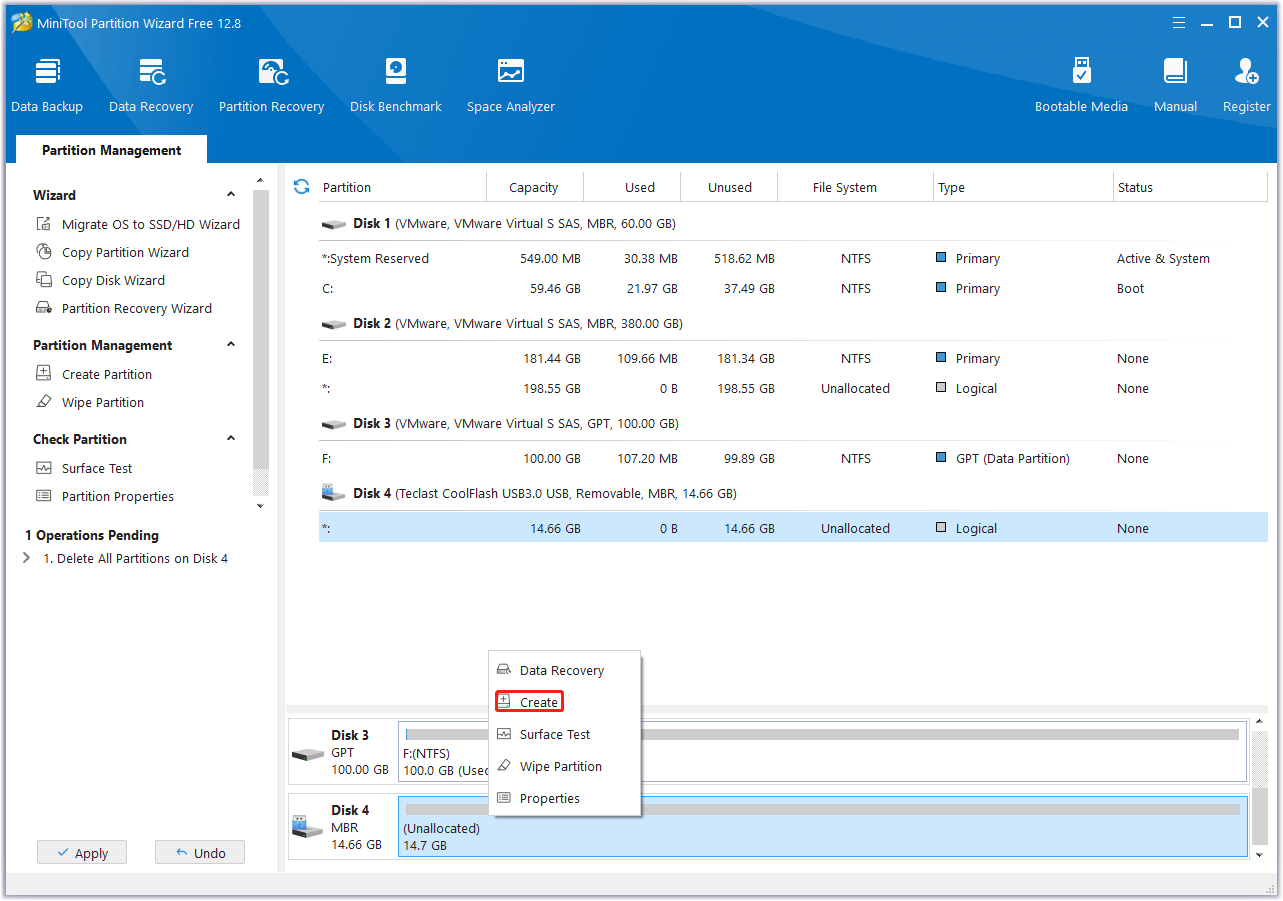
Step 2: Now, the USB drive shows unallocated space. Right-click on the on the USB drive and choose Create.
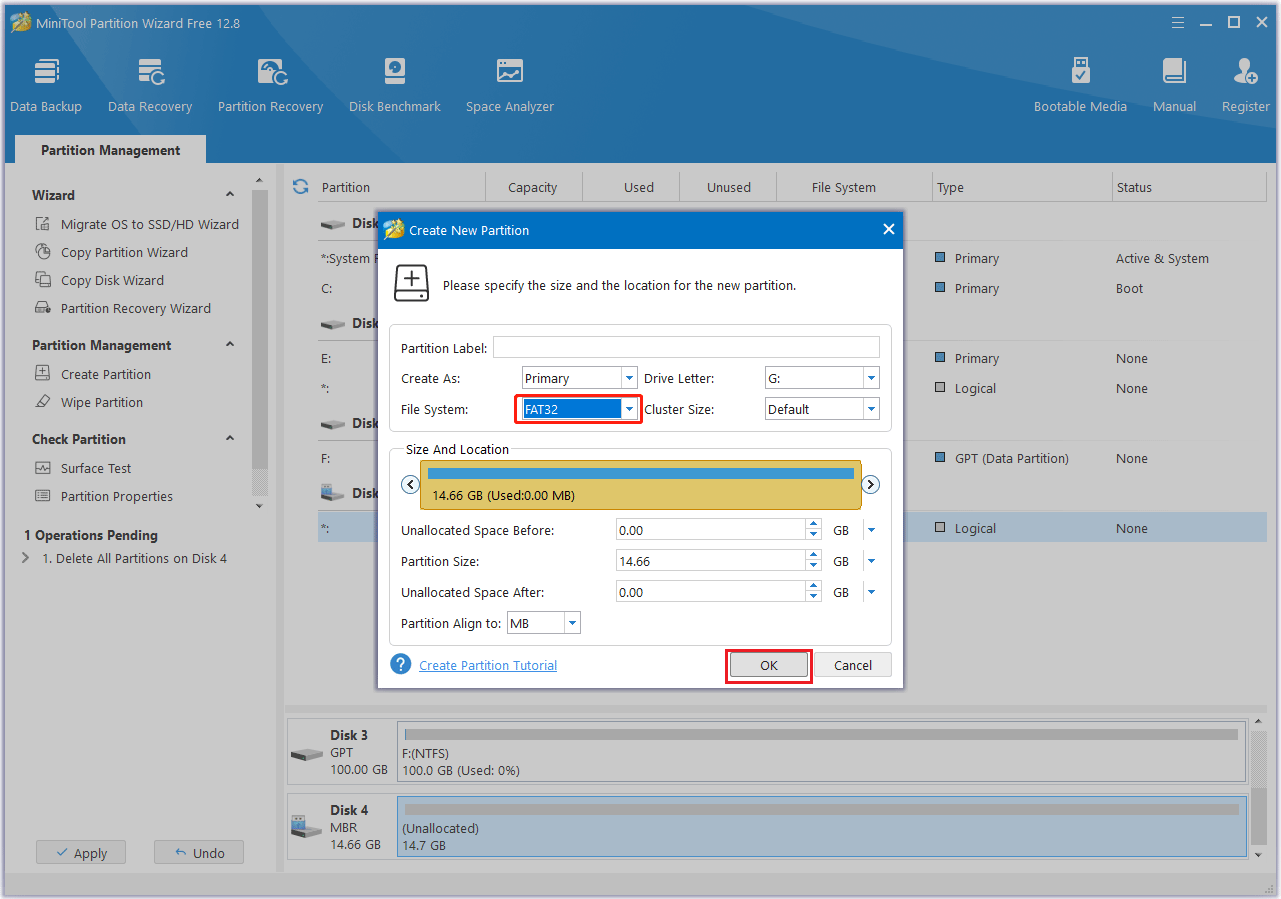
Step 3: In the pop-up window, click the down arrow in the File System column to select FAT32, and keep other parameters as default. Then click OK.
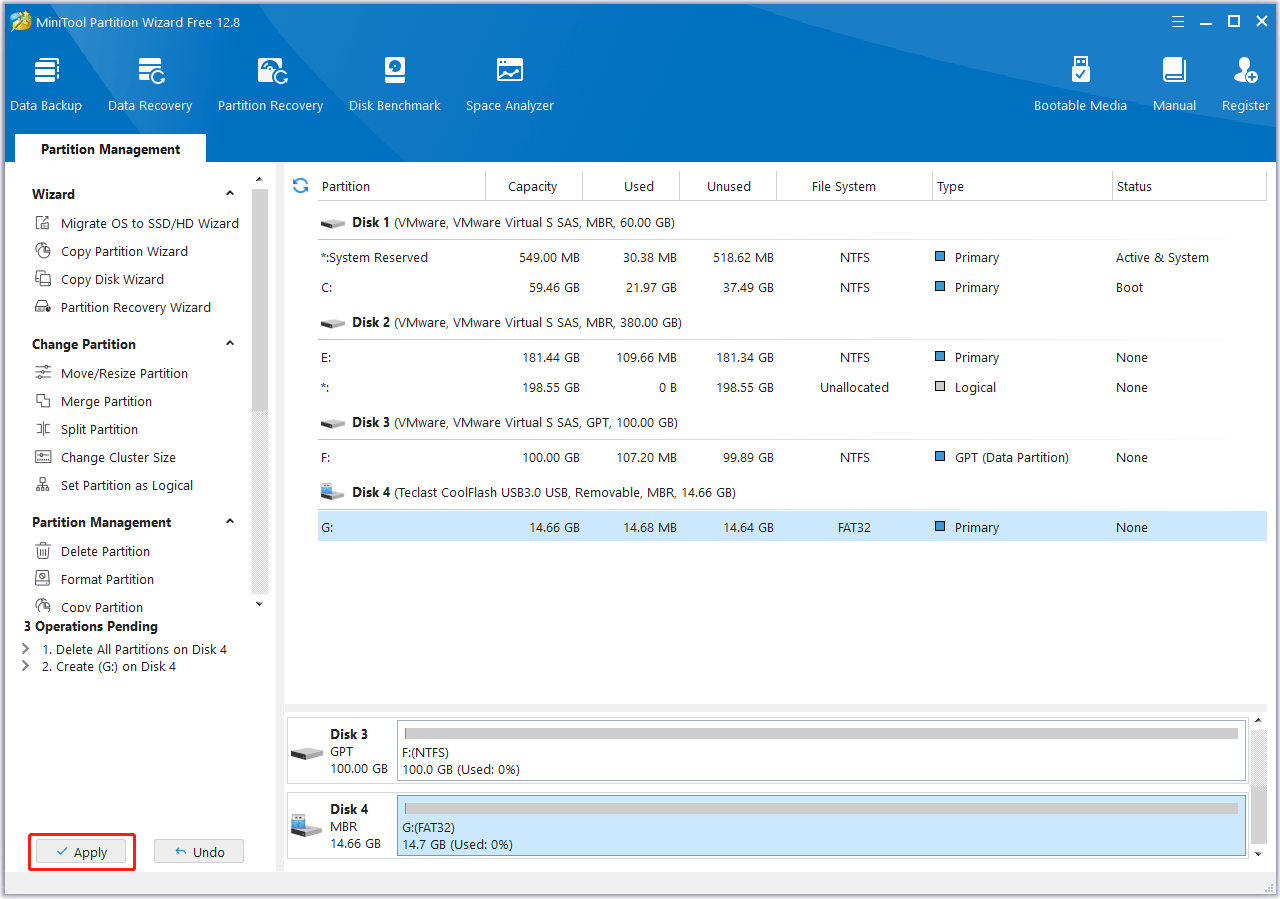
Step 4: MiniTool Partition Wizard will return to its main interface. Click Apply to make the operation effective.
After preparing a FAT32 USB drive, now you should update BIOS. The specific process of updating BIOS may vary slightly for different computer brands. You can refer to this article for detailed guidelines: Detailed Guides on How to Update BIOS with USB
Method 6: Perform a Clean Boot
Clean boot is another diagnostic mode that does not disable any Windows processes and services and can help you troubleshoot various errors. Here are the steps below:
Step 1: Type msconfig in the Search box and press Enter to open the System Configuration window.
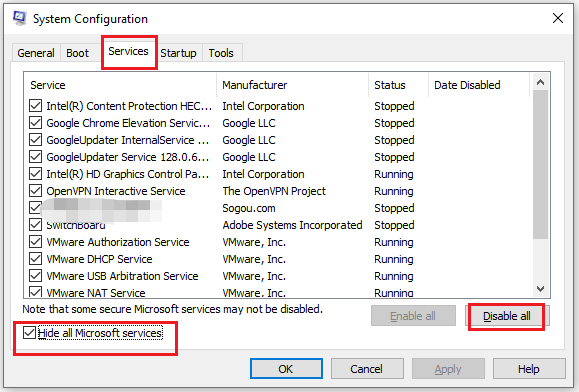
Step 2: Switch to the Services tab. Check the Hide all Microsoft services option. Finally, you need to press the Disable all button.
Step 3: Then, switch to the Startup tab and click Open Task Manager.
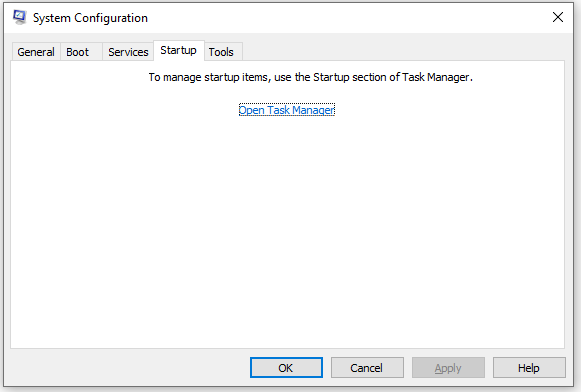
Step 4: When you open Task Manager, disable all startup items, and close the Task Manager.
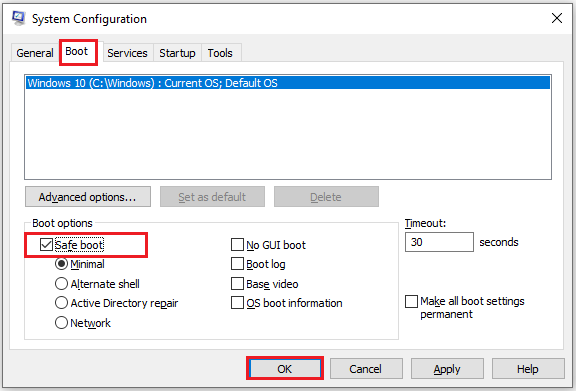
Step 5: On the System Configuration window, click the Boot tab and select the Safe boot option. Finally, click OK
Step 6: Restart your computer.
After the restart, check if the problem is still there. If the problem persists, then a software conflict is not the cause. If the problem goes away in a clean boot environment, then you can try to isolate the problematic program or service that is causing the problem.
You can also read: Clean Boot VS. Safe Mode: What’s the Difference and When to Use
Method 7: Run Windows Memory Diagnostic
You can use the Windows Memory Diagnostic tool to check for possible memory problems, such as the Random Access Memory (RAM) on your computer. Windows Memory Diagnostic is an excellent memory tool built into Windows that can do memory testing. It works on Windows 7 and above versions of Windows.
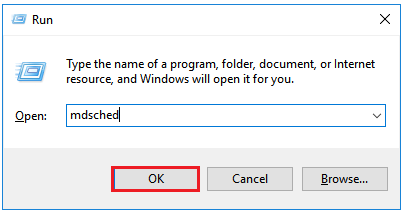
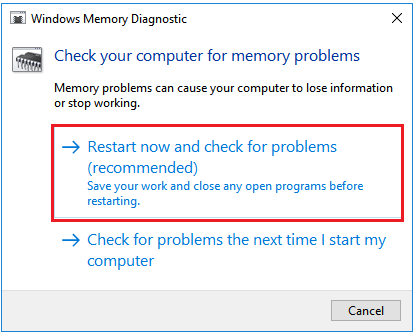
Step 1: Press the Win + R key on the keyboard simultaneously. And type mdsched and then click OK. Also, you can type Windows Memory Diagnostic in the Search box. Then click the search result named Windows Memory Diagnostic to open this tool.
Step 2: In the new pop-up window, click Restart now and check for problems(recommended). Once clicked, your computer will restart immediately. Any errors detected will be displayed during the memory test, which may take a while.
Step 3: If errors are found, you can replace the faulty RAM module.
After replacing the faulty RAM module, restart your computer to see if the Xbox wireless adapter BSOD in Windows issue is resolved.
Bottom Line
This article ends here. That’s all about how to fix the Xbox wireless adapter BSOD in Windows. Do you solve the issue by applying the above seven fixing methods? Hope this article is helpful.
If you have any questions or suggestions while using MiniTool Partition Wizard, you can contact us via [email protected] to get a quick reply.
About The Author

Position: Columnist
Cecilia has been an editor at MiniTool for two years. She primarily focuses on disk and partition-related content, with particular expertise in disk cloning, partition recovery, and PDF document conversion. She is dedicated to providing users with clear and accurate solutions to help them efficiently resolve common computer problems.
User Comments :