HDMI (high-definition multimedia interface) is a connection standard that you can use to transfer digital audio and video from your Xbox One to your smart TV. It is convenient and useful. However, sometimes, you may meet the “Xbox One HDMI not working” problem while attempting to display your console on the TV.
Once the problem happens, you are likely to suffer from certain specified issues, such as a “no signal” message on the screen, a black screen, a glitchy screen, and so on.
The following are some possible factors that can lead to the issue:
- A damaged HDMI cord
- The dirty or damaged HDMI port
- Random glitches on the system firmware
- Hardware issues
- A problematic hard drive
- …
To fix the “Xbox One HDMI not working” issue, some solutions are introduced in the tutorial below.
Solution 1: Power Cycle Your Xbox One
In general, you can resolve random bugs and glitches by power cycling your console. Therefore, you can have a try when you meet the “HDMI not working Xbox One” issue.
Step 1: Press and hold the Power button on your console for about 10 seconds to turn off your console.
Step 2: Remove all the cables from the Xbox One console and wait for 1 minute. Then reconnect these cables.
Step 3: Press the Xbox button on your controller to turn your console on.
After that, check if the “Xbox One HDMI not working” issue is repaired. If not, you can try other solutions.
Solution 2: Check Your HDMI Connection
when the “Xbox One HDMI not working” issue appears, you are supposed to check the HDMI connection as well. To make sure the HDMI cable is connected correctly, you can remove the HDMI cord from the ports of your Xbox and TV and then connect them back.
If the connection is perfect but the error persists, you can go on with the next solution.
Solution 3: Connect with HDMI Out
There are two HDMI ports on your Xbox One console – HDMI In and HDMI Out. The former is used to connect a satellite TV box so that you can watch TV on your Xbox One console while the latter is used to connect a display device to the console.
Therefore, if you connect your Xbox One and TV through the HDMI In port by mistake, the “HDMI not working Xbox One” issue may happen. In this case, you can try to connect them with HDMI Out. After that, you may repair the issue easily. If not, continue with the next method.
Solution 4: Try Another HDMI Cord
A damaged HDMI cord can also lead to the “Xbox HDMI not working” issue. To troubleshoot the problem, you can try using another HDMI cord that can run normally. If the issue doesn’t disappear, it indicates that it has nothing to do with the cord and you need to try the next solution.
Solution 5: Troubleshoot AVR Connection
If you encounter the “Xbox One HDMI not working” issue when connecting an audio-video receiver (AVR) to your Xbox One console and your TV, you need to check the AVR connection. To do this, follow the steps below.
Step 1: Turn on your TV first. Once your TV is displaying a picture, turn on the AVR.
Step 2: After the AVR turns on, turn on your Xbox One console.
Step 3: Switch the input source of the AVR away from the console and then back using the Input button on your TV’s remote control.
Step 4: Restart the AVR. Then press the Xbox button on your Xbox One controller to open the guide.
Step 5: Go to Profile & system > Settings > General > TV & display options > Video fidelity & overscan. Then select HDMI or Auto-Detect.
After the operation, the “Xbox HDMI not working” issue might be fixed.
Solution 6: Turn on Your Console in Low-resolution Mode
The low-resolution mode of your Xbox One can help the system and games run more smoothly and fix certain issues. To resolve the “Xbox One HDMI not working” issue, you can try to turn on your console in low-resolution mode.
Step 1: Press and hold the Power button on your console for about 10 seconds to turn off your console.
Step 2: Press and hold the Power + Eject buttons for about 20 seconds until you hear a second beep.
After the process finishes, you can restart your console in low-resolution mode, and the issue might be removed as well.
Solution 7: Turn off 24Hz on Your Console
If the “Xbox HDMI not working” issue shows up after watching Blu-ray Disc, you can try to disable the 24Hz video option.
Step 1: Press the Xbox button on your Xbox One controller to open the guide.
Step 2: Go to Profile & system > Settings > General > TV & display options.
Step 3: In the Advanced section, select Video modes.
Step 4: On the next screen, uncheck Allow 24Hz to disable the 24Hz refresh rate.
Once you accomplish the process, you may get rid of the “HDMI not working Xbox One” issue successfully.
Solution 8: Update Your Xbox One
The last method you can try to solve the “Xbox One HDMI not working” issue is to update your Xbox One. There are two ways available for you to update your Xbox One.
Way 1: Update Xbox One via the Internet
If your console is connected to the Internet, you can simply update your Xbox One with the steps below.
Step 1: Press the Xbox button on your controller to open the guide.
Step 2: Navigate to Profile & system> Settings > System > Updates & downloads > Update console.
Step 3: If there are any updates available, you will see the message “It’s time to update” on the screen. Select Start update and then press the A button to start the process.
Way 2: Update Xbox One Offline
If your console is not connected to the Internet or you fail to update your Xbox One by the Way 1, you can perform an offline update. To do this, there are three parts you need to follow.
Part 1: Prepare a USB Flash Drive Formatted to NTFS
First of all, you need to prepare a USB flash drive with a minimum of 6 GB of space formatted as NTFS. If the USB flash drive is not compatible with your Xbox One, you cannot finish updating your Xbox One because your console won’t recognize the USB drive.
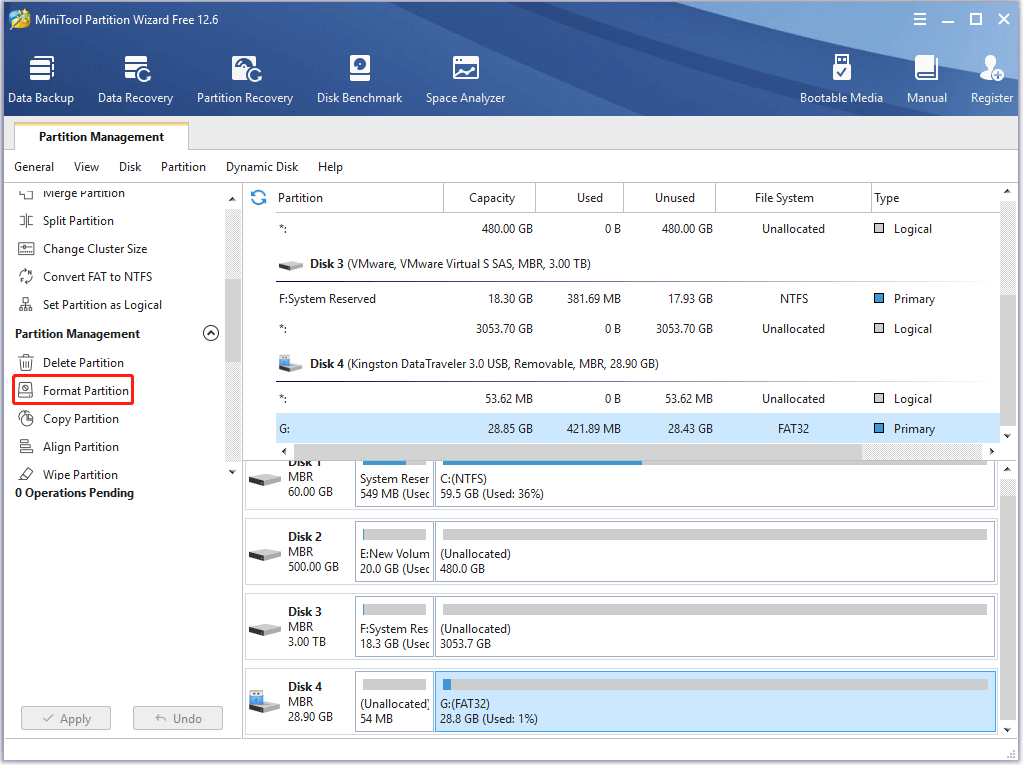
To format the USB drive, you can use File Explorer and Disk Management on your Windows PC. Here, the third-party software, MiniTool Partition Wizard, is also available. It is a comprehensive partition manager, with which you can do many operations to manage your disk and partitions better, including formatting partitions.
Step 1: Download and install MiniTool Partition Wizard on your Windows PC.
MiniTool Partition Wizard FreeClick to Download100%Clean & Safe
Step 2: Connect the USB flash drive to your Windows PC. Then launch MiniTool Partition Wizard to enter its main interface.
Note: this formatting process will erase all the data on the USB drive, so you’d better back up the important files before you start the operation.
Step 3: Click the partition on the USB flash drive and then select Format Partition from the left action pane.

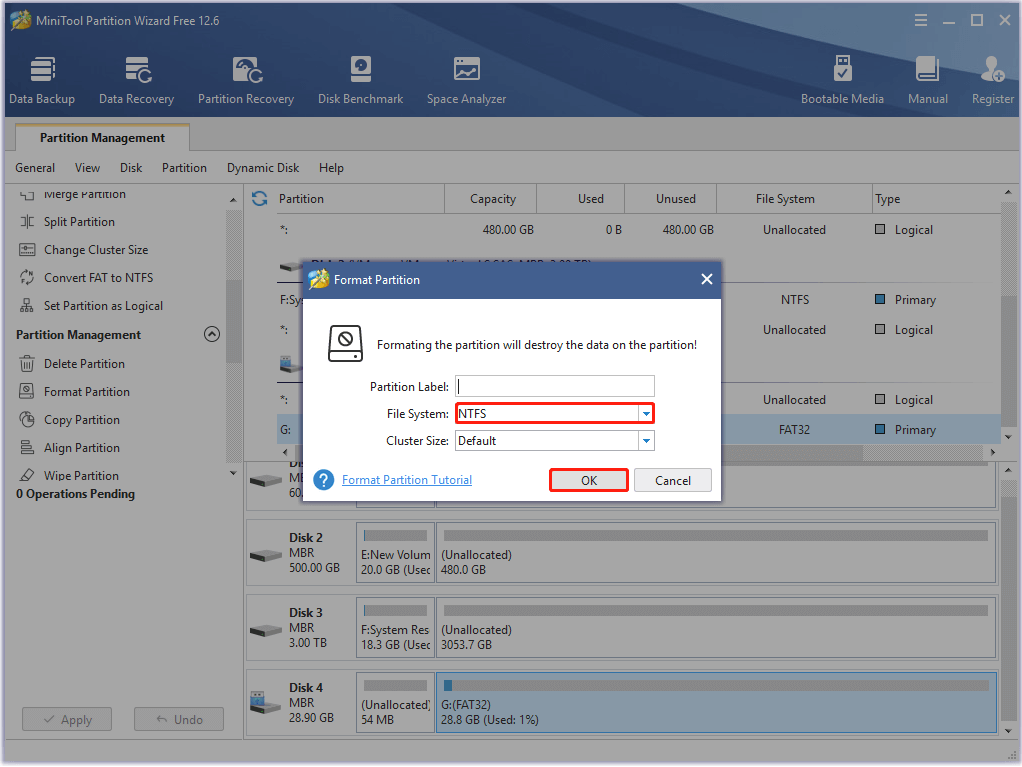
Step 4: In the pop-up window, select NTFS as its file system and then click OK.

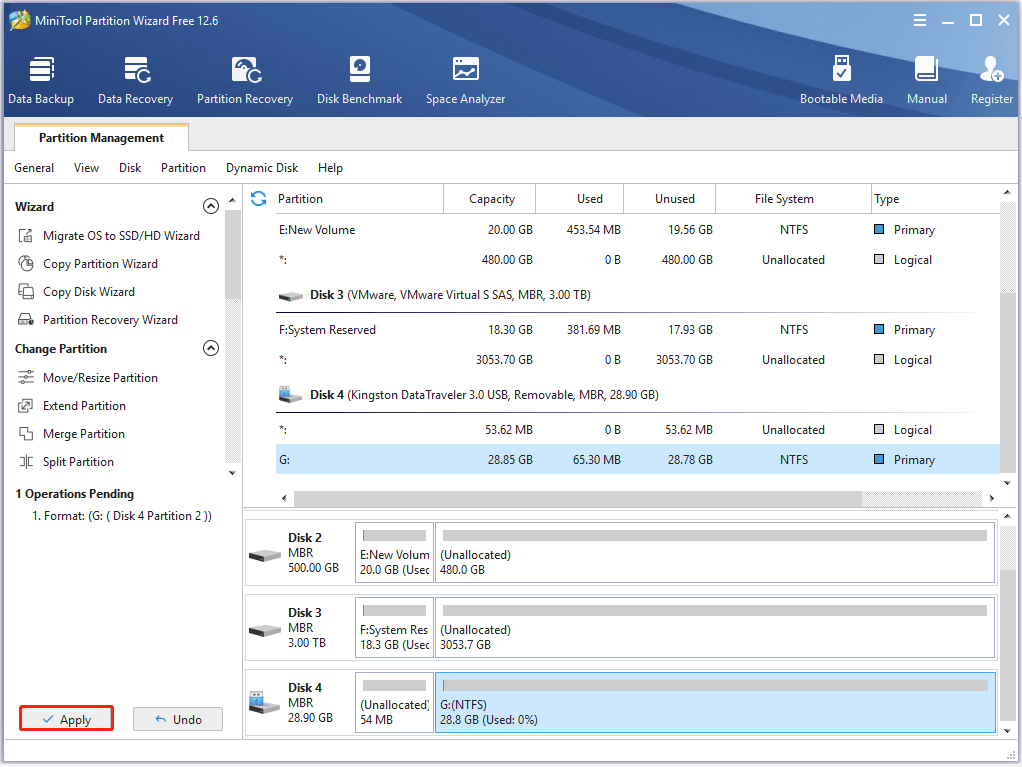
Step 5: Finally, don’t forget to click Apply.

Part 2: Download and Unzip the Update Files
After you get the formatted NTFS USB flash drive, you can start to download the update files.
Step 1: Download the Offline System Update file OSU1.
Step 2: After the file is downloaded to your computer. Right-click the file in File Explorer and select Extract all to unzip it.
Step 3: In the unzipped folder, find the $SystemUpdate file and copy it to your USB flash drive.
Note: The file should be copied to the root directory, or your Xbox One cannot recognize it.
Step 4: Remove the USB drive from your computer.
Part 3: Install the Update
Once the Offline System Update file is saved in the USB drive, you are supposed to begin updating your Xbox One console with the file.
Step 1: Turn off your console and then unplug the power cord to ensure that the console is completely powered off.
Step 2: After about 30 seconds, plug the power cord back to your console.
Step 3: Press and hold the Pair button and the Eject button. And then press the Xbox button on your console.
Step 4: Hold the Pair and Eject buttons for 10-15 seconds until you hear the second “power-up” tones.
Step 5: The console will power up and get into the Xbox Startup Troubleshoot screen directly.
Step 6: Connect the USB flash drive with the Offline System Update file to your Xbox One console.
Step 7: After that, you should press the D-pad and A buttons on your controller to select the Offline system update option on the screen. Then the update will start with the file on your USB drive.
Step 8: After the update is completed, the console will restart automatically.
Once you enter the Home screen on your console, it means that you have updated your Xbox One console successfully. Then you should go to check if the “Xbox One HDMI not working” issue is resolved.
Bottom Line
All these solutions mentioned in this post are available. When you meet the “Xbox One HDMI not working” issue, you can try them one by one to repair the issue. If you have any problems when you attempt to resolve the issue, you can leave a message in our comment part below.
Are you confused by anything when you use MiniTool Partition Wizard to format a USB flash drive? Well, if so, you can contact us via [email protected].

User Comments :