Windows already includes this new feature and users can install the Linux subsystem simply by enabling the “Windows Subsystem for Linux” feature. However, when downloading Linux distributions through Windows Subsystem for Linux or WSL, users encounter this error message “WslRegisterDistribution failed with error: 0x80370102”.
Windows Subsystem for Linux requires Hyper-V and virtualization to be enabled on our computer. Suppose you mistakenly disabled a feature on your computer after enabling Windows Subsystem for Linux. In this case, when starting WSL on your PC, you may encounter the error message:
WslRegisterDistribution failed with error: 0x80370102.
Error: 0x80370102 The virtual machine could not be started because a required feature is not installed.
Well, how to fix this error? The detailed steps to solve “WslRegisterDistribution failed with Error: 0x80370102” are shown below.
Fix 1: Enable Hyper-V
Hyper-V is a must-have feature or functionality for using the Windows Subsystem for Linux on Windows computers. If you don’t enable it, it will generate an error when installing a Linux distribution to access via Windows. So, enabling Hyper-V might solve the “WslRegisterDistribution failed with Error: 0x80370102” problem.
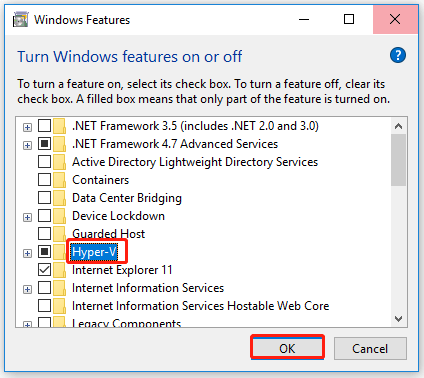
Step 1: Type turn Windows features on or off on the Search box and click the best-matched result.
Step 2: Check the Hyper-V option and click OK.

Then restart your computer and check if this issue gets fixed. If not, proceed with the next solution.
Fix 2: Enable Hardware Virtualization
In order to use the Hyper-V-powered Windows Subsystem for Linux on your PC, you need to turn on hardware virtualization. If you disabled WSL by mistake after installing it, you need to check and enable this feature from the BIOS. Until then, you can open Task Manager on your computer and switch to the Performance tab. Here you can find a tab called Virtualization.
Make sure the status shows Enabled. If not, you need to follow the steps below to enable hardware virtualization on your Windows PC.
Step 1: Restart your computer. Then press the specific hotkey to enter BIOS. The hotkeys may vary due to different brands. It usually is Esc, F2 or Del, etc.
Step 2: Once the BIOS window opens up, go to the Advanced tab, and press Enter to continue.
The Virtualization option may not be present in the Advanced tab on some computers. In this case, you'll find it in the Performance tab.
Step 3: Use the arrows on your keyboard to select Virtualization and enable it.
After that, save the changes and reboot your computer.
Fix 3: Enable Nested Virtualization & Change RAM Settings
Nested virtualization is a feature that allows you to run Hyper-V inside a Hyper-V virtual machine (VM). This is useful for running the Visual Studio Phone Emulator in a virtual machine, or for testing configurations that typically require multiple hosts. Turning on nested virtualization has reportedly been a solution for many online users. So, follow these steps:
Step 1: Shut down your virtual machine in Hyper-V Manager.
Step 2: Press Win + X on your keyboard and select Windows PowerShell (Admin) from the popup list.
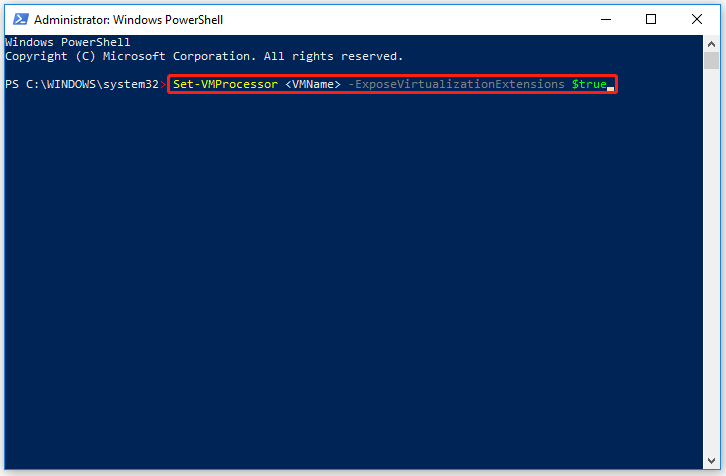
Step 3: In the PowerShell window, copy-paste this command and press Enter:
Set-VMProcessor <VMName> -ExposeVirtualizationExtensions $true

Step 4: Right-click your virtual machine in Hyper-V Manager and select Settings.
Step 5: Click Memory in the left pane, uncheck Enable Dynamic Memory, and set the RAM value to twice the current value, e.g.2048 > 4096.
Step 6: Click Apply and OK to save the changes.
Step 7: Start your virtual machine. Then right-click on your virtual machine and select Connect. This will run Hyper-V and your system will reboot.
Later, try running Ubuntu again to test to see if the “WslRegisterDistribution failed with Error: 0x80370102” issue is resolved.

![[Solved] Set Time Zone Automatically Greyed Out in Windows 11](https://images.minitool.com/partitionwizard.com/images/uploads/2022/10/set-time-zone-automatically-greyed-out-in-win-11-thumbnail.png)

User Comments :