Windows Subsystem for Linux (WSL) is part of the Windows operating system functionality that allows you to run Linux file systems, command-line tools, and GUI applications on Windows computers. However, many users reported that WSL does not work or does not start on Windows 11.
Well, how to fix WSL not working in Windows 11? Keep reading.
Fix 1: Enable Windows Subsystem for Linux
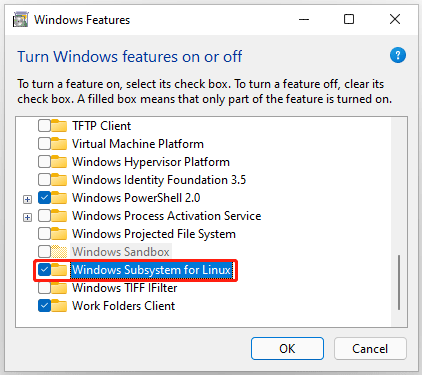
When users upgrade their systems to Windows 11, the WSL functionality will be disabled. So, just enable this feature and it will return to normal state.
Step 1: Press the Win + S key and type Turn Windows features on or off and press the Enter button.
Step 2: Scroll down the screen and select Windows Subsystem for Linux and enable it.
Step 3: Now click on the OK button.

Wait a few seconds for the system files to be installed, and you will be prompted to restart your computer.
Fix 2: Enable Virtual Machine
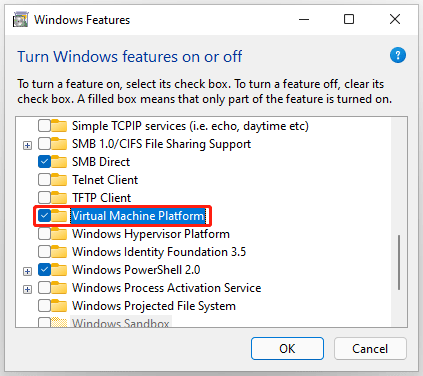
Running Windows Subsystem for Linux (WSL) requires installing a virtual machine, which allows you to run multiple operating systems simultaneously using the same hardware. If Windows Subsystem for Linux is enabled, the next thing you need to check is whether the virtual machine is enabled. Proceed as follows:
Step 1: Press the Win + S key and type turn Windows features on or off, then press the Enter button.
Step 2: Scroll down the screen and select Virtual Machine Platform and enable it.
Step 3: Now click on the OK button.

Wait a few seconds, you will be asked to restart your computer and check if the problem is resolved.
Fix 3: Enable Hyper-V
Hyper-V is a feature in the Windows operating system that allows the system to create virtual environments. If this feature is disabled on your system, you will not be able to start or create WSLs. Therefore, you need to enable Hyper-V.
In the Windows Features box, look for Hyper-V and enable it. After enabling the feature, restart your computer and check if it is fixed.
Fix 4: Launch Windows Subsystem for Linux from the Microsoft Store
Sometimes users are unable to start WSL because of a glitch in the installed application. Therefore, you must update WSL from the Microsoft Store, and you can start Windows Subsystem for Linux (WSL) from the Microsoft Store. This way you not only get the latest updates and new features, but also troubleshoot issues.
Step 1: Press the Windows key and type Microsoft Store, then press Enter.
Step 2: Select Library from the lower left corner of the Apps screen.
Step 3: Select the Linux distribution app, such as Ubuntu, and click Launch.
Now, start WSL and check if the WSL not working in Windows 11 problem persists.
Fix 5: Repair Linux Distribution Application
Your Linux distribution application may be dealing with broken bugs, or it may be outdated which prevents you from using it properly. If this is the case, then you have two options to fix the problem: fix it or uninstall it and reinstall it. To repair the application, follow the steps prescribed below:
Step 1: Press the Windows + I key to open Settings. Then select Apps.
Step 2: Click Apps & Features or Installed Apps on the right side of the screen.
Step 3: Scroll down the screen and select the Linux distribution application.
Step 4: Click on the three-dotted line and select Advanced options.
Step 5: Now click on the Repair button there. Then follow the on-screen instructions to complete the process.
Once done, you can launch WSL and check if the WSL not working in Windows 11 issue gets fixed.

![[Full Guide] How to Choose Hard Drive for Your Toshiba Laptop?](https://images.minitool.com/partitionwizard.com/images/uploads/2024/06/hard-drive-for-toshiba-laptop-thumbnail.png)

![[Full Guide] How to Recover exFAT Partition and Partition Data?](https://images.minitool.com/partitionwizard.com/images/uploads/2024/06/recover-exfat-partition-thumbnail.png)
User Comments :