Have you noticed the process wmpnetwk.exe in Windows Task Manager? Some users report the process is taking too much system resources and the system is running increasingly slow. To solve the problem, MiniTool Partition Wizard provides some solutions.
What Is Wmpnetwk.exe?
Wmpnetwk.exe is an internal system process responsible for connecting the built-in media player with an external network. Actually, the service is unnecessary unless you stream music or videos over the internet with Windows Media Player.
Generally, you might see wmpnetwk.exe in Windows 7 only, as it is disabled by default in Windows/8/8.1/10. It’s not a resource-demanding process, but some users complain that wmpnetwk.exe is taking about 70% resources in Task Manager.
It’s wired but common to see on Windows 7. Fortunately, here are some fixes to this problem.
Fix 1: Prevent Wmpnetwk.exe from Running Automatically
To fix wmpnetwk.exe high CPU usage, you can stop the service, change the startup type to Manual, restart your PC and then change the startup type to Automatic. In this way, wmpnetwk.exe will only run when you stream videos or music in Windows Media Player and it won’t start automatically.
Step 1: Press Win + R to invoke Run window. Then type services.msc in the box and press Enter to open Services.
Step 2: Scroll down to locate Window Media Player Network Sharing Service. Then right-click it and Stop.
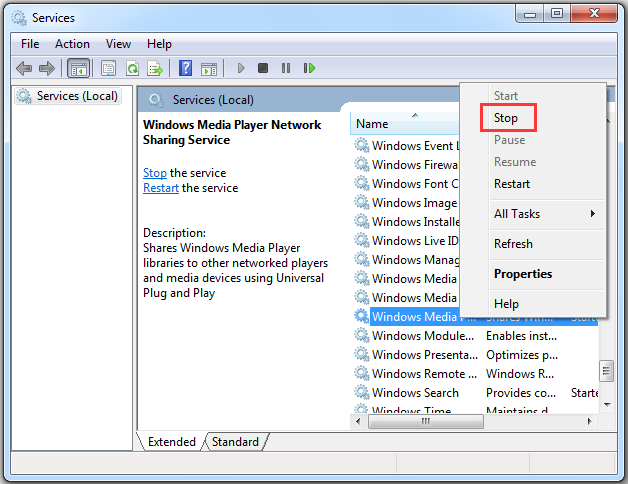
Step 3: Wait until the service is stopped. Then right-click it again and select Properties. In the pop-up window, choose Manual for Startup type under General tab. Click Apply to save the changes.
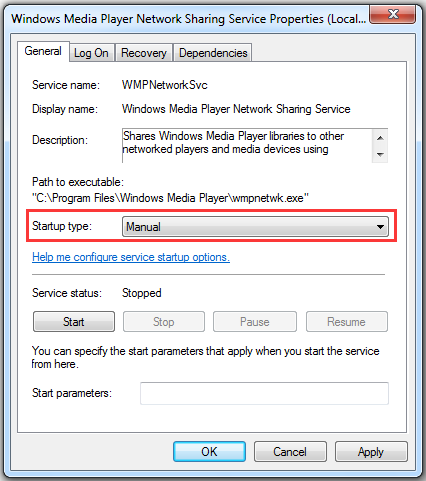
Step 4: Save your work and reboot your computer. Then open Windows Services again and go to Window Media Player Network Sharing Service Properties.
Step 5: Under General tab, select Automatic for Startup type and click Apply.
Then you can open Task Manager and check if it still takes much CPU resources.
Fix 2: Permanently Disable Wmpnetwk.exe service
If you don’t use Windows Media Player, you don’t need to keep wmpnetwk.exe service enabled. You can follow the steps below to disable the service.
Step 1: Open Services, right-click Window Media Player Network Sharing Service and select Stop.
Step 2: Open its Properties. Under General tab, select Disabled for Startup type. Then click Apply.
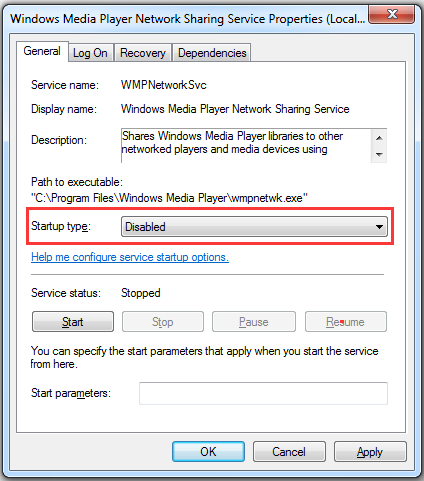
Now wmpnetwk.exe high CPU usage should be solved.
Fix 3: Uninstall Windows Media Player
Another simple way to fix wmpnetwk.exe high CPU usage is to uninstall Windows Media Player. The details are as follow.
Step 1: Click Start button to open Search utility. Type control in the search box and select Control Panel from the search results.
Step 2: Select View by: Category from the upper right corner and click Uninstall a program.
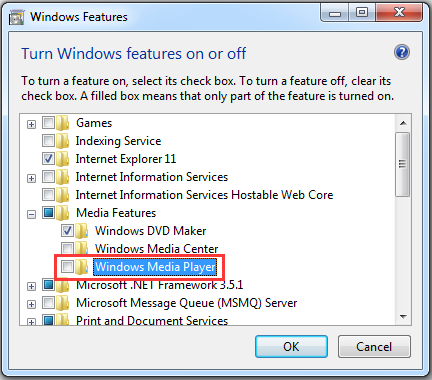
Step 3: In the following window, click Turn Windows features on or off.
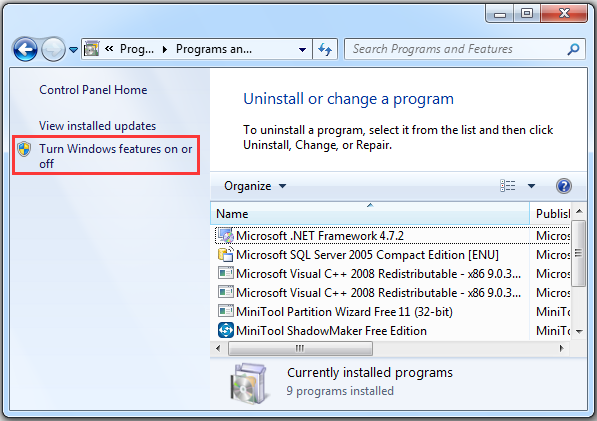
Step 4: Double-click Media Features to expand the category. Then uncheck Windows Media Player to uninstall it. In the pop-up window, click Yes to confirm the operation. Then click OK.
Fix 4: Scan for Malware
If you have tried all the fixes above but the wmpnetwk.exe high CPU usage still exists, you might need to scan for malware, as it could disguise itself as the wmpnetwk.exe process, which leads to high CPU usage eventually.
After the scanning, you can check whether the problem has been removed.



User Comments :