Recently, many users report that they encounter Windows Update Cleanup stuck issue while running the Disk Cleanup tool in Windows OS. How to fix the issue that Disk Cleanup stuck on Windows Update cleanup? This post from MiniTool offers you some effective solutions.
What is Windows Update Cleanup
After you install the latest updates via Windows Update, Windows will still keep the old update files on your computer, which allows you to uninstall updates if necessary. However, sometimes those files may take up a great amount of disk space, which is a waste of space if you don’t plan to uninstall updates.
So, to get more disk space, you need to clear up the old copies of all installed updates manually if they are no longer needed. Well, how to find out and remove the old Windows updates files? Luckily, Windows built-in tool Disk Cleanup provides you with an option called Windows Update Cleanup, which can help you clean up this kind of files in a simple way.
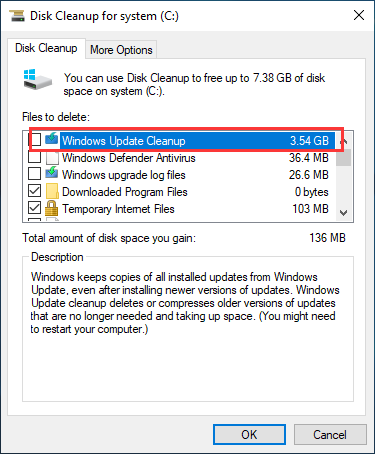
Windows Update Cleanup feature is designed to help you to release some disk space by removing the old pieces of Windows updates. As long as your computer is working properly after installing the newest updates and you don’t plan on uninstalling any updates, you can launch the Disk Cleanup tool to remove the old files of Windows updates.
However, when utilizing Disk Cleanup’s Windows Update Cleanup feature to clear old pieces of Windows updates, many users find that Disk Cleanup is stuck on Windows Update Cleanup.
If you are one of them who encounter Windows Update Cleanup stuck issue, you can try the following solutions to get rid of the Disk Cleanup stuck on Windows Update Cleanup issue.
Solution 1. Delete Contents of SoftwareDistribution Folder
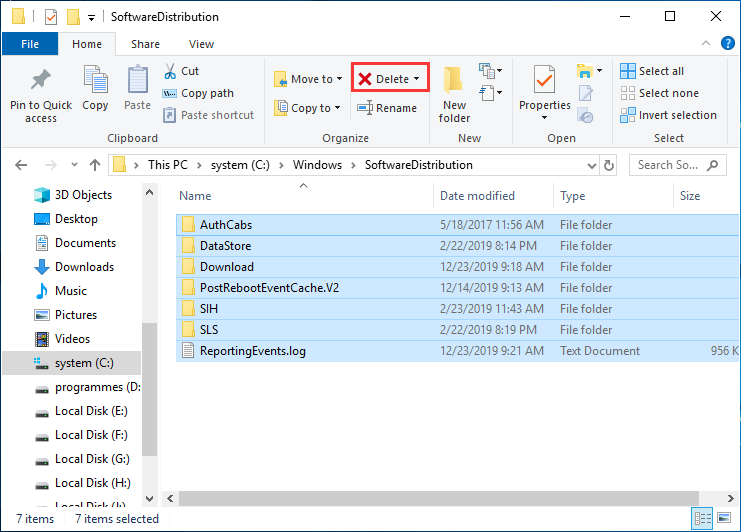
Usually, the Windows update files are stored in the SoftwareDistribution folder before they are installed on the operating system. If the files in this folder get corrupted, you may encounter the Windows Update Cleanup stuck when running the Disk Cleanup.
In this case, you may delete the contents in the SoftwareDistribution folder manually, which can remove old files of Windows updates. Here are detailed steps.
Step 1. Open File Explorer. Copy and paste the following path to the address bar.
C:WindowsSoftwareDistribution
Step 2. After opening the SoftwareDistribution folder, select all the sub-folders in the folder and choose Delete to delete all.
Solution 2. Delete the Contents of Windows.old Folder Manually
The Windows.old folder stores the old version of Windows after an upgrade, which is helpful when you want to revert to the older version of Windows. However, it can also lead to the Disk Cleanup stuck on Windows Update Cleanup issue. So you may need to delete all the sub-folders in the Windows.old folder.
You may follow the steps below to perform the deletion.
Step 1. Open File Explorer. Then copy and paste the following path to the address bar to open the Windows.old folder.
C:Windows.old
Step 2. Delete all the files inside the Windows.old folder.
You can also run commands to remove files in the Windows.old folder manually. Type cmd in the Windows search box and right click the best match Command Prompt to choose Run as administrator. Then type the following commands one by one and hit Enter after each.
- takeown /F C:Windows.old* /R /A
- cacls C:Windows.old*.* /T /grant administrators:F
- rmdir /S /Q C:Windows.old*.*
Solution 3. Run Windows Update Troubleshooter
Windows Update Troubleshooter can scan and fix any problem that is associated with Windows Update. So if you come across purging Windows Update Cleanup stuck, you can also run Windows Update Troubleshooter to resolve the problem.
You can follow the steps below to run Windows Update Troubleshooter.
Step 1. Right click Windows Start menu and choose Settings from the menu.
Step 2. On the Setting window, select Update and Security.
Step 3. Under the Troubleshoot tab, locate the Windows Update and click Run the troubleshooter.
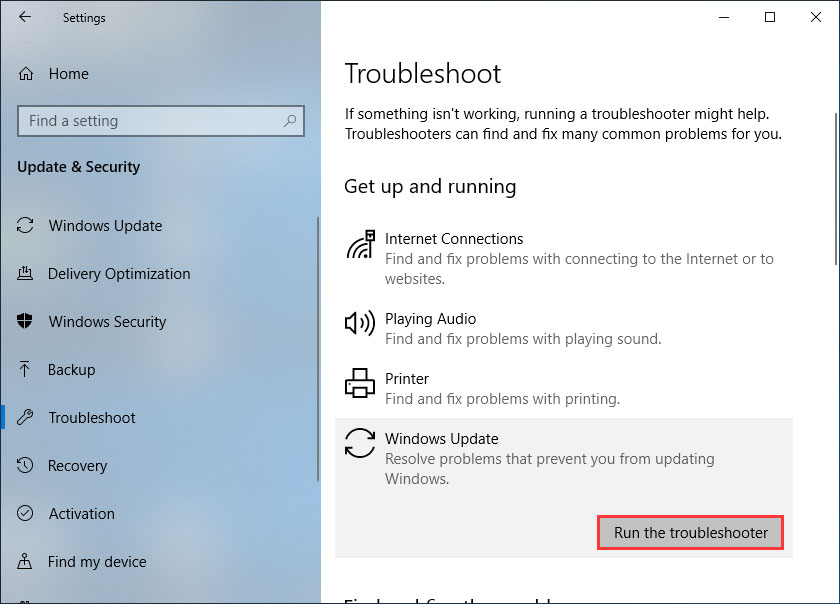
After Windows Update Troubleshooter scans and fixes problems it detected, you can check if the Disk Cleanup stuck on Windows Update Cleanup issue gets fixed.
Solution 4. Run System File Checker
If there are corrupted or missing system files on your computer, you could also get the Windows Update Cleanup stuck error. In this case, you’d better run System File Checker to scan and fix any corrupted system file.
Here are detailed steps to run System File Checker:
Step 1. Type cmd in the Windows search box. Right-click the best match Command Prompt and choose Run as administrator.
Step 2. Type sfc/ scannow in the Command Prompt and hit Enter.
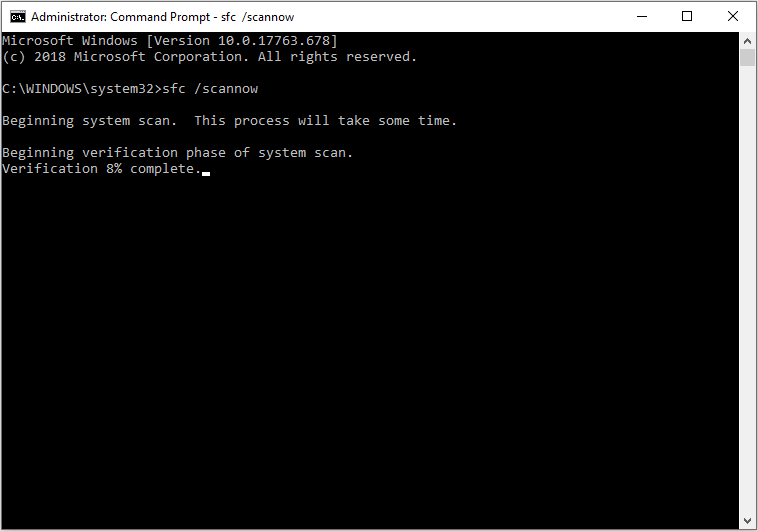
Step 3. Once there are corrupted or missing system files detected by System File Checker, it will fix them automatically. Just wait patiently when it is scanning.
Solution 5. Run DISM
System File Checker may not always work. If you still encounter Windows Update Cleanup stuck after running System File Checker, you can run DISM (Deployment Image Servicing and Management) utility to repair Windows system files.
If you don’t know how to run DISM, you can follow the steps below:
Step 1. Type cmd in the Windows search bar, right-click the best match Command Prompt and choose Run as administrator to open it.
Step 2. Then type the following commands one by one and hit Enter after each.
- DISM /Online /Cleanup-Image /ScanHealth
- DISM /Online /Cleanup-Image /CheckHealth
- DISM /Online /Cleanup-Image /RestoreHealth
Then DISM will fix the detected corrupted file. After it is finished, check if Windows Update Cleanup stuck error gets fixed.
Solution 6. Run Disk Cleanup in Clean Boot
The Windows Update Cleanup stuck error can be triggered by software conflicts. So it could be caused by the third-party software that you have installed on your computer. But you don’t know which one causes the error. In this case, you’d better perform a clean boot and then run the Disk Cleanup utility. A clean boot will start your system with the minimal amount of services it required, which removes the possibility of third-party software interference.
Step 1. Press Windows Key and R together on the keyboard to bring up the Run dialog box. In the Run box, type msconfig and hit Enter.
Step 2. On the System Configuration window, switch to the Services Tab. Then check the box next to the Hide All Microsoft Services and click Disable All button.
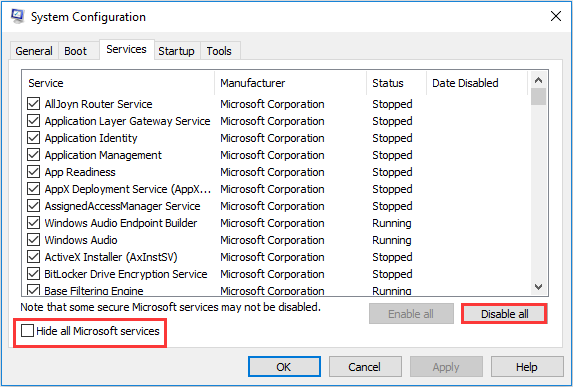
Step 3. Then switch to the Startup tab. Click Open Task Manager.
Step 4. Select each startup item and click Disable. After disabling all, close Task Manager.
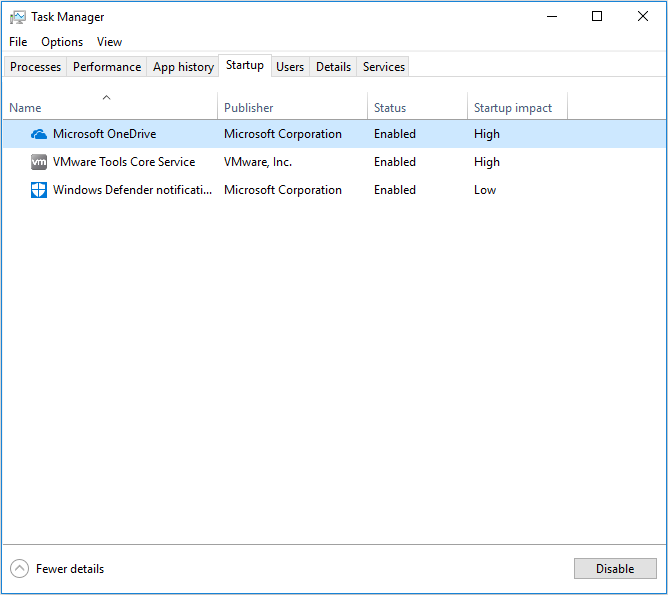
Step 5. Then, click Apply and OK in the Startup tab of System Configuration to save the change. Restart your computer in a clean boot environment.
Step 6. After starting your PC in a clean boot environment, you can run Disk Cleanup again to check if the Disk Cleanup stuck on Windows Update Cleanup issue gets resolved.
Solution 7. Run Third-party Space Analyzer
If the above fixes cannot help you resolve the Windows Update Cleanup stuck issue, you can run the Space Analyzer in MiniTool Partition Wizard Free Edition.
MiniTool Partition Wizard is an all-in-one partition manager. It can help you move/resize partition, extend partition, format partition, convert MBR to GPT without data loss, migrate OS to SSD/HD and so on.
Besides, its Space Analyzer feature can help you analyze disk space to find large files on your hard drive, remove system error memory dump files and delete other useless files on the drive to release disk space.
If you are unable to use Disk Cleanup to delete unnecessary files on the computer including temporary files, old Windows update files and other types of files, you can download MiniTool Partition Wizard Free Edition to help you find and delete these files.
You can click the following button to download one now.
MiniTool Partition Wizard FreeClick to Download100%Clean & Safe
After downloading and installing the free partition manager, you can launch the program and follow the steps below to run Space Analyzer.
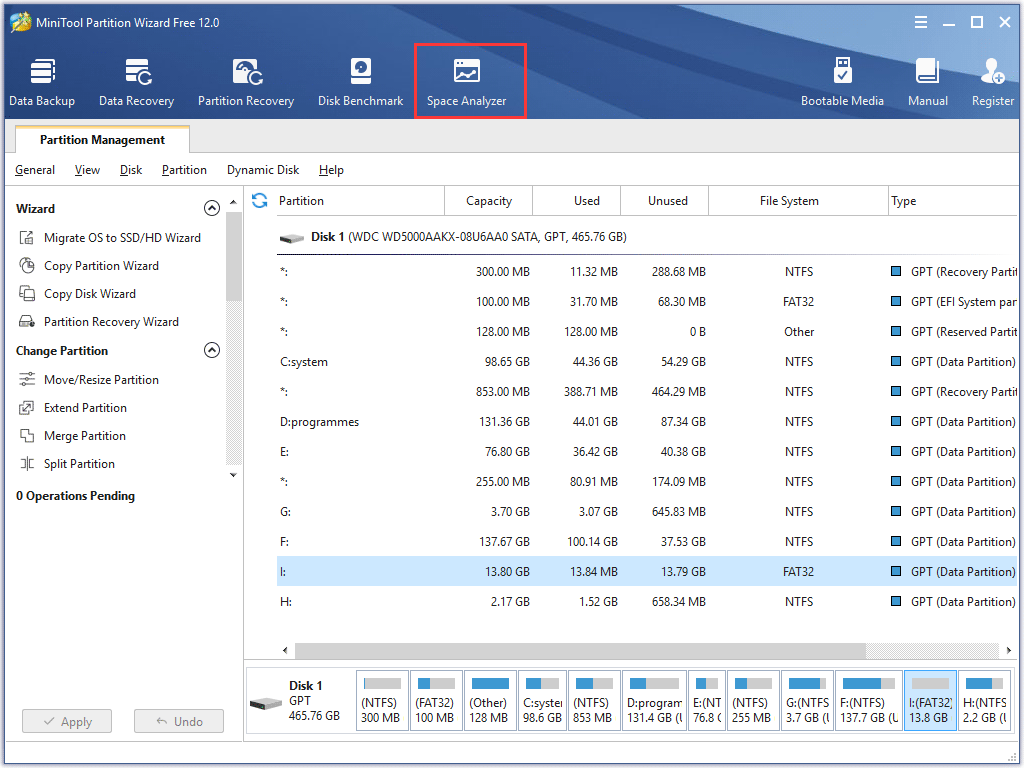
Step 1. On the main interface of MiniTool Partition Wizard Free Edition, click Space Analyzer.
Step 2. Click the drop-down menu to select a partition to scan. Then click Scan button.
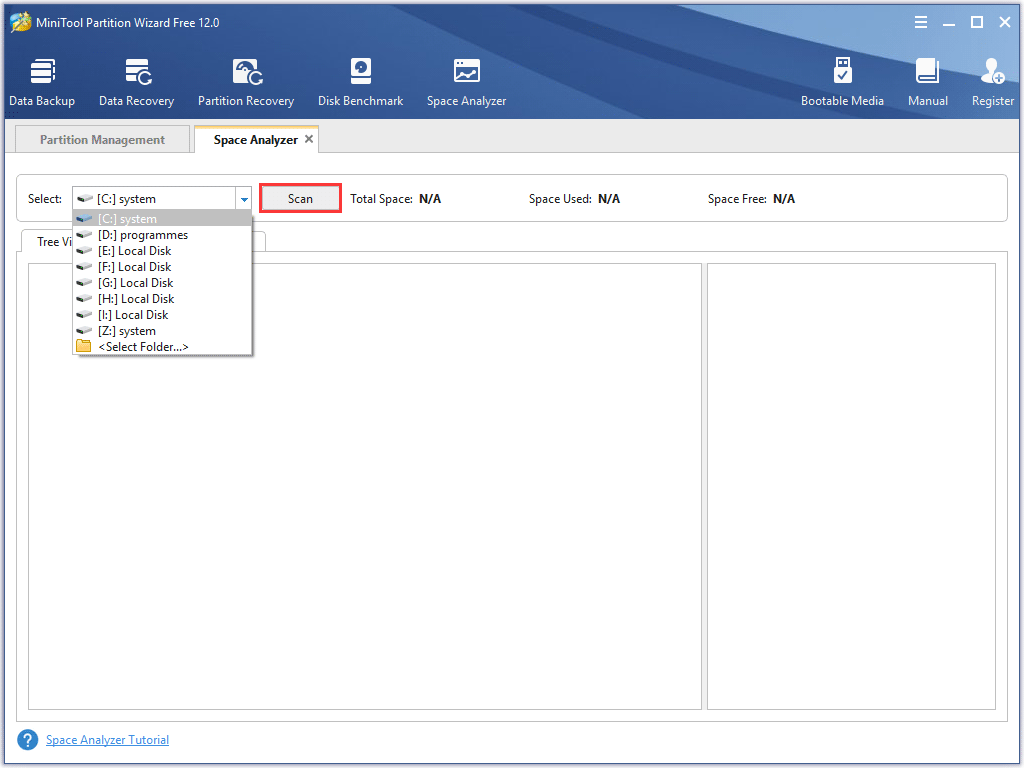
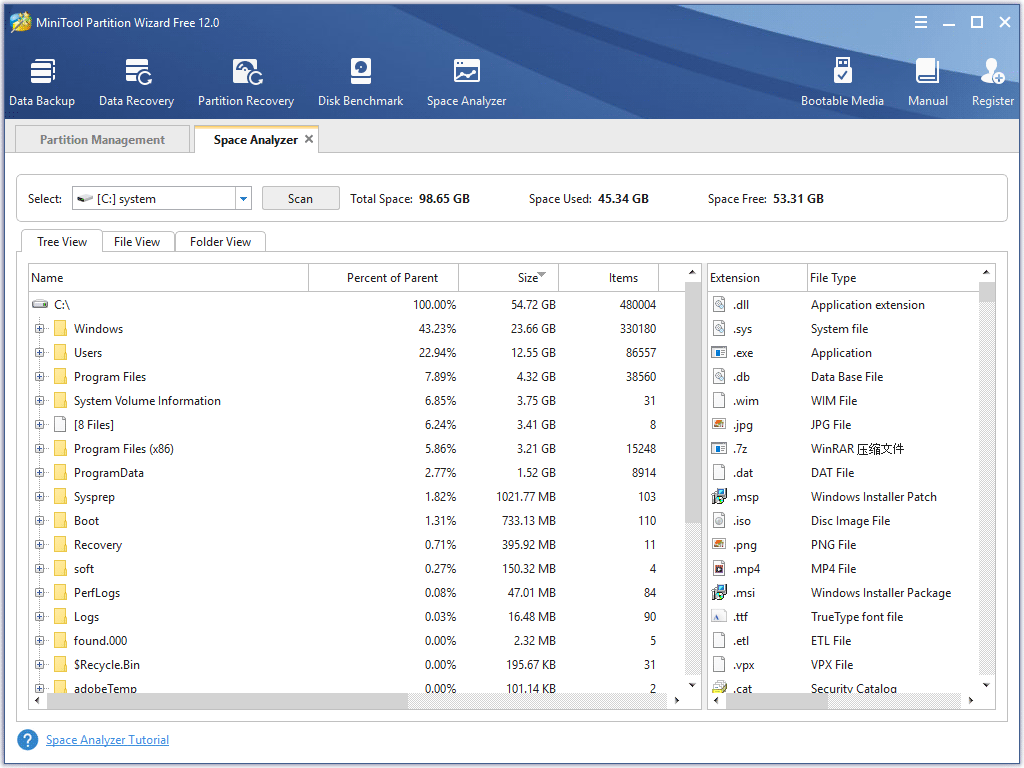
Step 3. After analyzing disk space, you will get the following screenshot. It will show you which file or folder is taking up your disk space most. You can also double click a file extension from the right pane to view the specific type of files only.
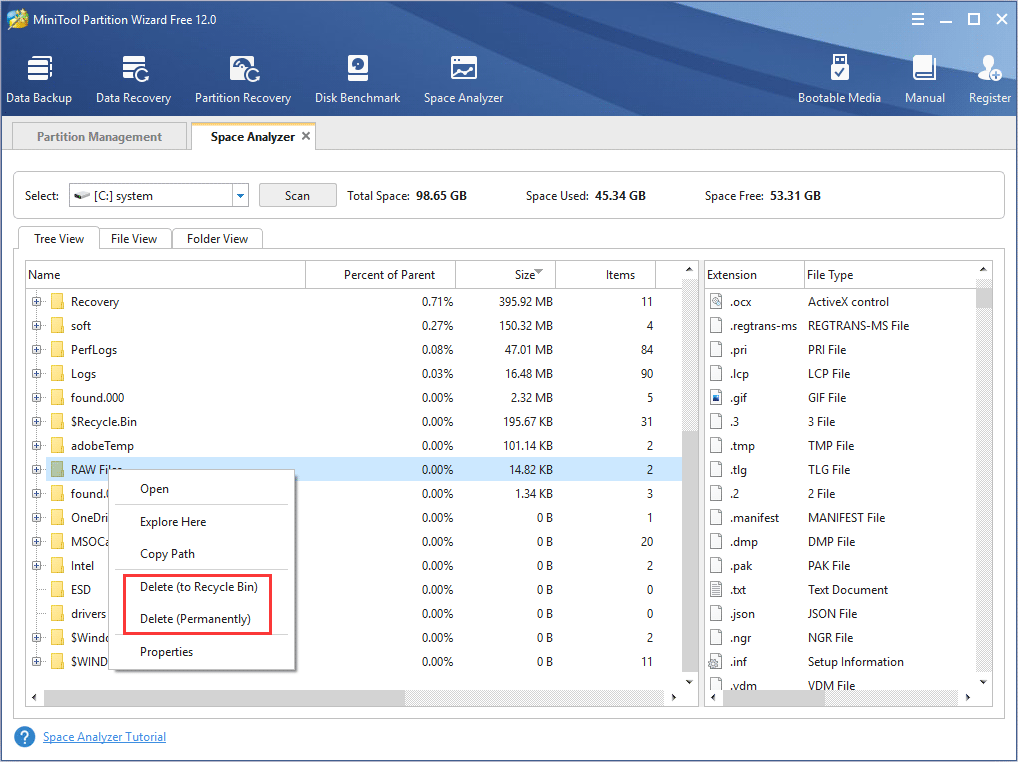
Step 4. To delete a file or a folder, you can right-click it and select delete to recycle bin or delete permanently. For example, you need to delete the sub-folders in the SoftwareDistribution folder. Right click the sub-folder and choose a way to delete it.
Apart from analyzing C drive, you can also utilize Space Analyzer to analyze other drives that need to release free space. Click the following button to download the free Space Analyzer now.
MiniTool Partition Wizard FreeClick to Download100%Clean & Safe
Bottom Line
After reading this post, have you fixed Windows Update Cleanup stuck issue? Which method works for you? If you have better solutions, please don’t hesitate to share it with us.
If you have any question about how to use the Space Analyzer in MiniTool Partition Wizard Free Edition, you can leave a message in the following comment zone and we will reply as soon as possible. If you need any help when using MiniTool software, you may contact us via [email protected].

User Comments :