Some users reported that they receive an error message saying “Windows Push Notifications User Service has stopped working” on their Windows 10 computer. How to get rid of the issue? In this article, MiniTool Partition Wizard explores some possible solutions and displays them with the detailed steps.
Windows Push Notification User Service (WpnUserService) is a platform that provides support for local or push notifications in Windows 10. Sometimes, this notification service might stop working and you are unable to receive notification on your computer.
Commonly, you might receive a window with error message that Windows Push Notification User Service has stopped working. And in some other cases, the error message could be “The Windows Push Notifications User Service terminated unexpectedly”.
If Windows Push Notification User Service stopped working on your computer, you can try fixing it by yourself with the following solutions.
Solution 1: Start or Restart the Service Manually
At first, you can go to restart the service manually if the WpnUserService stopped working. Here’s how to do that:
Step 1: Press Windows + R, input services.msc and click OK to open Services app.
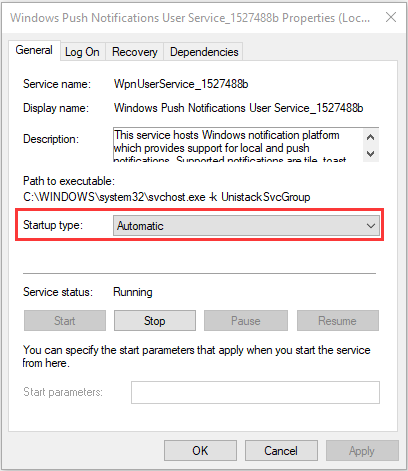
Step 2: Locate Windows Push Notifications User Service and double-click it to open its Properties.
Step 3: Under the General tab, choose Automatic from the drop-down list of Startup type. If the service is not running, click Start button to enable it; if it’s running, click Stop button and then Start to restart it. Then, click Apply and OK to save changes.
Solution 2: Perform SFC Scan
Besides, you are recommended to use the System File Checker utility to scan for memory leaks. This tool will scan your system files for errors and replace the problematic ones with a cached copy. You just need to follow the steps below:
Step 1: Invoke Run window.
Step 2: Input cmd in the empty box and press Ctrl + Shift + Enter to launch Command Prompt as administrator.
Step 3: Input the command sfc /scannow and press Enter key.
After the verification process is 100% completed, restart your computer to check if the Windows Push Notification User Service not working issue is fixed or not. If it persists, just move on to the next solution.
Solution 3: Update Windows
According to the reports, some users have resolved the problem effectively simply by updating their Windows to the latest version. So, you can also feel free to have a try.
Step 1: Press Windows + I to access Windows Settings directly.
Step 2: Navigate to Update & Security > Windows Update.
Step 3: In the right pane, click Check for updates button.
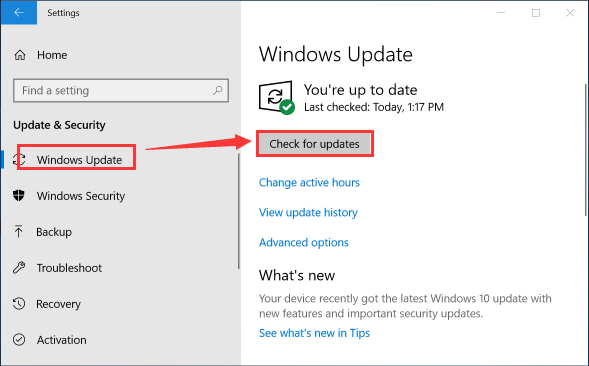
If there are any available Windows updates, download and install all of them according to the onscreen instructions. Once it’s done, check if the issue is resolved.
Solution 4: Reset Corrupted Notifications Database
Notifications database is a file saved on your computer, and it might get corrupted after a Windows 10 update which could cause the service to crash and trigger the issue under our discussion. If you receive the problem after performing Windows update, perhaps you can try resetting the corrupted notifications database in safe mode.
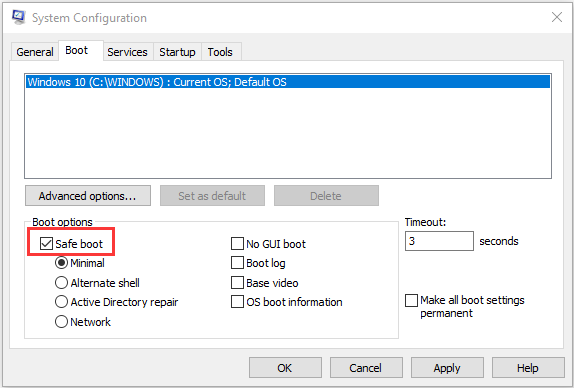
Step 1: Input msconfig in the Run window and click OK to open System Configuration.
Step 2: Switch to the Boot tab, check Safe boot in the Boot options section, and click OK button. Restart your computer to boot into Safe Mode.
Step 3: Press Windows + E to open File Explorer. Check Hidden items under the View tab and navigate to the path of C:UsersYOURUSERNAMEAppDataLocalMicrosoftWindows.
Step 4: Now, locate the Notifications folder and rename it with another name like Notifications.old.
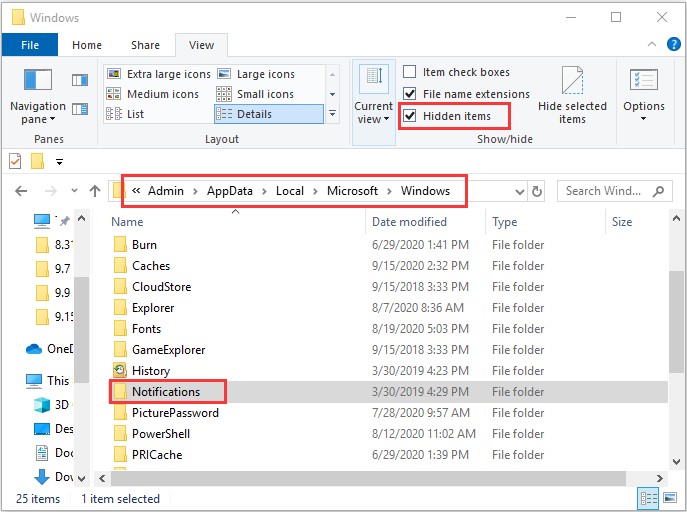
After that, restart your computer and your Windows will recreate a new Notifications folder automatically, which could resolve the Windows Push Notification User Service has stopped working issue effectively.

User Comments :