Windows 11 is the latest version of Windows released by Microsoft. It has a new user interface, updated design, and many other new features. In particular, Windows 11 introduces Windows Hello, a new, more secure way to log into Windows devices.
However, some users have complained that Windows Hello keeps asking them to set up a PIN on their Windows 11 . For example, see this setup Windows Hello message in the Account Protection section of Windows Security; get a prompt to use Windows Hello when opening certain programs or applications such as Outlook, etc.
This issue is very annoying for most users because they have set up PIN login before upgrading to Windows 11 version 21H2. If you also have this problem, some of the solutions presented in this post may help.
Solution 1: Turn off Settings Windows Hello Messages
Here is a very simple fix that might help you. All you need to do is turn off the message that prompts you to set up a Windows Hello PIN in Windows Security. Here are the steps:
Step 1: Click Start > Settings > Private & security > Windows Security.
Step 2: On the Account Protection option, click the Dismiss option.
You can also visit the Windows Hello section under Account Protection and click the Dismiss option there.
Solution 2: Sign in with a Local Account
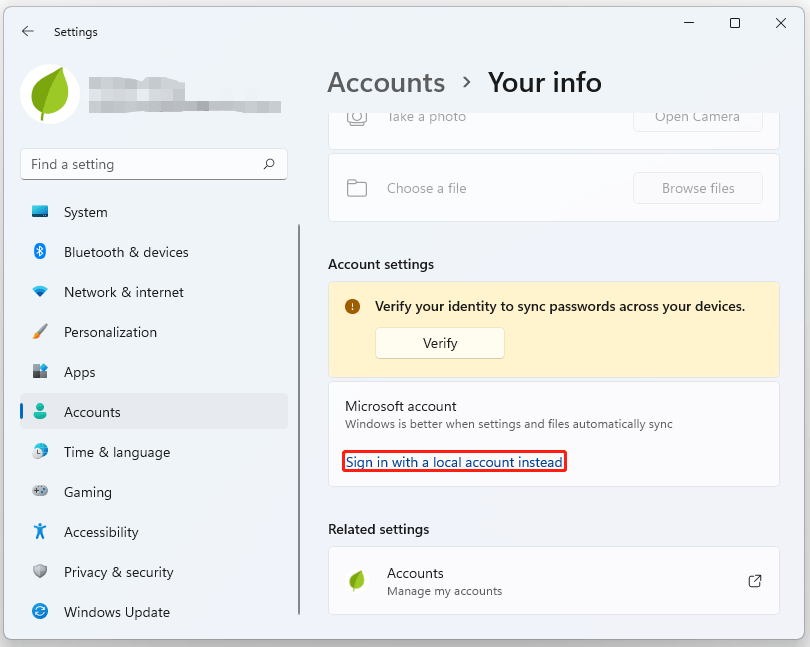
After some investigation, it appears that users experiencing this issue are logged into a Microsoft account instead of their local account. So, trying to switch to a local account maybe fix the problem.
Step 1: Open the Settings app and go to Accounts > Your info.
Step 2: In the new window, click Sign in with a local account instead under Account settings.

Step 3: Enter your password and details in the newly opened window and create your local account.
Step 4: Click Sign out and finish.
Solution 3: Clear the Ngc Folder
The Ngc folder is used to store all Pin-related information on Windows 11. Therefore, any corrupt file in the Ngc folder can cause a lot of problems and failures. This is probably why Windows Hello keeps asking to set up PIN. To delete the contents of the Ngc folder, follow these steps:
Step 1: Press the Win + E keys to open the File Explorer.
Step 2: Type the command listed below in the address bar and press Enter:
C:\Windows\ServiceProfiles\LocalService\AppData\Local\Microsoft
Step 3: Since permissions to open the Ngc folder are required, you need to right-click on the Ngc folder and select Properties from the menu that appears.
Step 4: Click on the Security tab, and then click on Advanced on the bottom.
Step 5: Click Change next to the Owner section.
Step 6: Type the user name of your account that has admin privileges in the Enter the object name to select enter field.
Step 7: Click on Check Names, choose your account name and press OK.
Step 8: Under Owners, check the box next to Replace owner on subcontainers and objects.
Step 9: This process will allow you to enter the Ngc folder. After opening the folder, just delete all files and folders.
Solution 4: Reset Settings App
If this is an error caused by corrupt data or files present in Windows 11’s Settings app, you’ll need to reset the Settings app. It can be done using the Settings application itself, an elevated Windows PowerShell, or the Command Prompt.
After completing resetting the Settings app, the setup app will reset the app data, hopefully, the “Windows Hello keeps asking to set up PIN” issue is solved.

![[Solved] Set Time Zone Automatically Greyed Out in Windows 11](https://images.minitool.com/partitionwizard.com/images/uploads/2022/10/set-time-zone-automatically-greyed-out-in-win-11-thumbnail.png)
![How to Fix MapleStory 2 Error Code 10053? [Here Are 4 Methods]](https://images.minitool.com/partitionwizard.com/images/uploads/2022/10/maplestory-2-10053-thumbnail.png)

User Comments :