Trying to install Windows but receive an error message saying that Windows was unable to format a partition on disk 0? To go through the installation process smoothly, you can try on the 3 formatting solutions explained in this article as well as more suggestions that have been proved useful by some users.
We Receive Error 0x80070057 When Trying to Reinstall Windows 7
Sometimes we need to reinstall Windows 7. Then we should first of all prepare an installation media, back up important data on the local drive, and then reinstall Windows 7. If the process is successful then naturally we have solved the problem smoothly. Unfortunately, there are times we get stuck during the process. The following error message which reads: “Windows could not format a partition on disk 0. The error occurred while preparing the partition selected for installation. Error code: 0x80070057” may appear…
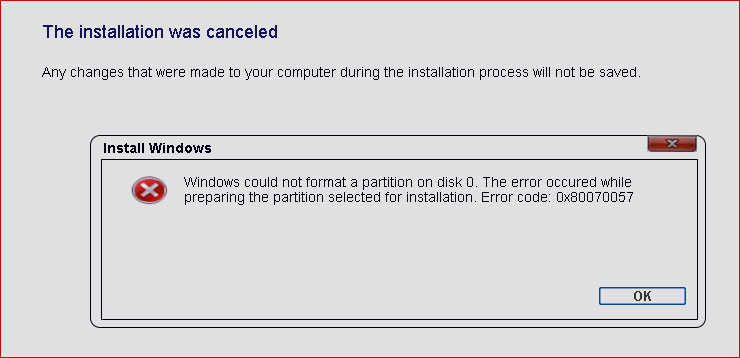
Another possible error code that can occur is:”
Failed to format the selected partition. Error: 0x80070057“.
In fact, this is a very common error that can occur to anyone of us. After searching the internet, we find this problem is all over the internet. Below is a typical example:
“Hey everybody, I am trying to do a clean install of windows 7 onto my laptop, and I keep getting the error, “windows could not format a partition on disk 0. The error occurred while preparing the partition selected for installation. Error code: 0x80070057″. I have reformatted the hard drive and tried clicking next from there. This is the 64-bit version of windows 7, any help would be grateful.”— from sevenforums
Have you ever encountered this problem? Are you troubled by this error code now? What caused this error? And what should we do to address this problem? Let’s see the details.
Solutions to “Windows Could Not Format a Partition on Disk 0”
Solution 1: Format Partition under Startup Mode
Since Windows could not format a partition on disk 0 and sends out error code 0x80070057, we have to find other reliable ways to do this job. For example, we can turn to MiniTool Partition Wizard Bootable Edition for help. The reason why we list it here as top recommendation is that this tool is rather user-friendly to use for Windows 7/8/10 users. Please note that this is a paid feature in Partition Wizard, and you need to buy a license if you do not have one to activate this feature.
Preparatory work:
- Build Boot CD/DVD Discs and Boot Flash Drive with Bootable Media Builder.
- Set computer to boot from the bootable media in BIOS.
- Boot computer to enter MiniTool Partition Wizard.
Step 1. On the main interface of MiniTool Partition Wizard, click the partition that you are installing Windows 7 to and select “Format Partition“.
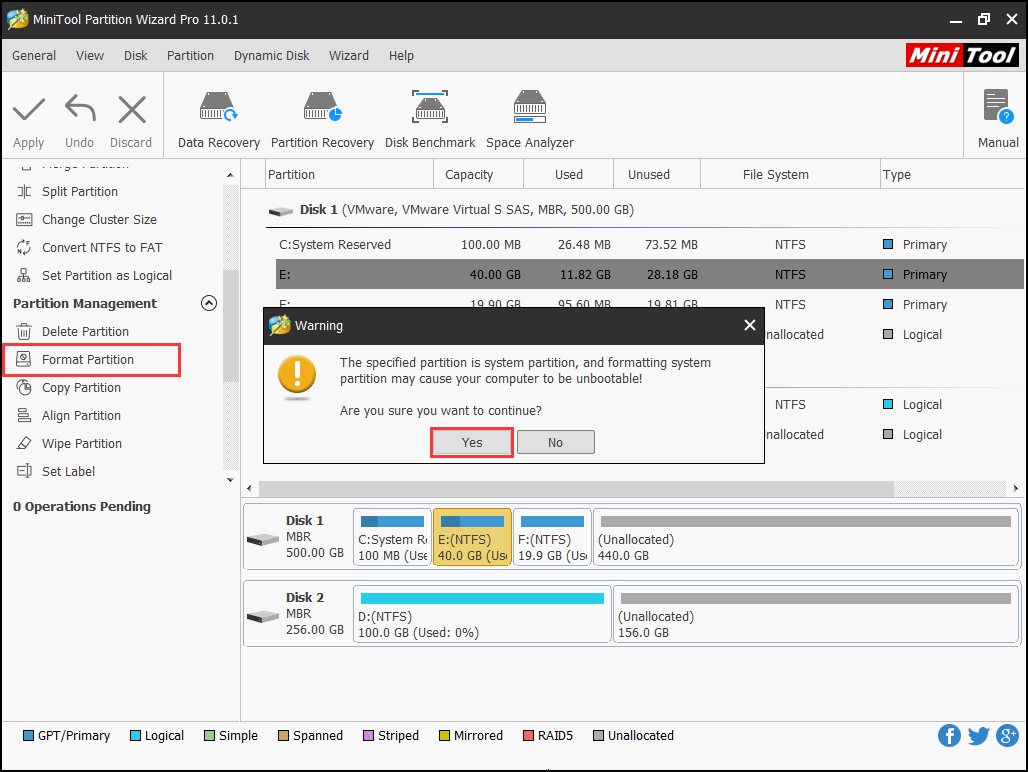
Step 2. Confirm that you want to continue and hit “Apply” on the toolbar.
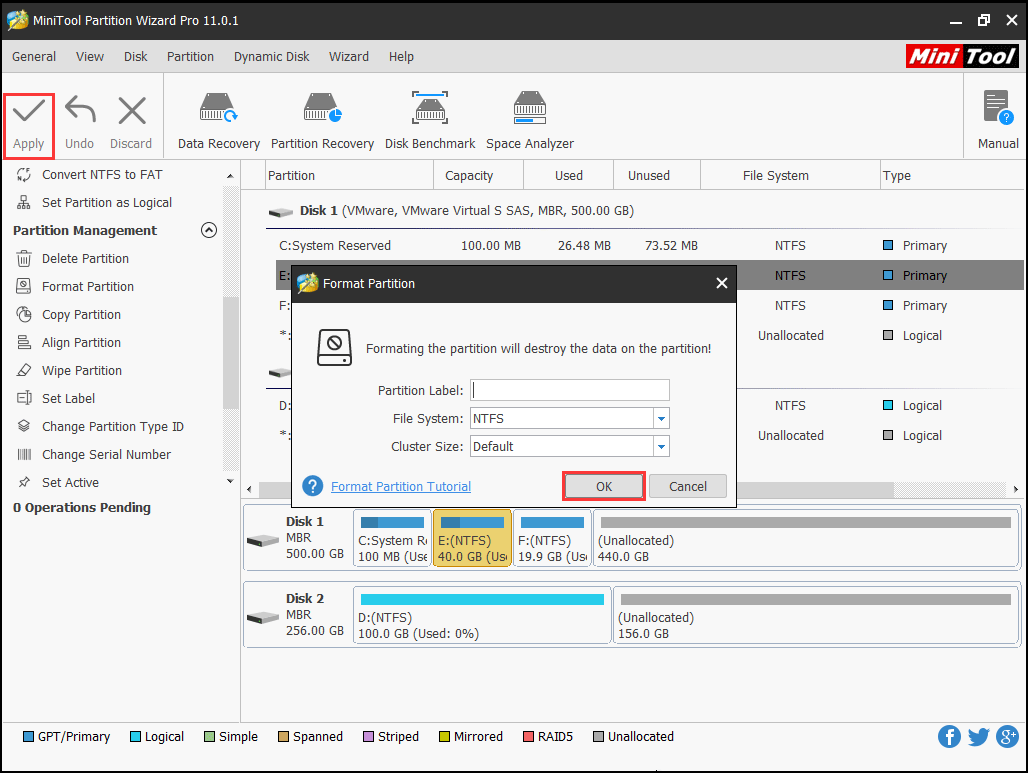
Now you can exit MiniTool Partition Wizard, disconnect the bootable media of Partition Wizard, and then try to reinstall Windows 7 once again.
Solution 2: Format Partition in Command Prompt Window
Windows command prompt is a rather reliable method when you need to format a partition. But to format system partition, you will need the help of Windows installation disk. Here is how you can do this:
Step 1. Boot the computer with windows 7 installation DVD, then instead of selecting “Install Windows 7“, select “Repair Your Computer” and then select “Use Recovery Tools…“;
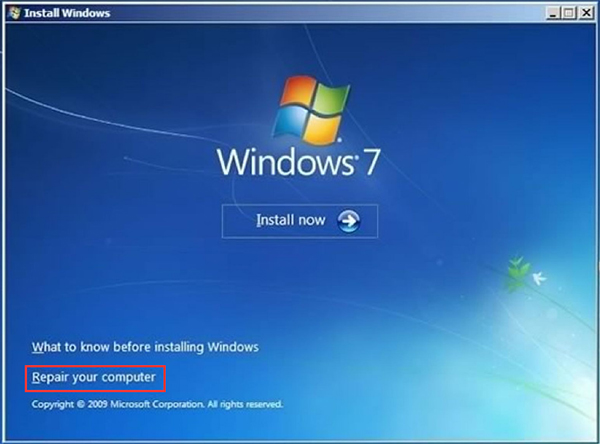
Step 2. In the next window select “Command Prompt“;
Step 3. Type “diskpart“. This may take some time for it to pop up and it will ask you for Administrative privileges. Go ahead and click “Yes“;
Step 4. Type “list disk“. It will show a list of disks;
Step 5. Type “select disk [n]” to select your disk out of the list above. For example: “select disk 3“;
Step 6. Type “clean” to clean the drive;
Step 7. Type “create partition primary“; Step 8. Type “select partition 1“;
Step 9. Type “active” to activate the partition on the disk;
Step 10. Type “format fs=ntfs” to do a full format into NTFS. Depending on the size of the disk, this will take some time to complete.
Step 11. Type “exit” when the format is finished. We need to type “exit” for two times. One to exit from diskpart, and the other one for command prompt.
Step 12. Repeat installing Windows 7.
Solution 3. Format Partition during Windows 7 Installation Process.
Accroding to Microsoft support, this error code will appear when the system reserved partition is damaged. (System reserved partition is an area reserved for the BitLocker encryption and the restoration of Windows.) Microsoft suggests that we need to delete the system reserved partition as well as the system partition at first, then create a new partition, and continue with the formatting during the installation process.
To do these, please follow the detailed steps here:
Step 1. Insert the Windows 7 installation DVD, set your preferences and click “Install now“.
Step 2. After reading the Microsoft license agreement, click “I accept the terms of license“, and then click “Next“.
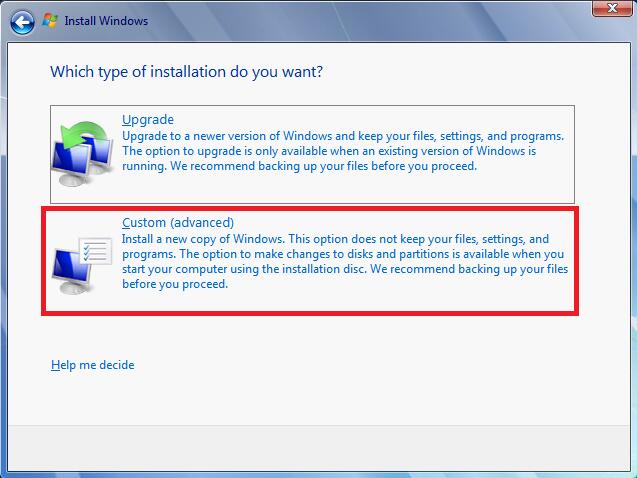
Step 3. When you see the following window, click “Custom (advanced)“.
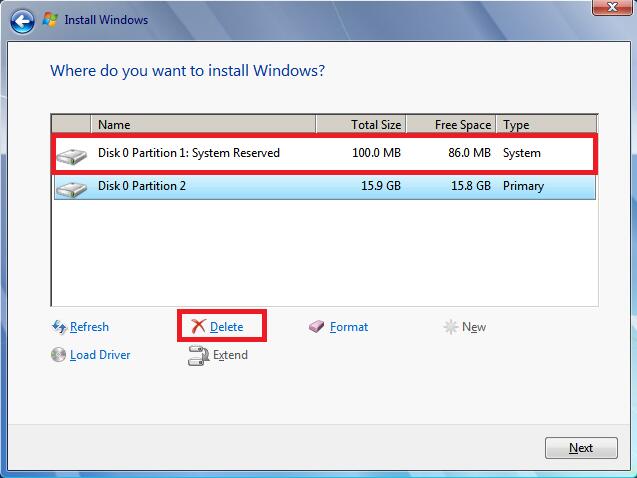
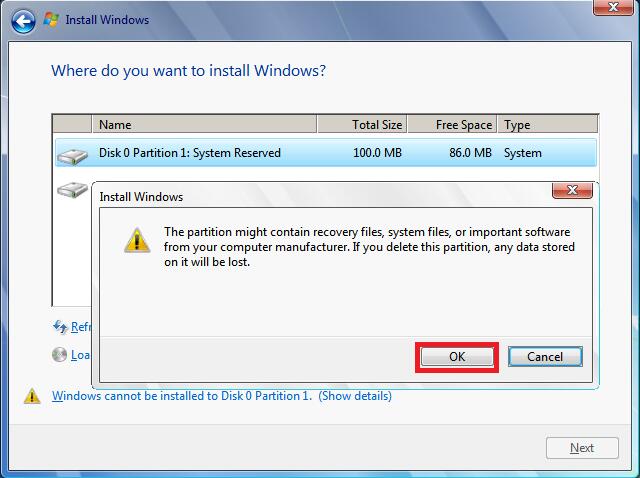
Step 4. Select “Disk 0 partition 1“, and click “Delete“. Then click “OK” to confirm the deletion on the pop-up window.
Maybe you are looking for: 10 Cases: External Hard Drive Not Showing up & Best Fixes.
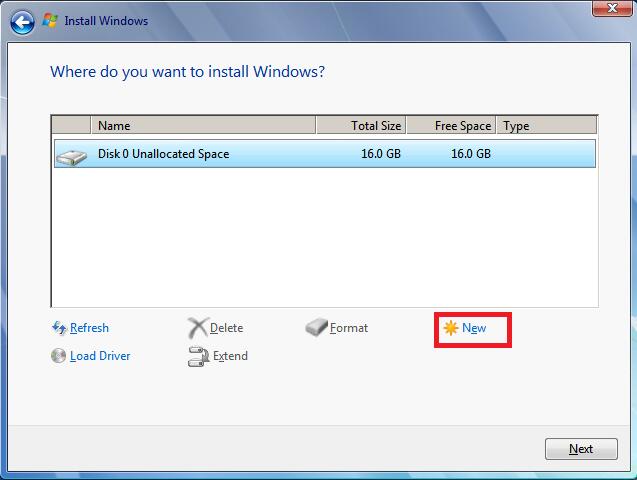
Step 5. Repeat Step 4 to delete Disk 0 partition 2. Then the whole disk becomes an unallocated space. Now you can click “New” to create a new partition.
Step 6. Define the size of the disk, and then click “Apply“. If you don’t make any change of the new partition size, then the default value is the maximum size of the disk.
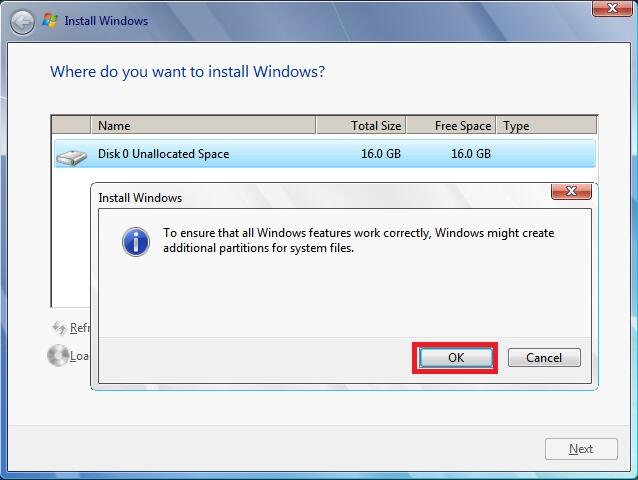
Step 7. At this time Windows will prompt that “To ensure that all Windows feature work correctly, Windows might create additional partitions for system files.” Click “OK” when prompted.
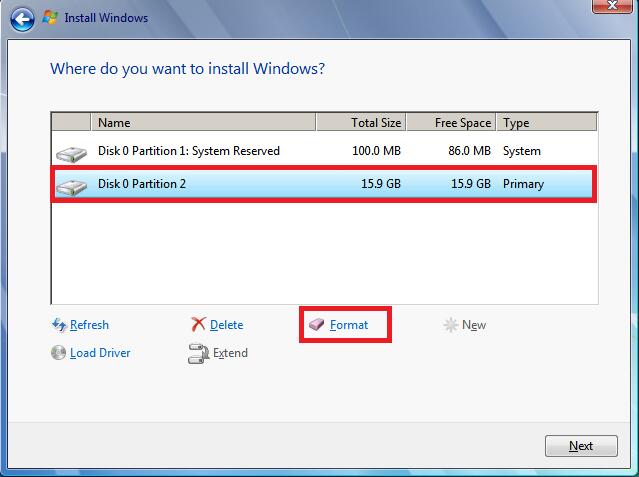
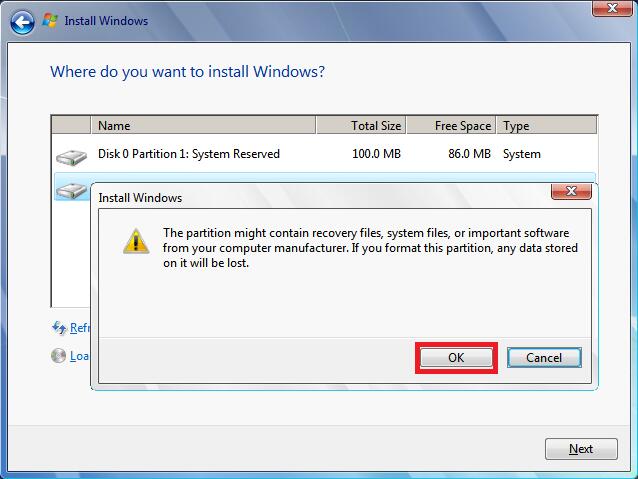
Step 8. Then you can see two partitions are created again. Select Disk 0 partition 2, and then click “Format“. Click “OK” when prompted.
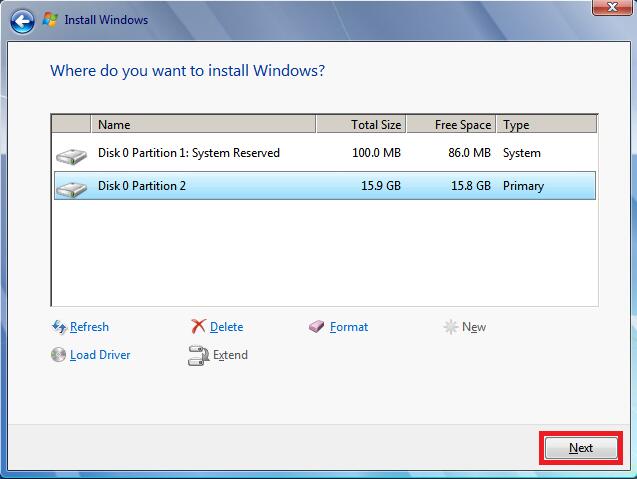
Step 9. Formatting should be completed correctly. Click “Next” to continue. you can now complete the installation without problems.
However, if these three solutions do not help, please try the following solutions to take your chance…
Solution 4: Reinstall RAM
RAM is a form of computer data storage which stores frequently used program instructions to increase the general speed of a system. When error 0x80070057 appears, you can try removing the RAM and installing RAM again, for the RAM may get wrong. How to do this? Please refer to PCWorld guide – How to install new memory in your PC – to complete. After that, repeat the 3rd solution.
Solution 5: Reinstall Hard Disk Driver
Another possible reason for error code 0x80070057 is that the System Has Lost Hard Disk Driver and Needs Installation. At this time, you can insert the Windows 7 installation DVD and follow the steps listed in Solution 3. When it comes to selecting where you want to install windows, you are expected to select “Disk 0 Partition 2“, and then click “Load Driver“. It will automatically install the disk driver.
Solution 6: Replace the SATA Cable or SATA Port
If you still get the same error code, you should consider SATA cable fault. Here is a specific example on answers.microsoft that gets to the point. Just have a try.
I recently bought components to build a new Win 7 64bit PC. I’ve built many PC’s in the past so wasn’t expecting any problems I couldn’t deal with. I had this exact same error message and have been pulling my hair out for the last two weeks trying to solve it. I even bought a new motherboard, CPU, and HD and got the same error. Urgghh!
Well when I finally figured out what it was I was so relieved and so angry at the same time! IT WAS THE SATA CABLE! I’ve never had a problem with a SATA cable before so I never even thought about replacing it. The one that turned out to be faulty was one of the thin ones, but I’ve used many of these in the past without incident. This may or may not be the cause of your problem, but try it. Have a great Xmas and all the best for the new year!— from answers.microsoft
Solution 7: Modify User Permission
Sometimes, when we try to format a partition before installing Windows, Windows is unable to complete the format. This error might be caused by insufficient user permission, and what we are expected to do is to modify user permission. Follow the instructions below.
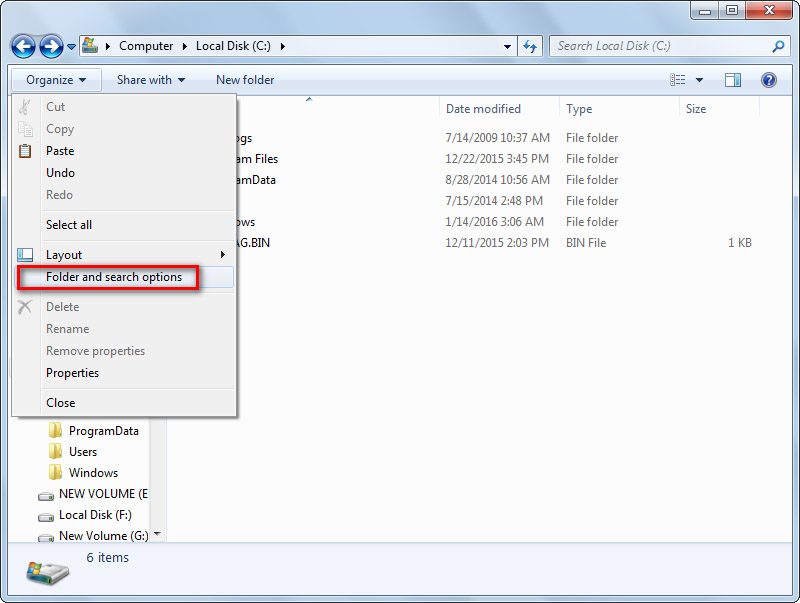
Step 1. Open Windows Explorer, drop down “Organize” and choose “Folder and search options“.
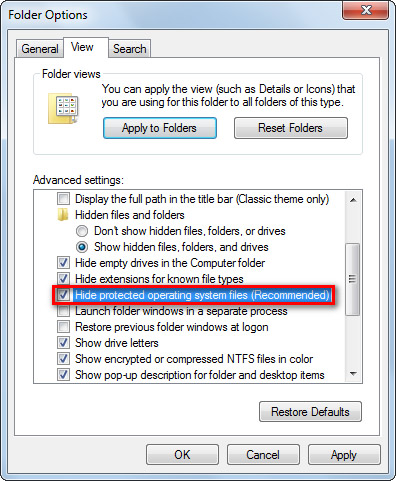
Step 2. Remove the tick before “Hide protected operating system files (Recommended)” under “View” board. Immediately you will receive a warning window saying “These files are required to start Windows. Deleting or editing them can make your computer inoperable. Are you sure you want to display these files?” You don’t need to worry about it and click “Yes“.
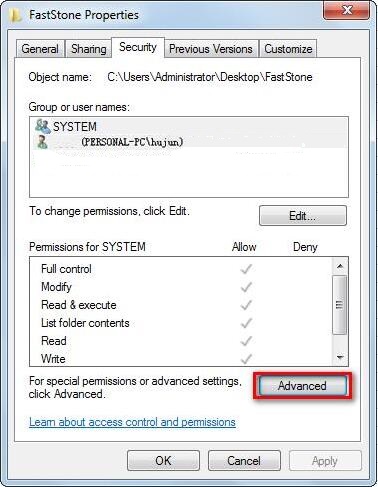
Step 3. After that, find the folder that cannot be deleted. Right click on it and select “Properties“. Switch the board to “Security” and press “Advanced“.
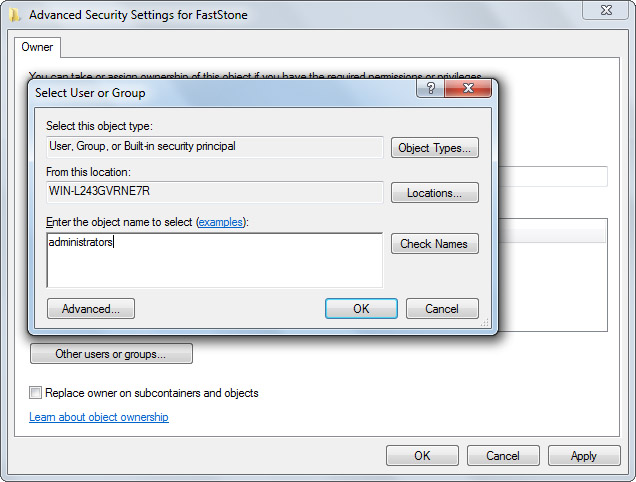
Step 4. Switch the board to “Owner” and press “Edit” button.
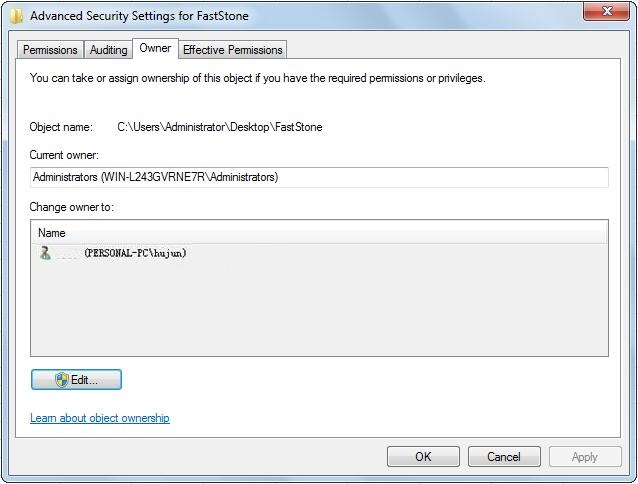
Step 5. Press “Other users or groups” to assign ownership to Administrators. Then you can format the hard drive without block.
Very Similar Issue – Windows Was Unable to Complete the Format
“Hello,
I’m new to these little things. How can I open my flash drive when it says “You need to format the disk before you can use it”. But when I format it, a pop up message appears saying “Windows was unable to complete the format”. How can I open it when I can’t format it? Hope you’ll help me.
Thanks.” — from CCM
Disk formatting is quick and efficient in cleaning up disk partition files, and is usually adopted by us when we are asked to format before we can use it, or when we are creating a bootable USB flash drive or empting an external hard drive. However, sometimes Windows will give us a prompt saying “Windows was unable to complete the format“, just as shown in the figure below.
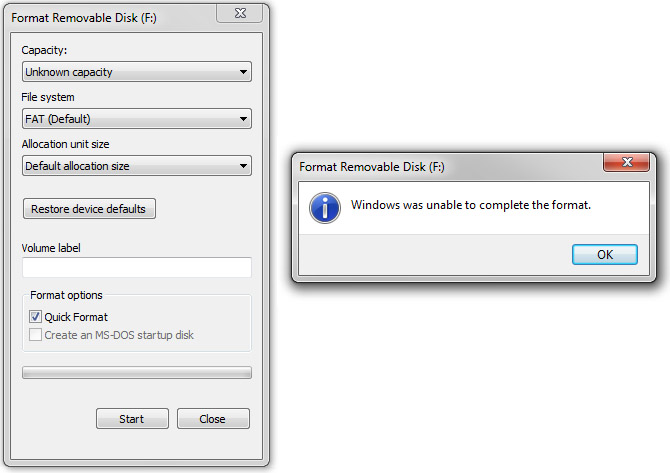
If you encounter such a situation when formatting a removable disk or USB flash drive, what should you do to overcome this? Do you know what caused this error and how to avoid this error message in the coming days?
To get detailed explanations, please refer to our previous post: How Do I Fix Windows Was Unable to Complete the Format, there you will find the possible reasons that lead to this issue as well as the best solutions.
Bottom Line
Here comes to the end of this post. In this article, we have talked so much about why Windows could not format a partition on disk 0 and explained the most feasible solutions for error code 0x80070057.
In addition, we mentioned another very similar error – Windows was unable to complete the format, and also listed the solution immediately. If you are suffering from the same issue, try these methods to get out of the trouble. We expect your success.
For any questions or suggestions, please leave it in the comment zone or send email to [email protected], thanks in advance!

User Comments :