Some users complain that Windows 11 HDR washed out. If you also run into this issue, this post from MiniTool Partition Wizard is what you need. You can try the solutions below to fix Windows 11 HDR washed out.
“Windows 11 HDR washed out” can disrupt workflow, especially for those who do content creation on a desktop. People who use graphics and image editing applications like Photoshop, Lightroom, or any video editing application need a neat color profile for consistent output across all devices.
Most users have successfully resolved the issue by enabling HDR through Windows, display, and in-app settings.
Solution 1: Enable HDR
Normally, the HDR feature is automatically enabled where applicable. But in some cases, it can be enabled through Windows and monitor settings and disabled in the in-app settings or similar to the game you’re playing. In this case, you can easily fix the problem by enabling it manually by the following instructions:
For Windows 10, read this article: How to Turn on HDR Settings in Windows 10 for Better Video
For Windows 11, read this article: How to Turn on Auto HDR on Your Windows 11 Computer?
Solution 2: Change the Color Bit Depth
SDR typically uses 8-bit depth, while HDR uses 10-bit depth. 10-bit depth can produce 64 times more color than 8-bit.
Here are the steps to change the color depth of an NVIDIA GPU:
Step 1: Right-click on your desktop and select NVIDIA Control Panel.
Step 2: In the left pane under Display, click Change Resolution.
Step 3: Under Output color depth, choose 10 bpc and click Apply. If the 10 bpc option is not available, change the frame rate and try again.
Step 4: Also, if you haven’t already, change the Output dynamic range to Full. If this breaks the color and makes the content too bright, you can always change it back to the limit.
Here are the steps to change the color depth of an AMD GPU:
Step 1: Right-click on the desktop and launch AMD Radeon Settings.
Step 2: In the Display tab, change the Color Depth to 10 bpc.
Step 3: Also, it’s worth going to Preferences > Radeon Additional Settings and changing the Pixel Format to RGB 4:4:4 Pixel Format PC Standard (Full RGB).
Step 4: Close the Radeon settings and check the new configuration.
Solution 3: Adjust Color Settings
Many users have had success manually configuring the color settings to their liking. Alternatively, you can download a color profile from the monitor manufacturer’s website and use it. Here are the steps to do this:
Step 1: Press the button on the monitor and look for the Color or similar setting.
Step 2: Right-click on the desktop and select Intel Graphics Settings.
Step 3: Navigate to Display > Color Settings and adjust Brightness, Contrast, Hue, Saturation, Temperature, and Gamma to your liking.
Step 4: Alternatively, if you have downloaded a color profile, use the run command colorcpl.
Step 5: Select your display and press Add > Browse.
Step 6: Import the ICC file you downloaded.
Step 7: Press Add again, select Imported Color Profile under ICC Profile, and press OK. Now select it from the list and press Set as Default Profile.
Close the Color Management utility and restart your PC.
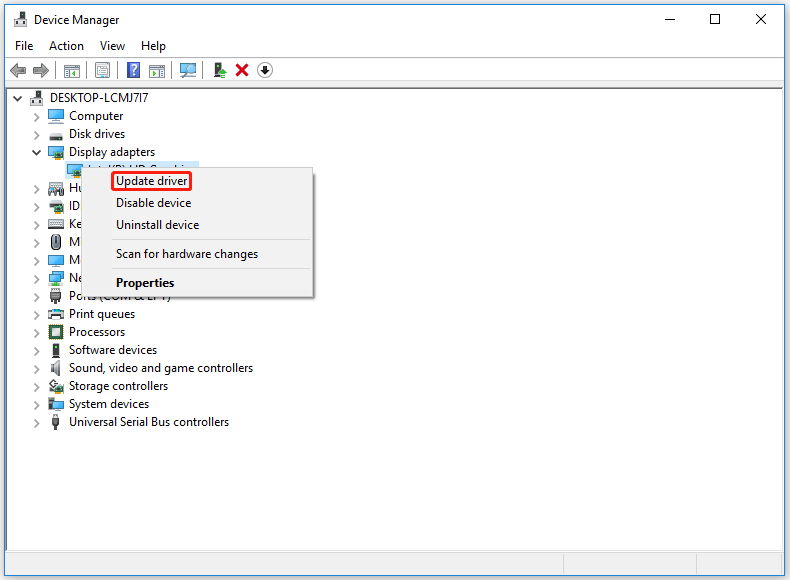
Solution 4: Update Display Adapter Driver
An outdated Display adapter driver Cause Color Fade on the PC. So, updating the Display adapter driver may solve the HDR washed out issue in Windows 10/11. Here are the steps to do this:
Step 1: Press Win + X and select Device Manager.
Step 2: Expand the Display adapters section, right-click the chosen device, and select Update driver.

Step 3: Start by selecting Search for drivers automatically and following the on-screen instructions.
Also, it is a good idea to update the Monitor driver in the same way.


User Comments :