Windows update is a free Microsoft service providing updates like service packs and patches for the Windows operating system and other Microsoft software. It can also be used to update drivers for popular hardware devices.
Generally speaking, keeping your PC up-to-date is good to keep your PC safe. However, considering that the twice-yearly new update can be unstable (For instance: Windows 10 1803 Crashes Computers with Intel SSD) and the time-assuming update may bar users from working with their computers, knowing how to stop Windows 10 update is necessary.
Right here in this post, we provide you with the most effective ways to disable Windows 10 update – even temporarily.
RECOMMENDED: How to Fix Windows Update Stuck on Checking for Updates
Solution 1. Disable Windows Update Service
Step 1. Press Win+ R to invoke the run box.
Step 2. Input services.msc and press OK.
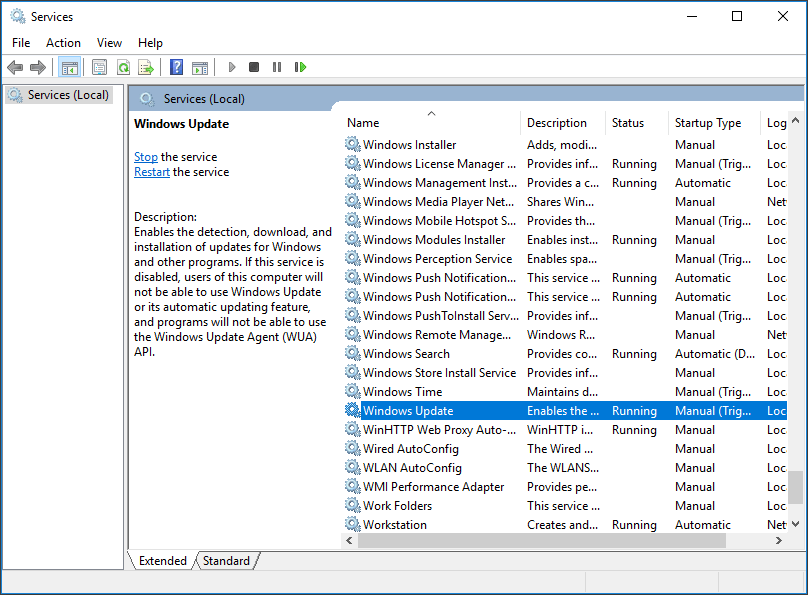
Step 3. Scroll down to find Windows Update and double-click on it.
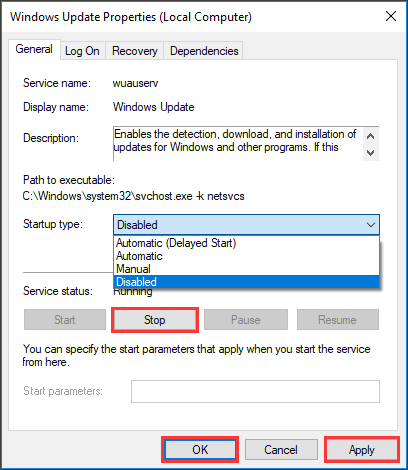
Step 4. In the pop-up window, drop down the Startup type box and choose Disabled. Then press Stop, Apply and OK orderly.
Solution 2. Notify for Download/Install
Option A. Prevent Automatic Updates Using the Registry
In this case, free partition manager – MiniTool Partition Wizard Free – is strongly recommended. Its “Copy Disk” feature can assist you with a sector-by-sector clone. Simply put, it helps to clone all the sectors even if the sector is blank or is a logically bad sector.
As a result, the target disk will be equal in size to the disk being cloned after the process. And if you are copying the system disk, the target disk is bootable when finished.
To use this feature, you will need to prepare a hard drive which can be cleaned for a successful clone.
MiniTool Partition Wizard FreeClick to Download100%Clean & Safe
See how MiniTool Partition Wizard helps you.
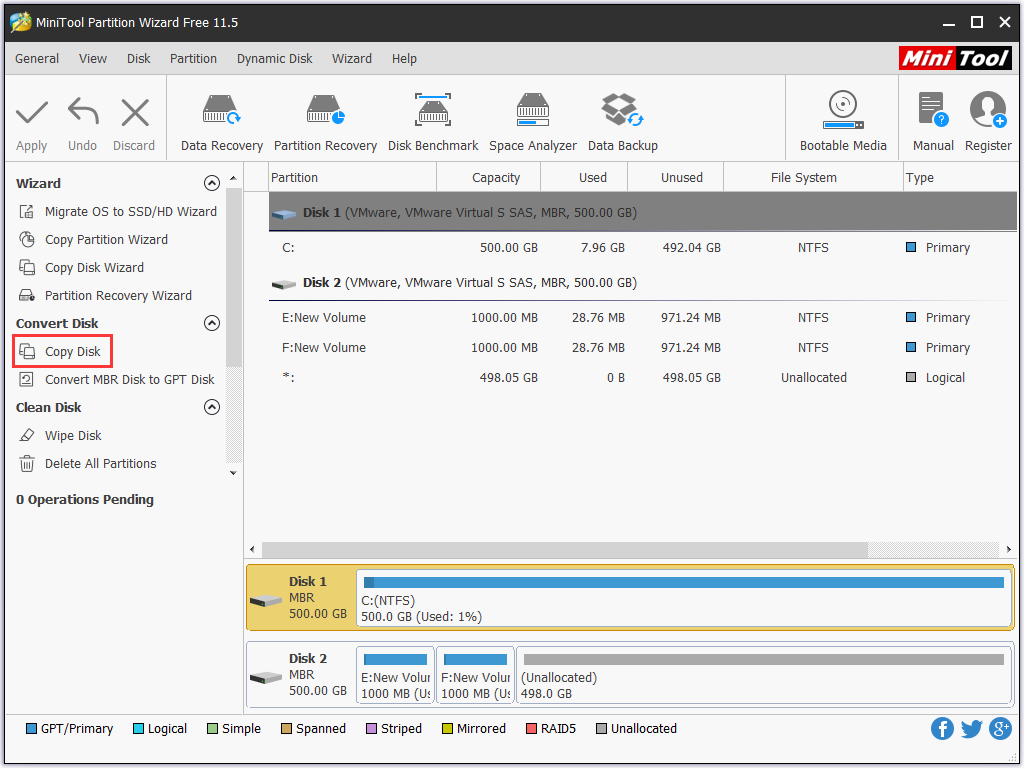
Step 1. After installation, run this program to get the main interface. Now select the system disk as the source drive and choose Copy Disk feature form the left action panel.
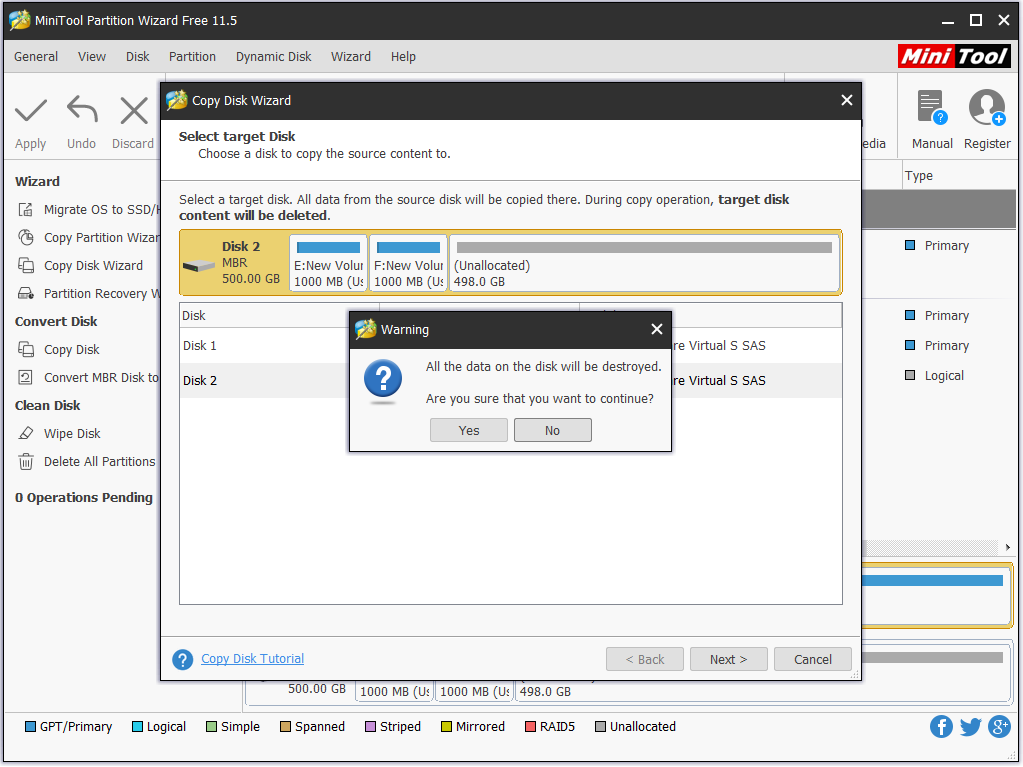
Step 2. Select the disk you just prepared as the target disk and confirm you want to do so.
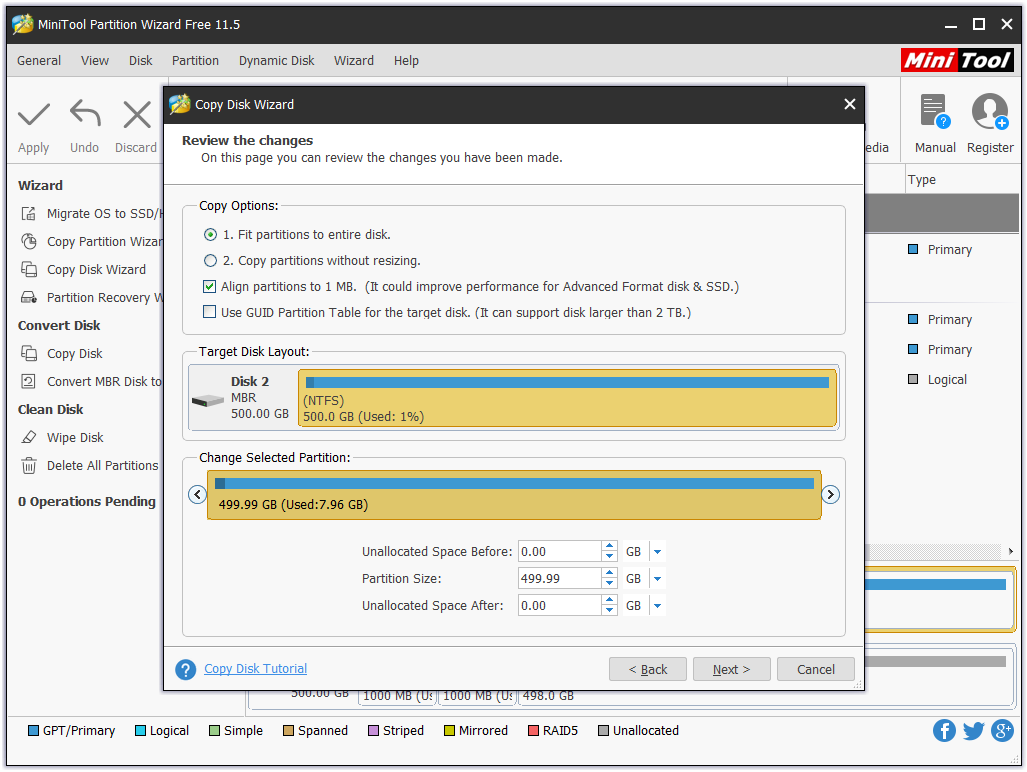
Step 3. Confirm the copy options. No matter you select “Fit partitions to entire disk” or “Copy partitions without resize”, you can resize each partition size by dragging the slider by located in the lower part. And it is suggested to select “Align partitions to 1 MB” if the target disk is an SSD or advanced format disk.
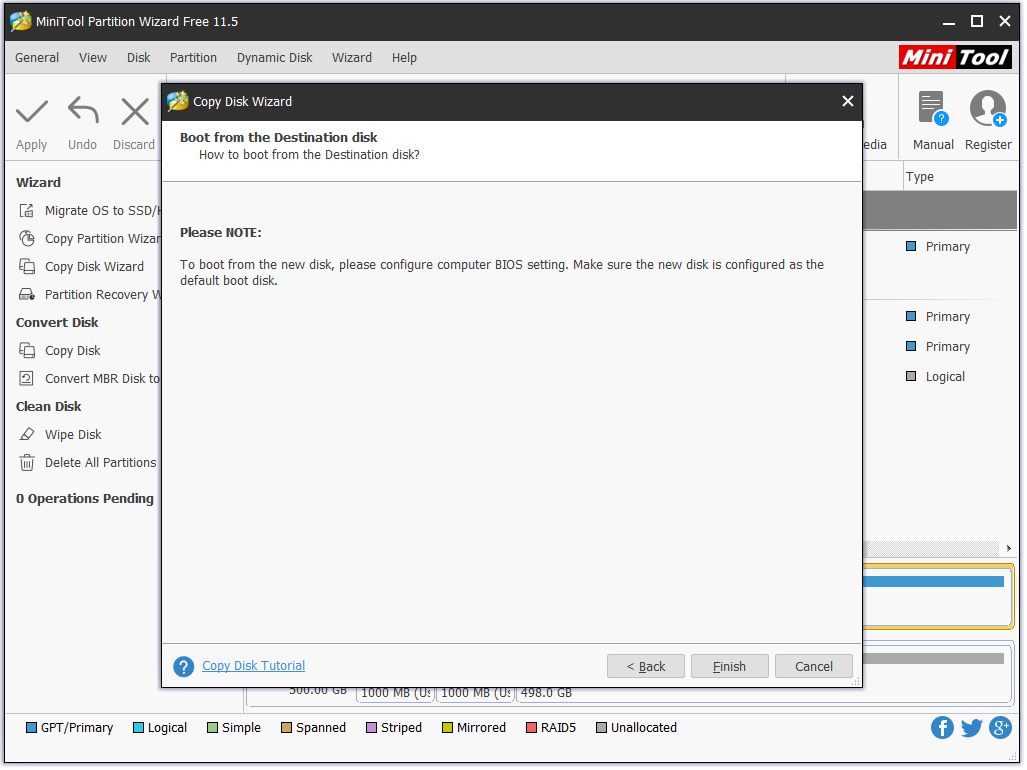
Step 4. Now pay attention to “how to boot from the target disk” before you click Finish
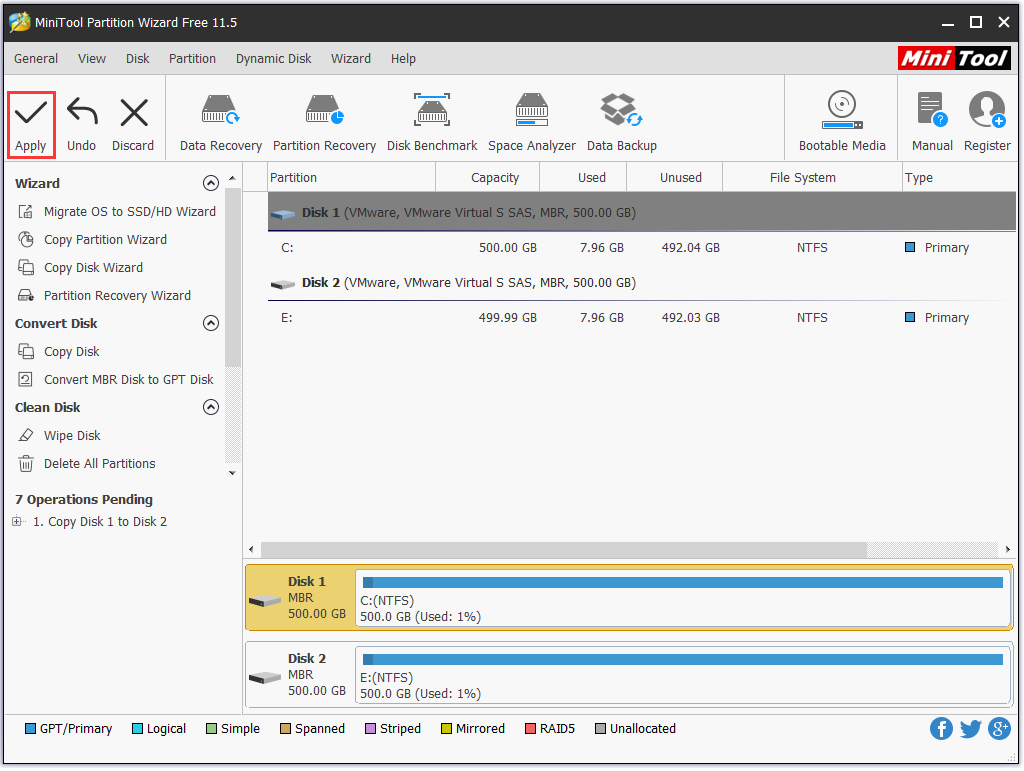
Step 5. Finally, you can preview the changes to be made on the target disk from the disk map area. And to confirm this change, click Apply.
Now it is time to edit the registry to disable automatic updates Windows 10.
Step 1. Press Win + R keys to open the Run command. Then type “regedit” and click OK to open the Registry.
Step 2. Go to this path: HKEY_LOCAL_MACHINESOFTWAREPoliciesMicrosoftWindows.
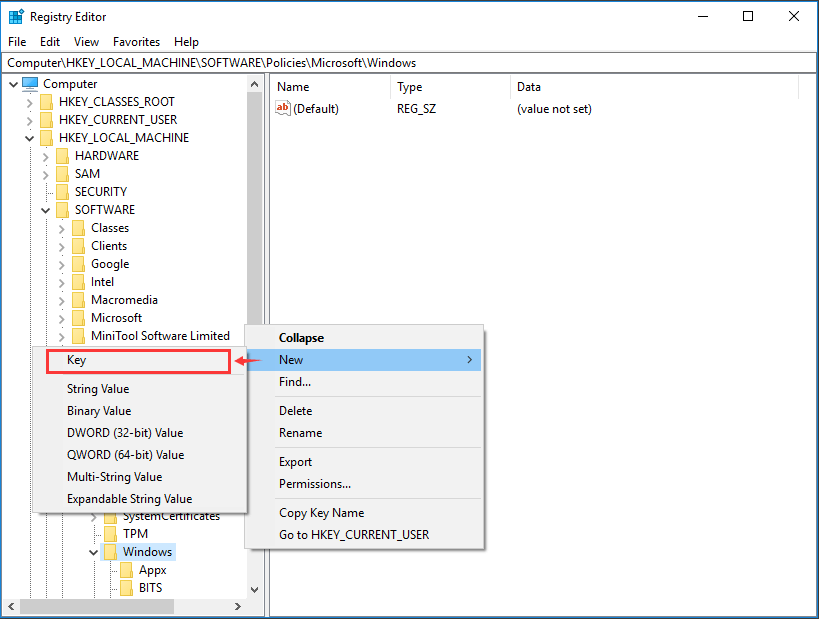
Step 3. Right-click the Windows folder key, select New and then click Key. Name the new key AU and press Enter key.
Step 4. Inside the newly created AU key, right-click on the blank space of the right panel, select New, and then DWORD (32-bit) Value. Name it AUOptions and press Enter.
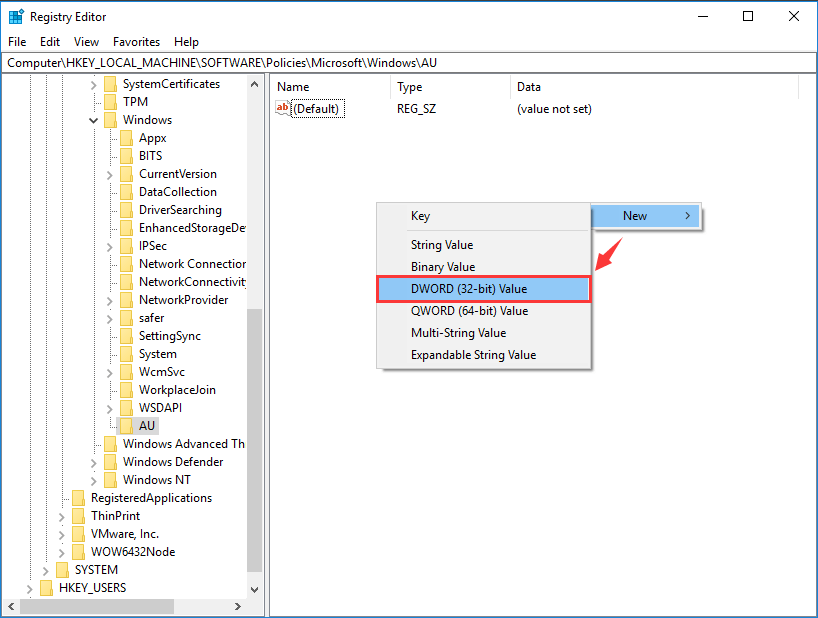
Step 5. Double-click the newly created key and change its Value data using one of the following options:
- 2 – “Notify for download and notify for install (before and include version 1607).” OR “Notify for download and auto install (since version 1703).” This is the best choice to prevent Windows 10 from downloading updates automatically, and you’ll get a notification when new updates are available. Updates won’t download and install until you’re ready to do it manually
- 3 – “Auto download and notify for install.”
- 4 – “Auto download and schedule the install.”
- 5 – “Allow local admin to choose settings.”
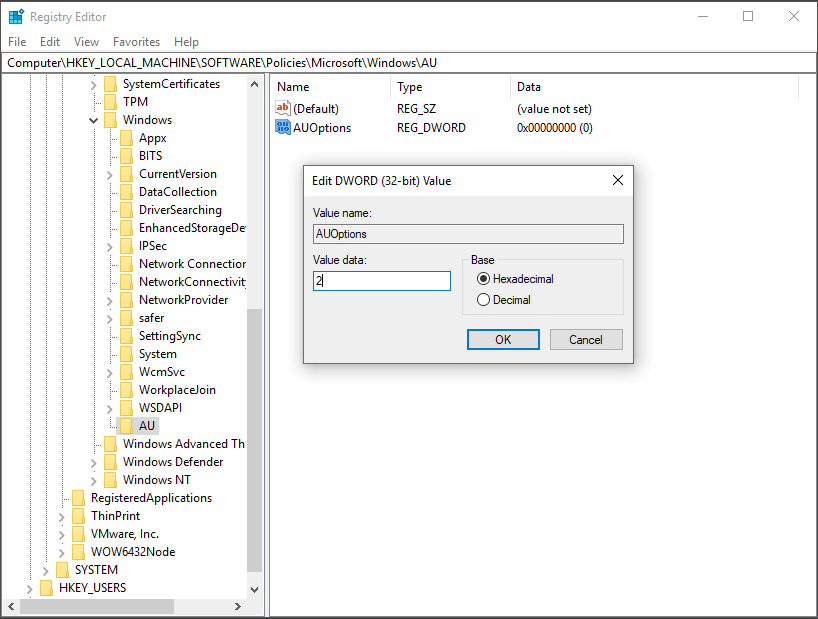
Step 6. Click OK and close the Registry to turn off Windows 10 updates.
Option B: Change the Setting of the Group Policy Editor
In addition to editing the registry, you do have another choice that is to change the setting of the Group Policy Editor. How to stop Windows 10 update using this way? Follow the steps below:
Step 1. Press Win + R to call out the Run box.
Step 2. Input gpedit.msc and press Enter to bring up the Local Group Policy Editor.
Step 3. In the left pane, navigate to Computer ConfigurationAdministrative TemplatesWindows ComponentsWindows Update.
Step 4. Find and double-click Configure Automatic Updates.
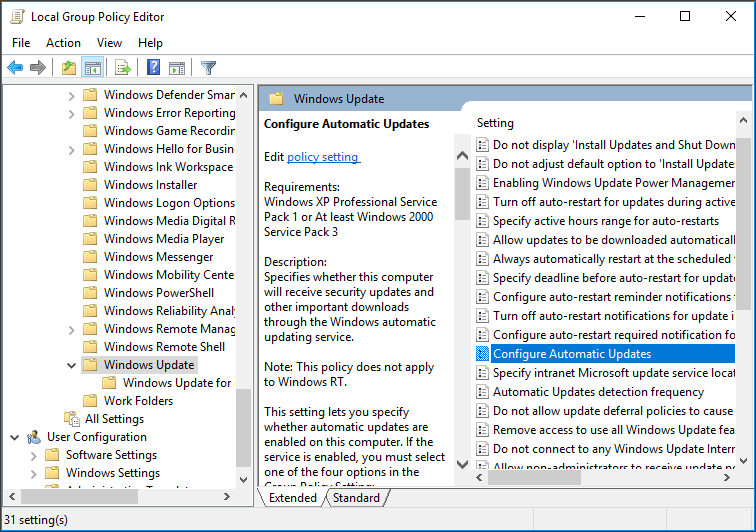
Step 5. In the pop-up window, select Enabled and Notify for download and auto install to configure automatic updates.
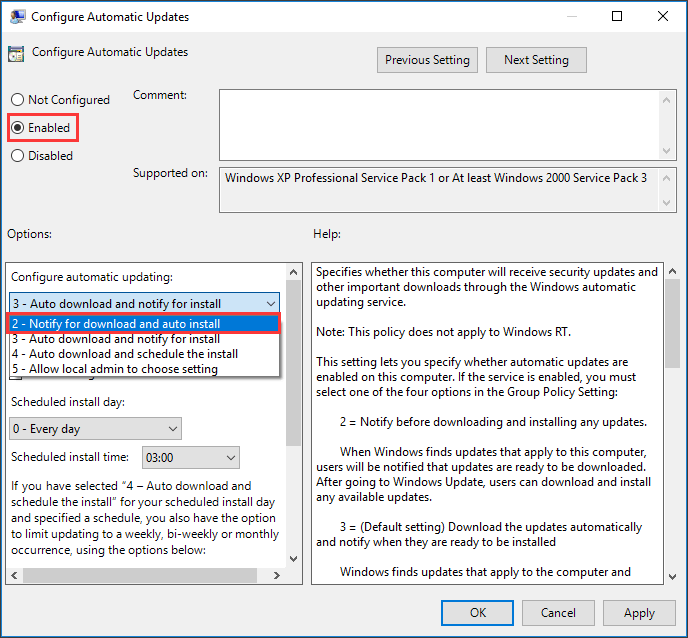
However, if you want to completely stop Windows 10 upgrade, continue with Solution 3.
Solution 3. Never Notify or Check for Updates
Step 1. Click here to download the “Never_Notify_or_Check_for_Updates.reg” file.
Step 2. Double click/tap on the downloaded .reg file to add it to the registry.
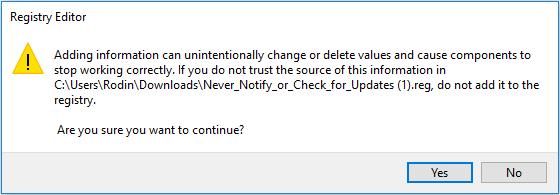
Step 3. Go to Settings > Update & Security, then tap on the Check for updates option in Windows Update.
Step 4. Restart the computer to apply. You can now delete the downloaded .reg file.
Solution 4. Meter Your Network Connection
Internet service providers can charge by data used (the amount of data sent and received by your PC). That’s called a metered internet connection. These plans often have a data limit, and if you exceed the limit you might have to pay extra.
If you have a metered internet connection, setting your network connection to metered in Windows can help you reduce the amount of data you send and receive. In this way, you can disable Windows 10 update as it requires massive network connection.
Step 1. Click Windows10 Start menu and select Settings.
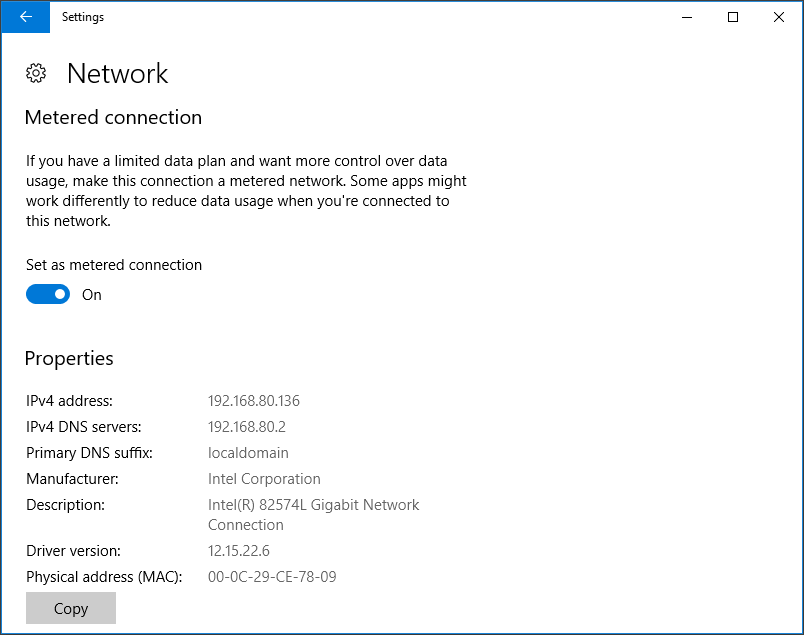
Step 2. Select Network & Internet > Status > Change Connection properties.
Step 3. Next, under Metered connection, turn on Set as a metered connection.
Solution 5. Turn OFF Automatic Device Driver Installation
Device Installation Settings allow you to change if Windows is to automatically download drivers and realistic icons for your devices from Windows Update.
This option will work in all Windows 10 editions.
Step 1. Right-click This PC, choose Properties and then Advanced system settings.
Step 2. Navigate to Hardware and choose Device installation settings.
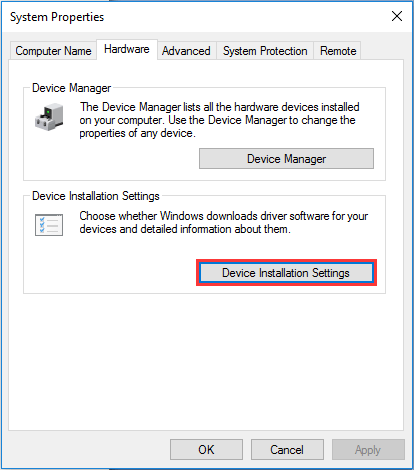
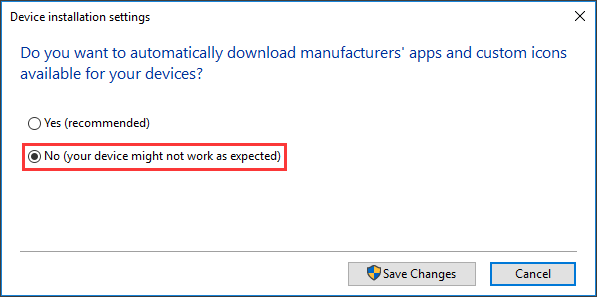
Step 3. Check No (your device might not work as expected) and then click Save Changes.
Solution 1-5 are relatively reliable approaches to disable automatic updates Windows 10. But if you only want to delay the update, Solution 6-7 tell you how to turn off automatic updates temporarily. Just keep reading.
Solution 6. Pause Windows Updates for 35 Days
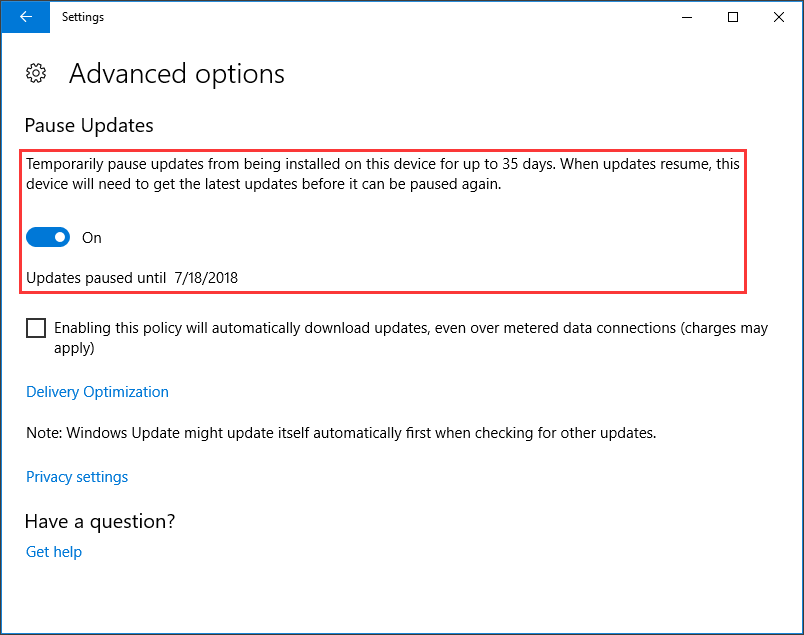
By changing Windows update settings you are able to turn off auto update Windows 10 for 35 days. And it is rather easy to do this job.
Step 1. At Windows Start menu, choose Settings > Update & Security.
Step 2. In the new emerging window, scroll down the right panel until you see the Advanced options below.
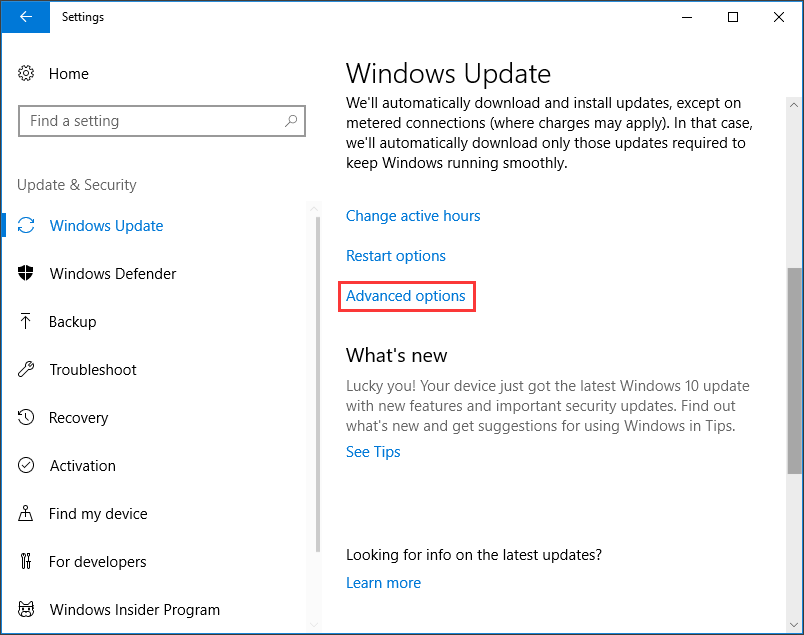
Step 3. This option enables you to disable Windows 10 update for 35 days at most. However, please note that when this setting reaches its expiry date, your computer will need to get the latest update before it can be paused again.
Solution 7. Change Restart Option
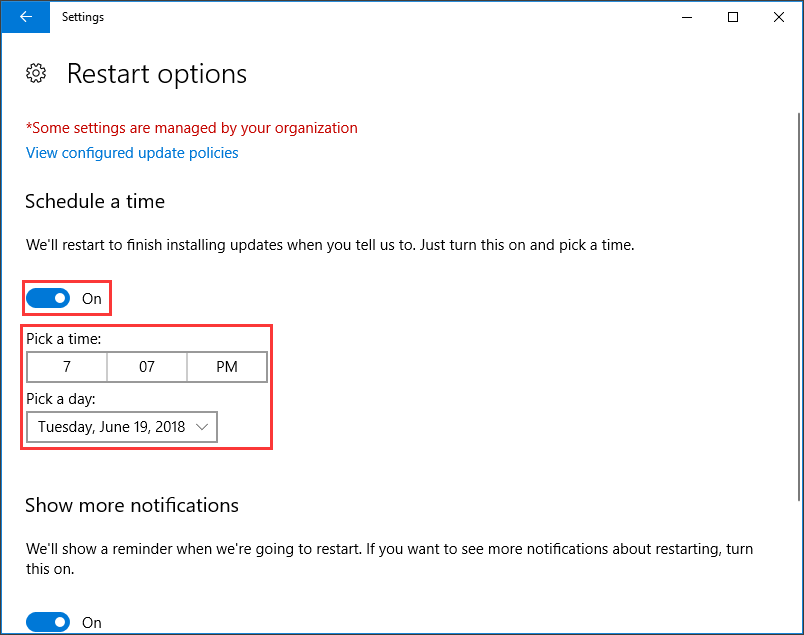
It is possible for you to set a time allowing Windows 10 to install the latest update within 7 days. This is useful when you have got a lot of things to do and need to focus on for a period of time.
Step 1. At Windows Start menu, choose Settings > Update & Security.
Step 2. In the new emerging window, scroll down the right panel until you see the Restart options below.
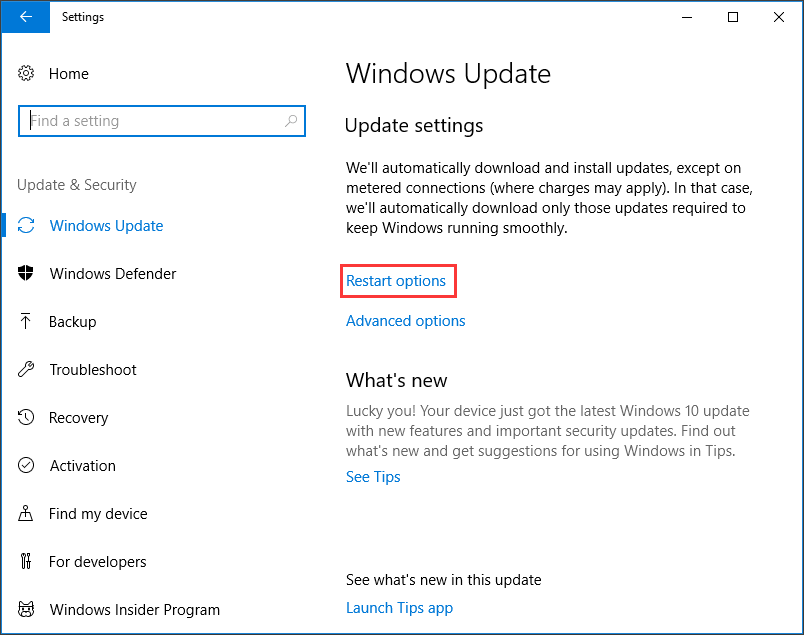
Step 3. Toggle the button of Schedule a time to ON, and then pick a time and day to let Windows 10 installing the latest update.
But if all of these solutions do not help stop Windows 10 upgrade, you may head on and use MiniTool Software.
Solution 8. Go Back to Previous Version Using Backup Image
If you have gone so far and reached here, it seems that none of the above solutions are useful to disable Windows 10 update. So we strongly advise you to make a system backup before the update. By doing this you are able to revert Windows 10 to the previous version even the new update is installed. Here MiniTool ShadowMaker is strongly recommended for its outstanding performance.
MiniTool ShadowMaker is professional Windows backup software aiming at safeguarding your files, system, disks and partitions. With its schedule backup feature, you can set up automatic backup plans like daily backup, weekly backup and monthly backup to save energy.
Download the 30 days free trial edition right now.
MiniTool ShadowMaker TrialClick to Download100%Clean & Safe
After installing, what you need to do are:
First of all, create automatic system backups.
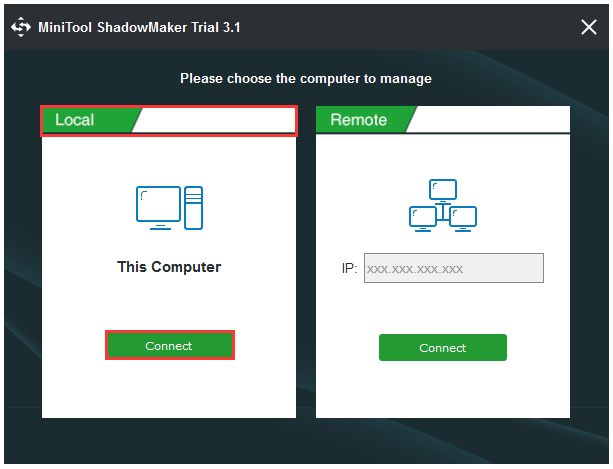
Step 1. Run MiniTool ShadowMaker and choose Keep Trial. When you see the following interface, select the Local computer to connect.
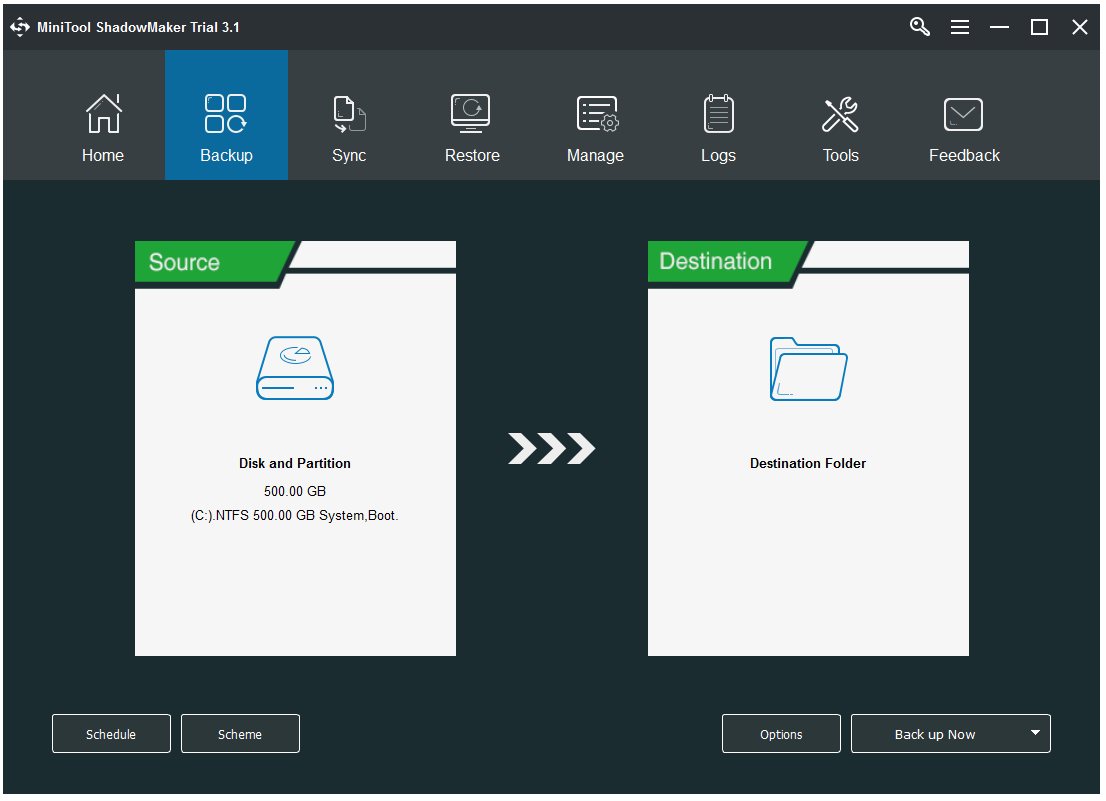
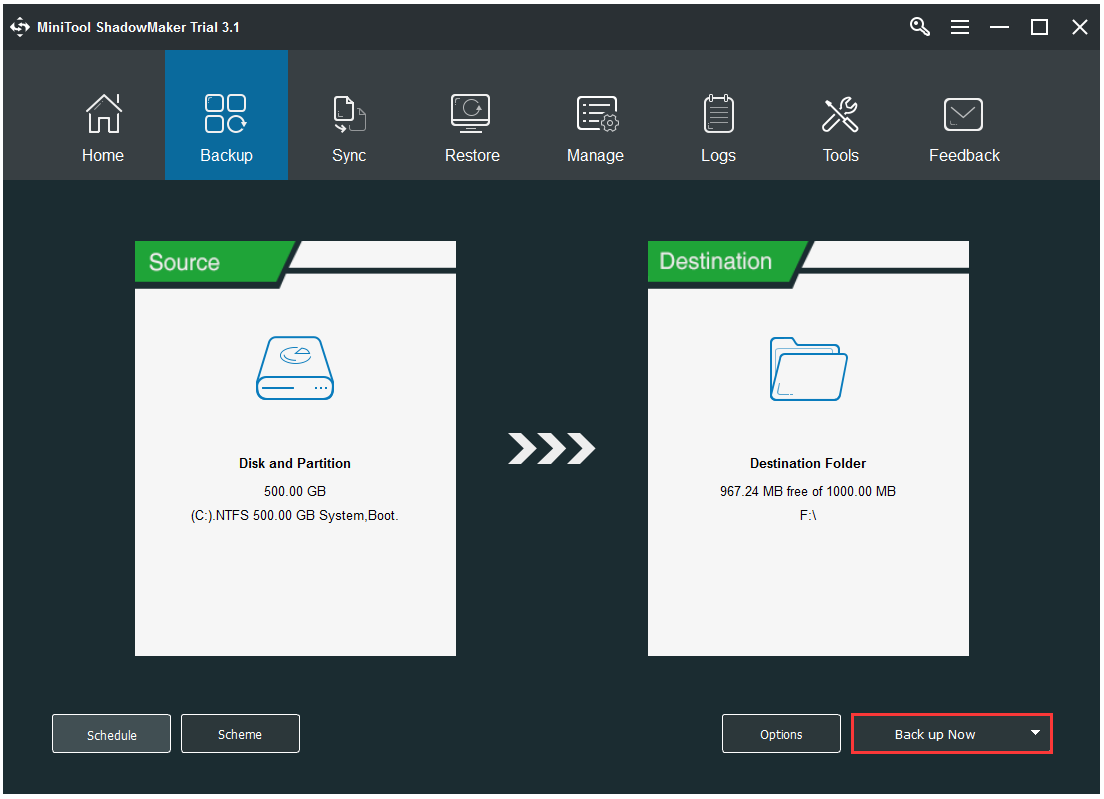
Step 2. In the main interface of MiniTool ShadowMaker, go to Backup tab. You will see the running operating system is selected as the backup source by default, and a destination folder is selected to store the system backup image.
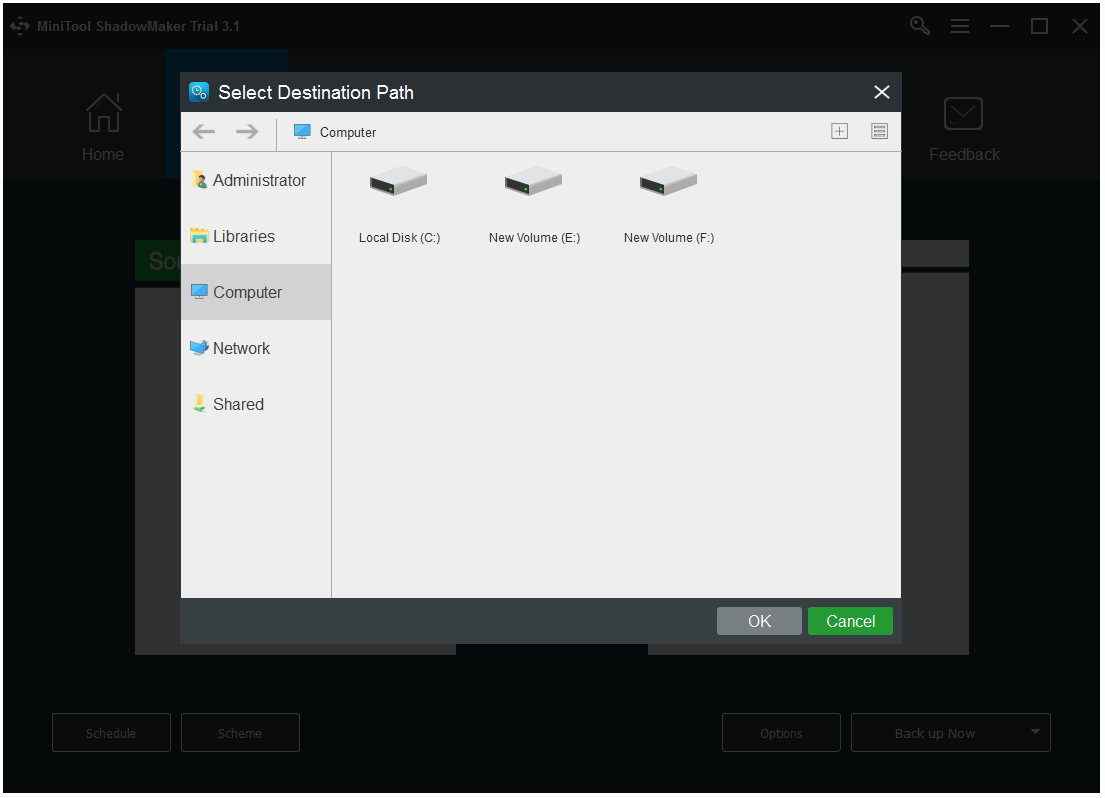
If you want to save the system image to another location, enter Destination tab to choose the desired one. Considering data safety, partitions created on an external hard drive is preferred.
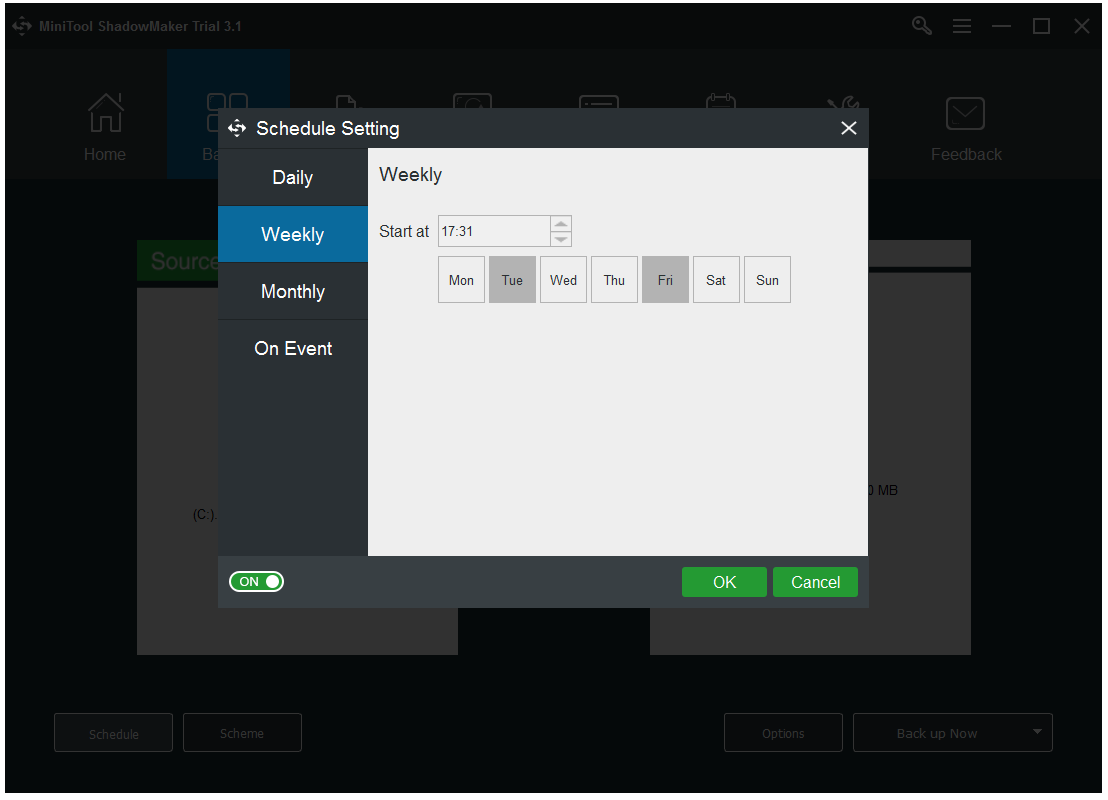
Step 3. Now click Schedule option located in the lower part to set automatic backup. For instance, set MiniTool ShadowMaker to back up at 17:31 on every Tuesday and Friday.
Step 4. Finally, click Back up Now. After doing these, MiniTool ShadowMaker will continue with the rest automatic backup on the scheduled basis.
Secondly, create a bootable rescue media.
This is important. With MiniTool ShadowMaker bootable, you can easily and quickly disable Windows 10 update by restoring Windows 10 to the previous state. You can refer to the following guide to create the MiniTool bootable media:
How to Build Boot CD/DVD Discs and Boot Flash Drive with Bootable Media Builder?
After doing these, you can use the bootable rescue media to restore Windows 10 whenever you want to revert the update. Here are the tutorials you may need:
- How to Boot Your PC from MiniTool ShadowMaker Bootable?
- How to Restore System Image Using MiniTool ShadowMaker?
Bottom Line
Reading here, guess you already know how to disable automatic updates Windows 10. Now it is your turn to try the solutions out. If you have come across other workarounds, list the troubleshooting steps in the comment section below. For any questions related to MiniTool software, you can send an email to [email protected].

User Comments :