You might have encountered Windows update error code 0x80070070 or Windows 10 update assistant not enough disk space issue when you try to install Windows 10 using Windows Update or the Update Assistant. What does error code 0x80070070 mean? How to fix it? In this post, I will show you 5 methods on how to fix Windows 10 update error code 0x80070070 with detailed steps and pictures.
In the process of Windows 10 update, you might encounter Windows 10 update error code 0x80070070, or 80070070, 0x80070070–0x50011, 0x80070070–0x50012, 0x80070070–0x60000 on your Windows 10 PC. This means that there isn’t enough drive space on your computer to install the new Windows 10 version.
Error code 0x80070070 is caused by Windows 10 update not enough disk space. In this case, before you try the following resolutions, you can delete files you don’t need or move them to another partition or an external drive (See: How Do I Backup Partition with the Best Partition Manager). And you can uninstall some applications on your computer that you don’t use at all.
Then you can try Windows update to see if error code 0x80070070 disappears. If that’s not enough, let’s try the following methods.
Solution 1. Using Disk Cleanup Tool to Free up Space in C Drive
In most cases, you’ll need about 16GB of free space to install Windows 10. If you don’t have enough space on the system partition, you may receive the error code 0x80070070.
In this case, you can use Disk Cleanup tool to clean up the system files and free up some space and then try Windows 10 update. Here are detailed steps and pictures.
Step 1. Right-click Windows Start menu and select Disk Management to open it.
Step 2. Right-click the C drive and select Property from the pop-up window.
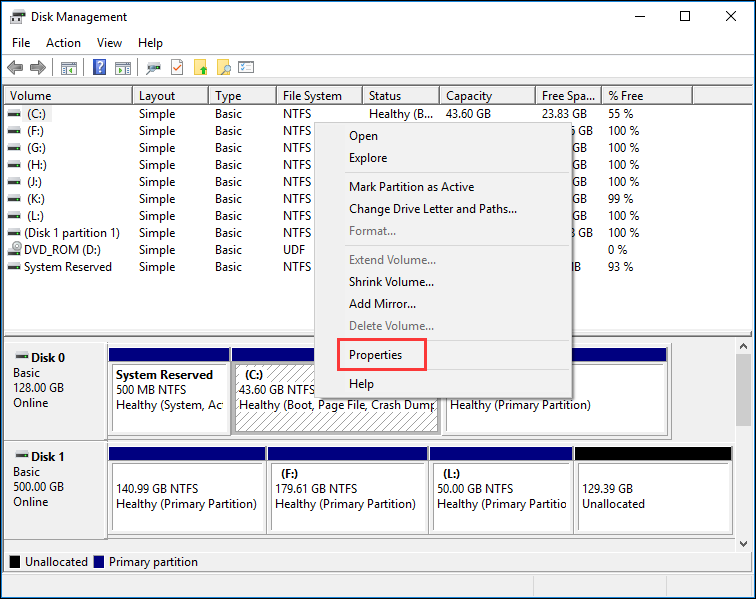
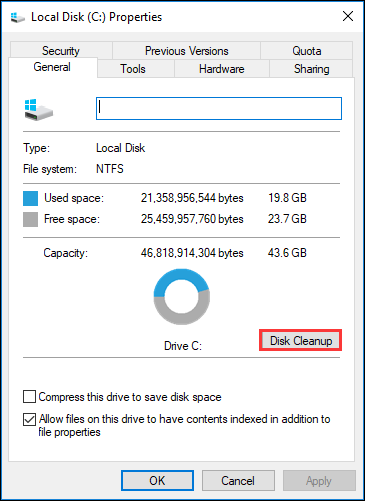
Step 3. Click the Disk Cleanup button.
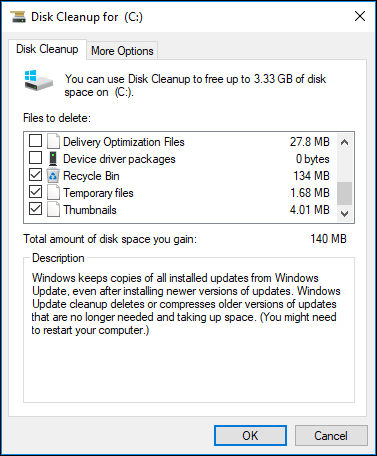
Step 4. Check the items you want to delete. For example, you can delete Windows upgrade log files, Recycle Bin, Temporary Files, Thumbnails, and System created Windows Error Reporting. After checking all the files that you want to delete, click OK.
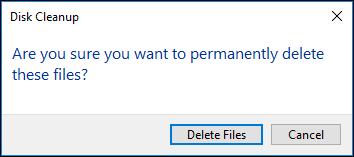
Step 5. Click Delete Files.
If you find there is not enough free space after running Disk Cleanup tool, you can try the following methods to fix error code 0x80070070 windows 10.
Solution 2. Disable Disk Quotas or Limit Disk Space
Disk Quotas are set by the system administrator with the purpose of controlling disk usage. Some users set disk quotas to allocate limited disk space in a reasonable way.
Using Disk Quotas is beneficial in allocating limited disk space in a reasonable way. However, Windows 10 update error code 0x80070070 can be triggered if you have Disk Quotas enabled on your drive with Disk Quotas levels being reached.
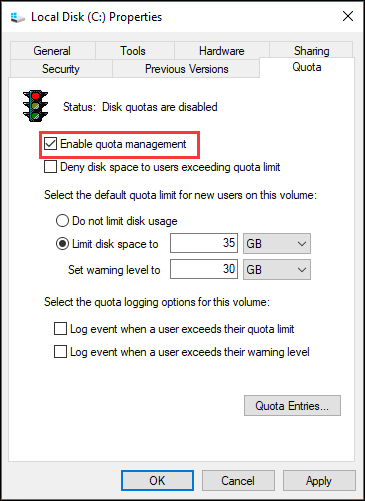
So, to eliminate Windows 10 update error 0x80070070, you can disable the Disk Quotas or adjust the limit disk space. You may follow the steps as below to find Disk Quotas and reset it.
Step 1. Right-click Windows Start menu and select Disk Management to open it.
Step 2. Right-click the C drive in Disk Management and select Properties from the pop-up windows.
Step 3. Click the Quota tab to open the section. In the following picture you can see the Disk Quotas are enabled, so it might be the cause of Windows update error 0x80070070. You can uncheck the Enable quota management option or reset the limit disk space. Then click Apply to confirm.
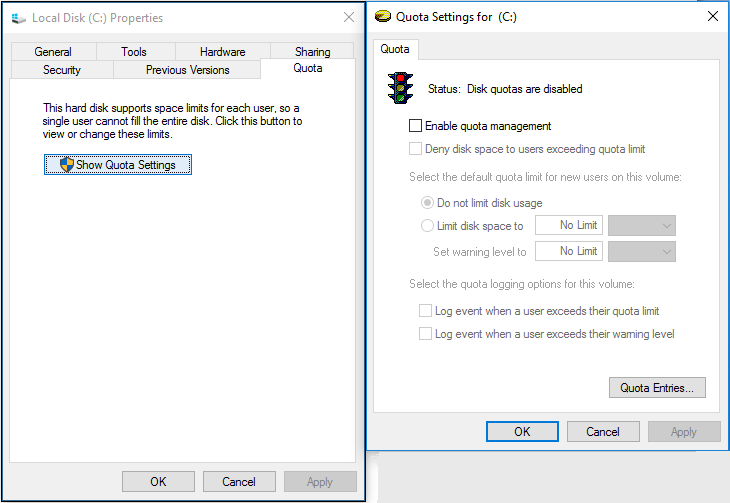
Step 5. Restart your system and attempt to re-apply the Windows 10 update. If it’s still failing with the error code 0x80070070, you may resort to the next method.
Solution 3. Extend the System Partition
If the above methods cannot help you release enough space to update Windows, or you don’t want to delete any application to get some free space, you can try this way to extend system partition and fix error code 0x80070070 Windows 10.
MiniTool Partition Wizards is all all-in-one partition manager, which can help you resize partition, extend partition, copy partition, recover lost or deleted partition, convert MBR to GPT and convert NTFS to FAT32, etc. Besides, it also provides bootable edition, which is commonly used to fix boot issue. (See: Quickly Fix Boot Failure Press Any Key to Continue with 6 Solutions)
To extend system partition, it is recommended to use MiniTool Partition Wizard Bootable Edition to resize it.
To run MiniTool Partition Wizard Bootable Edition, firstly, you need to create a bootable USB drive by using MiniTool Partition Wizard’s Bootable Media Builder.
Step 1. Prepare a USB flash drive (or CD/DVD disc) and connect it to your computer.
Step 2. Get MiniTool Partition Wizard Pro Edition by clicking the following button. Install it on your computer and get it registered.
Step 3. At its main interface, launch Bootable Media Builder (you may see this feature by clicking the More Tools icon).
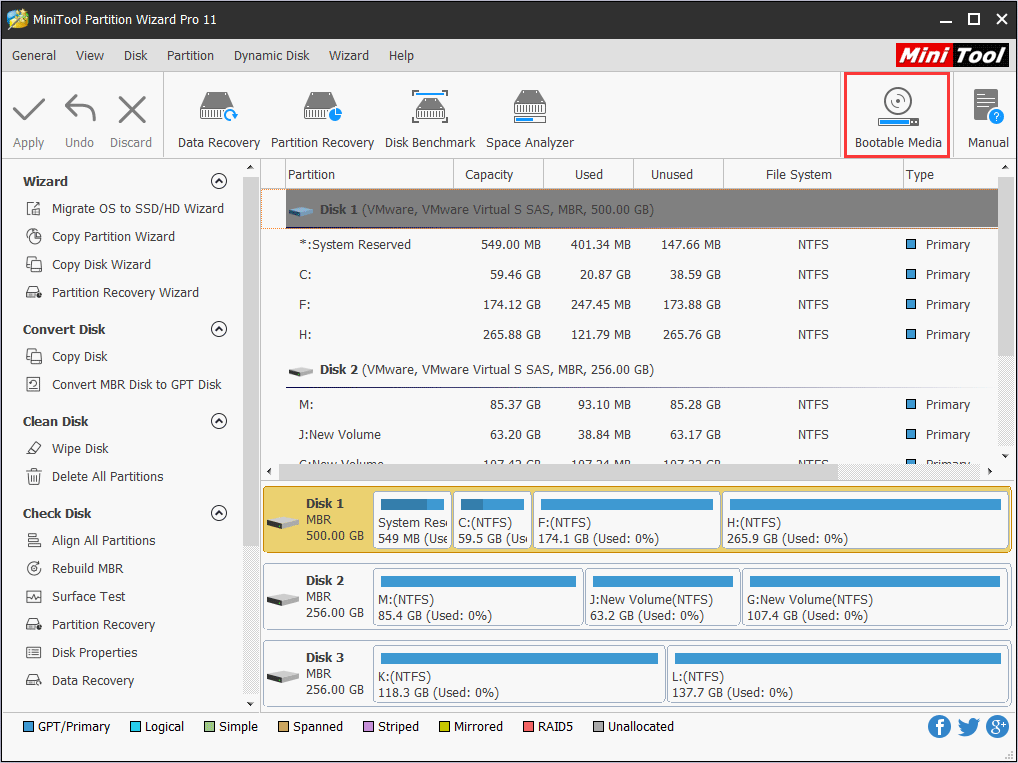
Step 4. Select WinPE-based media with MiniTool plug-in to continue.
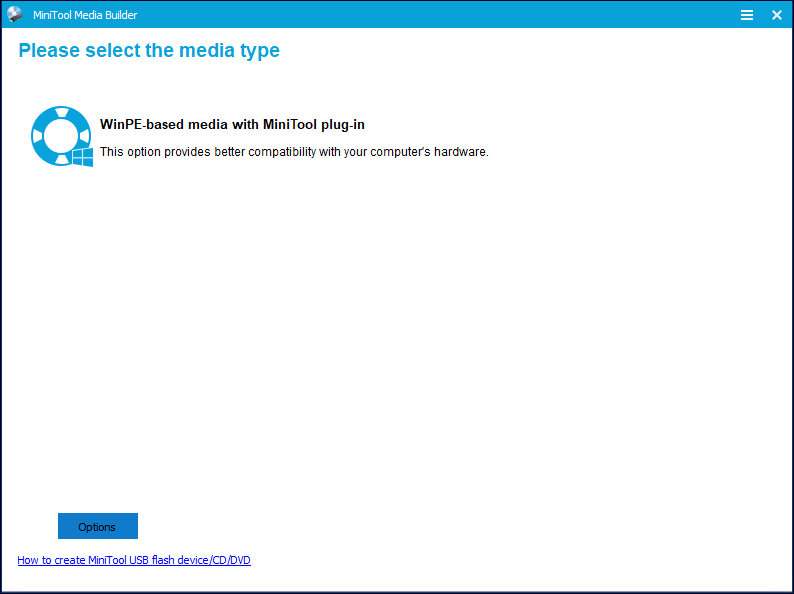
Step 5. Select USB Flash Drive option and choose the correct USB flash drive. Then click Yes to confirm that you want to burn the boot flash drive.
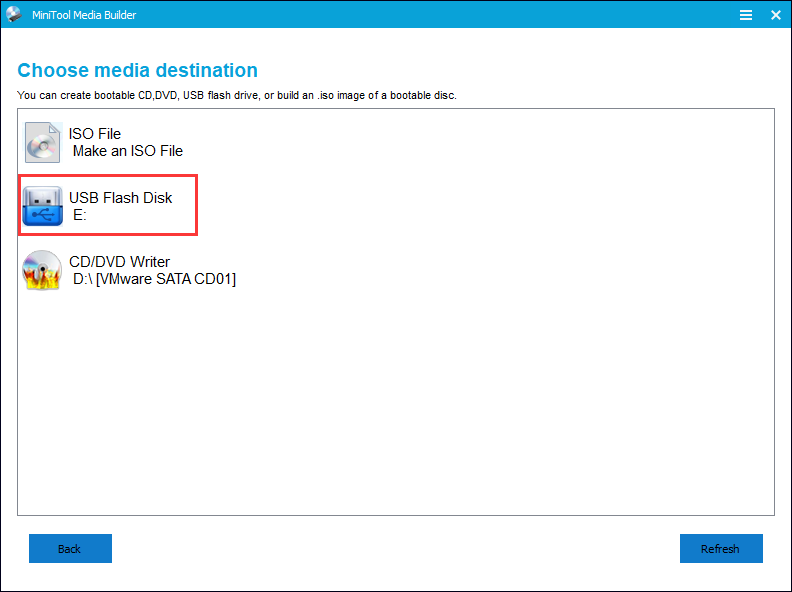
Step 6. When you select the USB Flash Disk, MiniTool Partition Wizard will remind you that the data on the USB disk will be destroyed. Please make sure the USB does not contain any important files and data as MiniTool Partition Wizard will format the drive firstly. Then click Yes to go on.
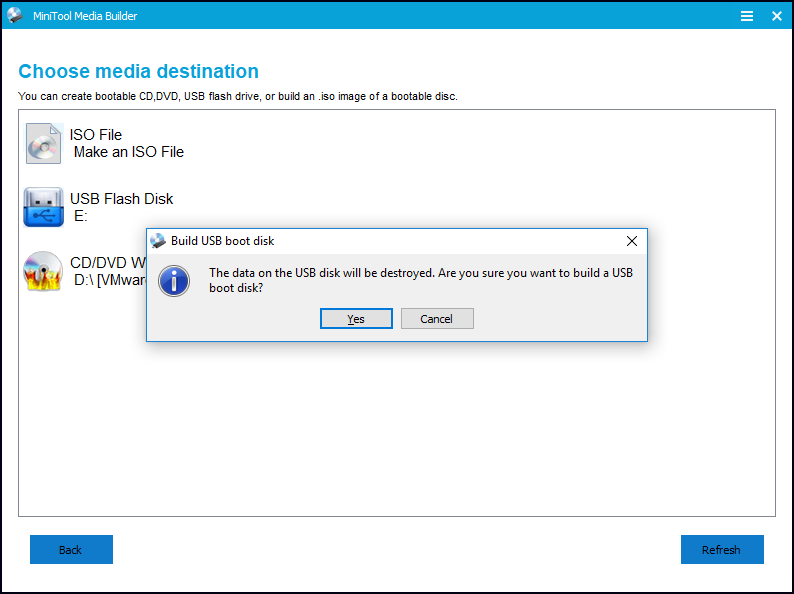
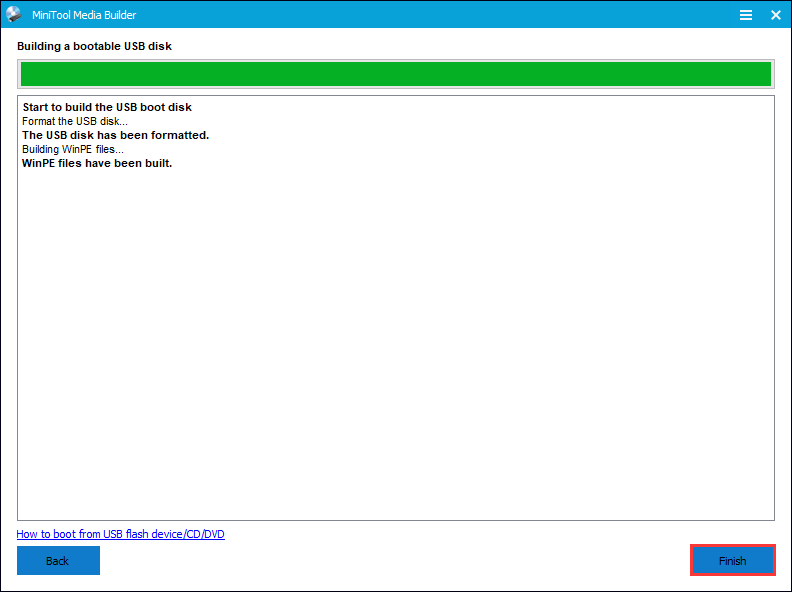
Step 7. click Finish after successful burning.
Step 8. Enter the BIOS to change the boot order, giving the USB device boot sequence priority over the hard drive. If you are using a DVD/CD disc, change the boot order accordingly.
Step 9. When you boot from the USB drive, you will get the interface of MiniTool PE loader. MiniTool Partition Wizard Bootable Edition will be launched automatically.
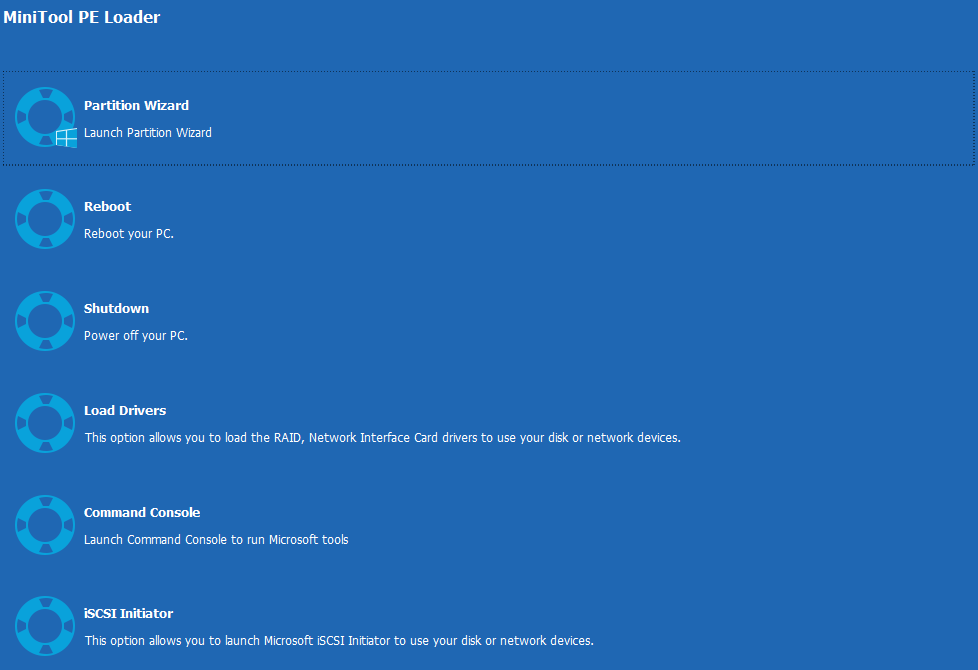
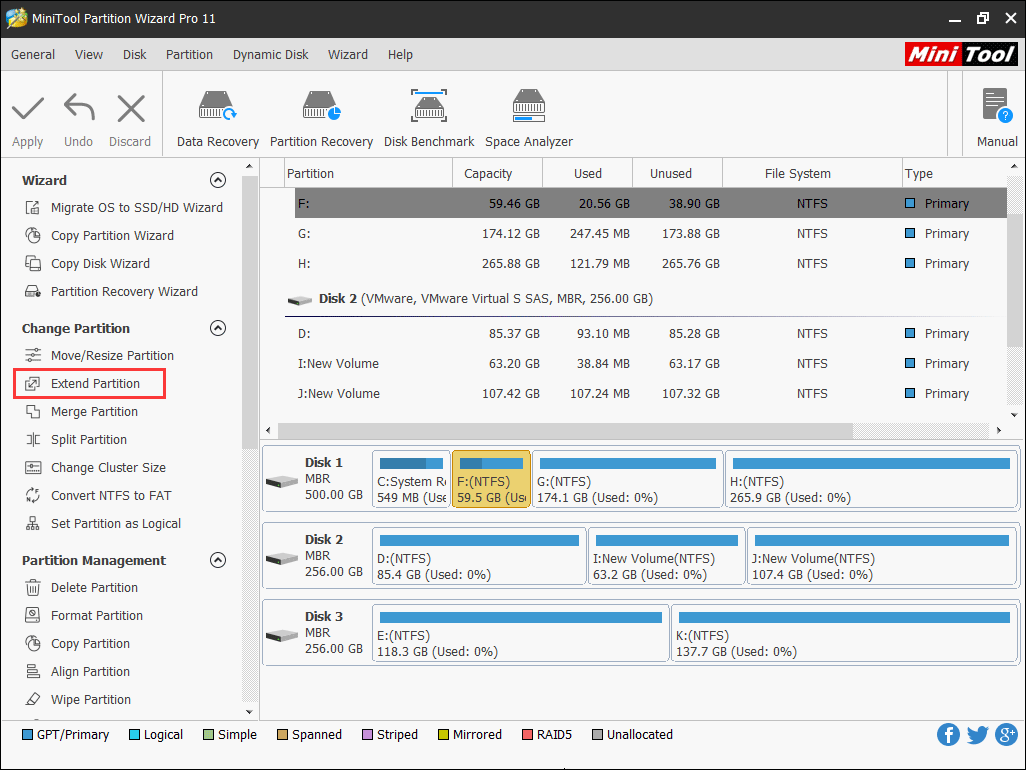
Step 10. On this page, you can see all your disks and partitions. To extend system partition, you need to select it and choose Extend Partition.
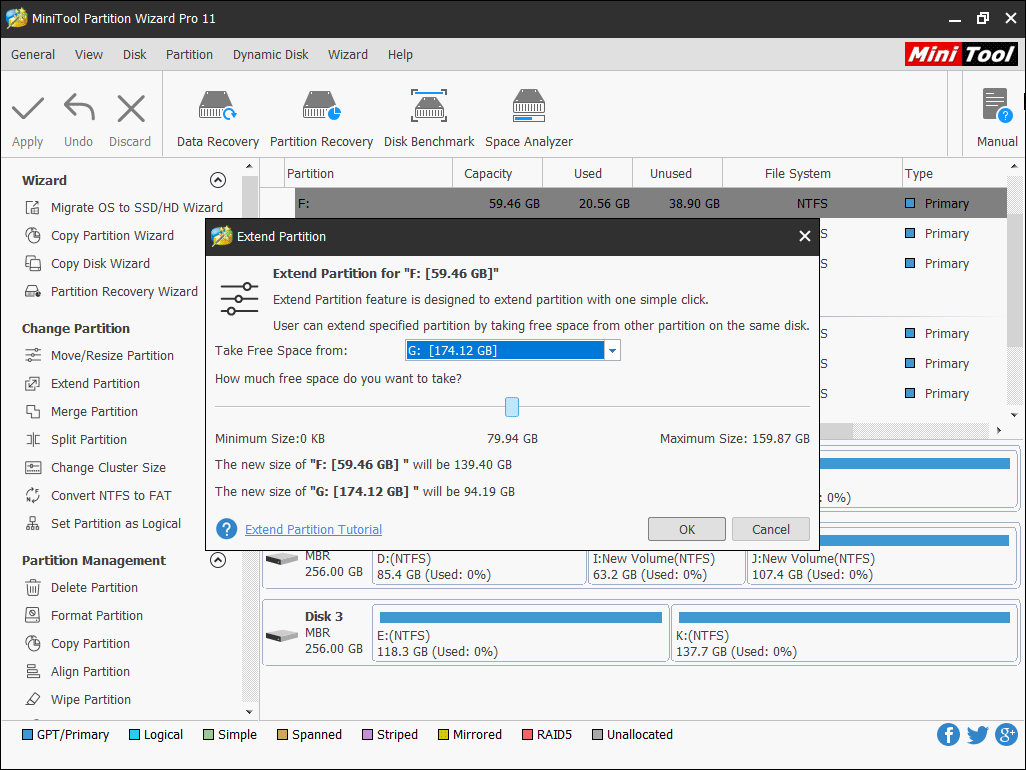
Step 11. Now, you can choose an existing partition or unallocated space on the same disk to take free space, which will be used to extend the target system partition, and then drag sliding handle to decide how much free space to take. After that, click OK button to go back to the main interface.
Step 12. In this interface, click Apply at last.
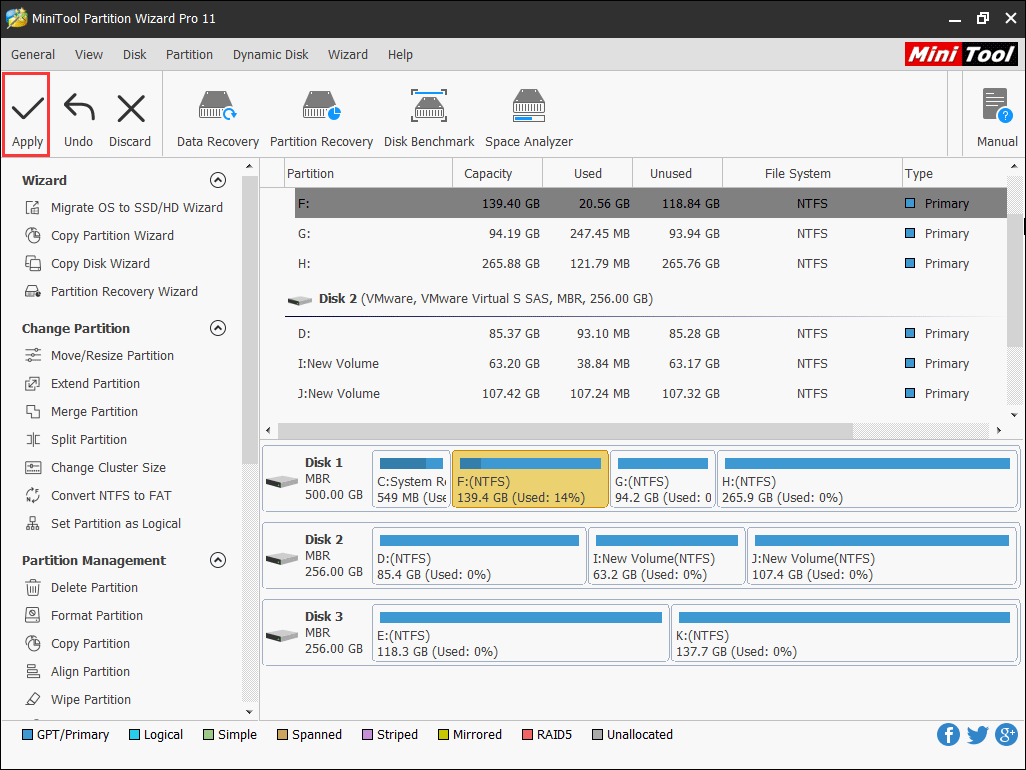
After system partition resizing, you should fix the windows 10 update not enough disk space issue and error code 0x80070070. If you try again and still find Windows 10 update error code 0x80070070, then you may try the following methods.
Solution 4. Increase the Size of Windows Recovery Partition
Some users have reported they have enough free space on system partition when they update Windows 10, but the 0x80070070 error still exists. Well, if you have enough free space on system partition, it might be the problem of Windows recovery partition.
Windows creates a Windows recovery partition when you install it on a clean disk. When you have problem with Windows OS, you should be able to recover your system with the partition. On an MBR disk, the partition is called system reserved partition, while on a GPT disk, this partition is called EFI system partition or ESP.
When upgrading to Windows 10, the upgrade wizard is trying to copy files to the Windows recovery drive. If the recovery partition is full, the update will fail with error code 0x80070070.
In this situation, the best resolution is to extend the Windows recovery partition via a third-partition software as Windows Disk Management cannot extend that partition.
Then how to increase the size of Windows recovery partition? Here, MiniTool Partition Wizard Professional Edition is highly recommended as it can extend recovery partition in just a few clicks. Now, let’s see detailed steps.
Step 1. Follow the steps 1-9 in the last solution to launch MiniTool Partition Wizard Bootable Edition.
Step 2. Select the system reserved partition and choose the Extend Partition feature from the left.
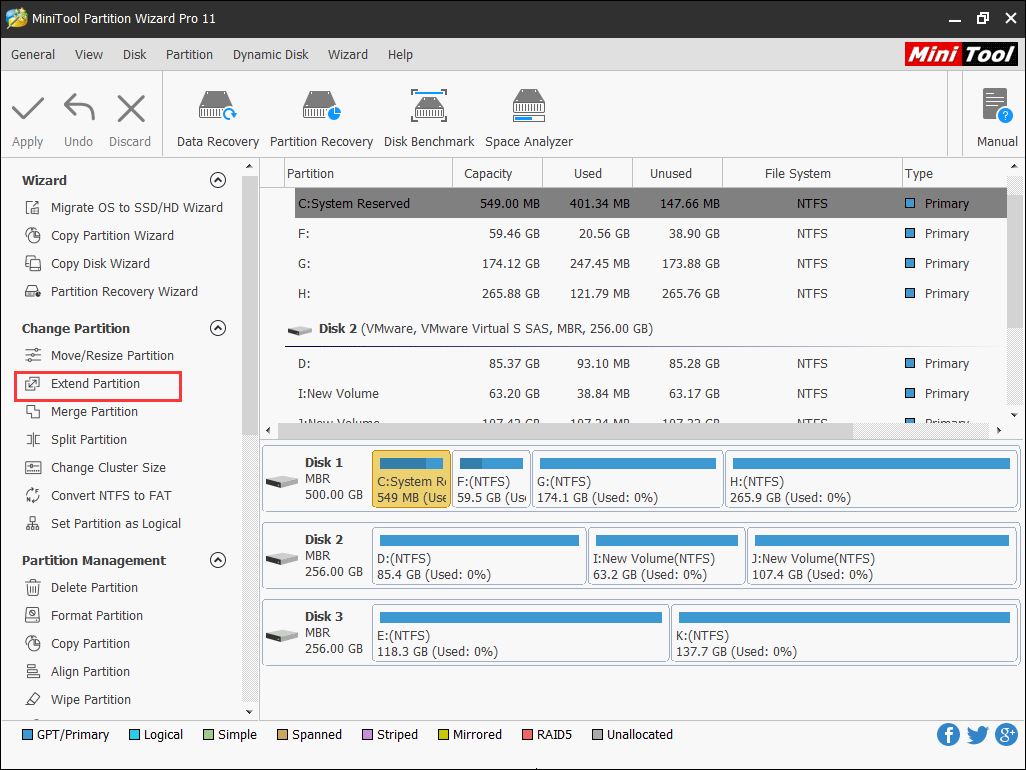
The steps to extend Windows recovery partition is the same as extending C drive in Solution 3. You just need to follow the step-by-step instruction in MiniTool Partition Wizard and click Apply at last.
Solution 5. Using the Media creation Tool to Upgrade Windows 10
Many users who have problem with Windows 10 update report that using Media Creation Tool to update Windows 10 is a perfect solution to fix error code 0x80070070.
If you were unable to remove the 0x80070070 error with the methods above, try using the Media Creation Tool to update Windows 10. The Media Creation Tool will help you update an existing installation to the latest version and leave all your files where you left them.
Here’s a step-by-step tutorial to using Media Creation Tool to upgrade Windows 10
Step 1. Download Media creation Tool from official link.
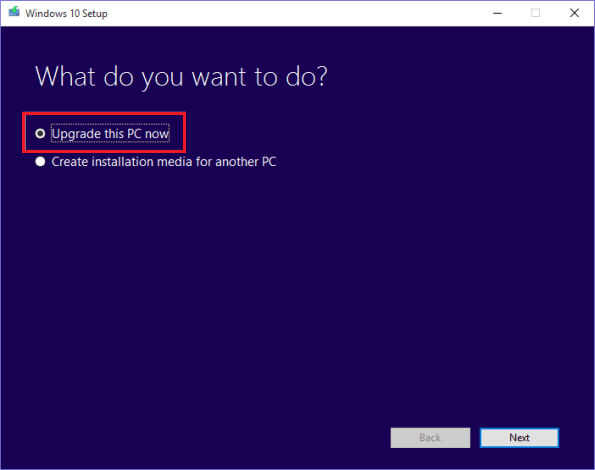
Step 2. Open the tool and choose Upgrade this PC now and click Next to continue. It will start downloading the necessary files. You just need to wait patiently.
Step 3. Select Keep personal files and apps and click Next.
Step 4. Let it install. The installation process will start and your PC will reboot. Your system will restart several times during this process. When it’s finished, you just need to log in with your account. Hope this method can help you.
Bottom Line
In this post, I have introduced you 5 solutions on Windows update error code 0x80070070. If you’re seeing the 0x80070070 error when the Windows 10 upgrade fails, you may try the above 5 methods to fix Windows 10 update error code 0x80070070. If you want to extend system partition or system reserved partition, try using MiniTool Partition Wizard.
If you have any have any question about how to fix error code 0x80070070 Windows 10 or how to extend system partition or system reserved partition, you can leave a message in the following comment zone and we will reply as soon as possible. If you need any help when using MiniTool software, you can contact us via [email protected].

User Comments :