Since Microsoft released Windows 10 update, many error codes also come with like Windows 10 update error 0x80070422. How to fix this error quickly? In today’s article, MiniTool Solution will provide you with a few best troubleshooting methods to fix error code 0x80070422.
About Windows 10 Update Error 0x80070422
To make some new features and security protection such as Windows defender accessible for Windows users, Microsoft delivers free Windows Update for the operating system in regular. Windows update is essential to run any Windows operating system.
In general condition, the Windows Updates are installed automatically. Also, you can manually update your Windows by clicking Check for updates in Windows Update settings.
Well, if you don’t want to update your Windows 10, you can turn off the automatic Windows update settings.
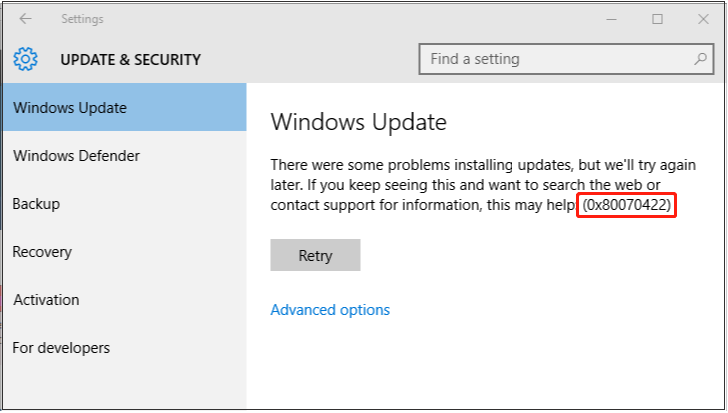
The error code 10 0x80070422 is one of the Windows Update bugs that may be caused by the corrupted system files on your device. Furthermore, many users reported that Windows 10 update error 0x80070422 also appears when they try to check for updates, and sometimes when they install the Microsoft apps.
Fortunately, Windows 10 Update error 0x80070422 is relatively easy to fix. There are top 8 methods to fix this error.
Let’s begin!
Method 1. Use System File Checker
System File Checker (SFC) is a kind of Windows built-in utility that enables the user to scan and restore corrupted system files. As we mentioned above, Windows 10 Update Error 0x80070422 may be caused by corrupted system files. So, you can scan your device with the SFC utility.
To scan the error code 0x80070422 smoothly, we assist you with the detailed steps in the section below.
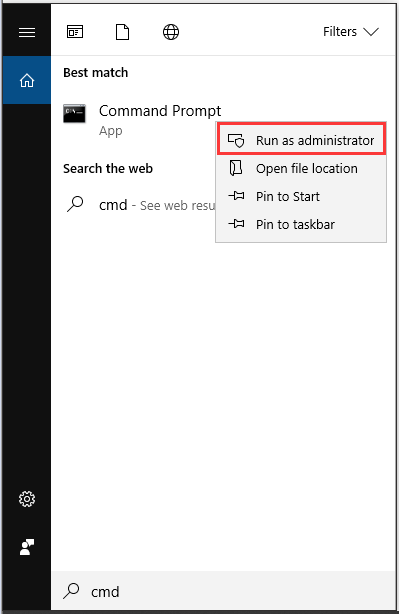
Step 1. Type “Command Prompt” in the search box on the taskbar, and then right-click the app in the list to select Run as administrator.
Step 2. Type sfc/scannow in the command prompt and hit Enter. Then it will automatically start to scan the whole system and locate the damaged files on the computer. This process may take you much time to scan, please patiently wait.
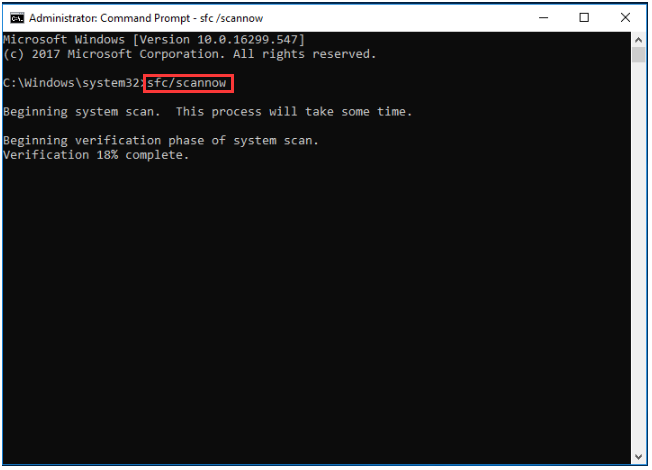
After the scanning completes, you can check if Windows 10 update error 0x80070422 gets resolved or not.
Method 2. Start Your Windows Update Service
Windows Update service was designed to handle Windows updates and all the processes related to it. If Windows Update service is stopped, the error code 0x80070422 may appear when you install Windows updates. So, you should make sure that your Windows Update service is running with the automatic startup type.
Let’s see how to start your Windows Update service.
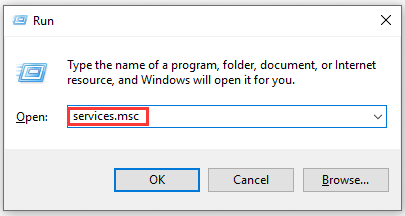
Step 1. Press Win + R keys in the keyboard to call out the Run dialog box. Then type service.msc in the box and hit Enter.
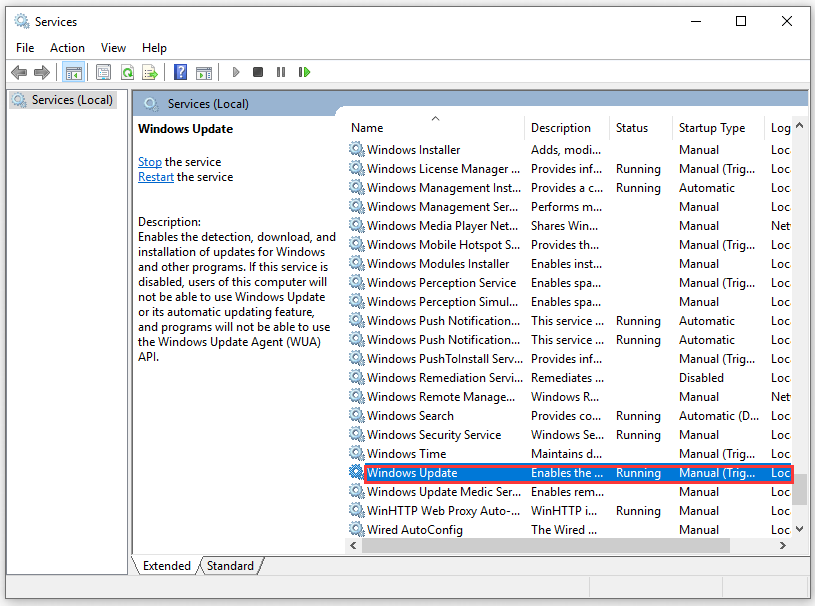
Step 2. Inside the service window, navigate to Windows Update and double click it.
Step 3. In the pop-up window, select Automatic from the drop-down menu in the Startup Type section. Then click on the Start button if the service is stopped.
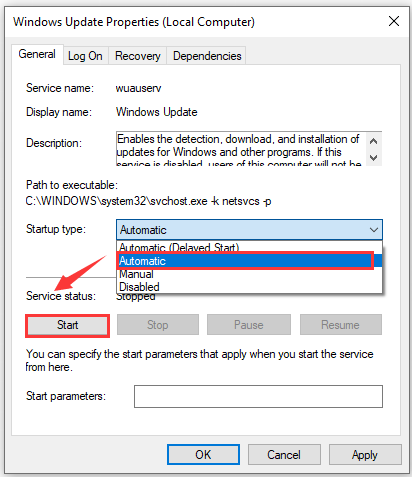
Step 4. Click on Apply button to save the changes and select OK.
After starting your Windows Update service, you can check if the Windows Update error 0x80070422 still persists when you install Windows Updates.
Method 3. Make Sure the Related Services Are Running
In addition to starting your Windows Update service, you should also make sure these related services are running. These services impacts on the proper functioning of your Windows and its updates.
There are a few more services you need to set up, please keep reading patiently.
Step 1. Open up the Run dialog box and type service.msc in it.
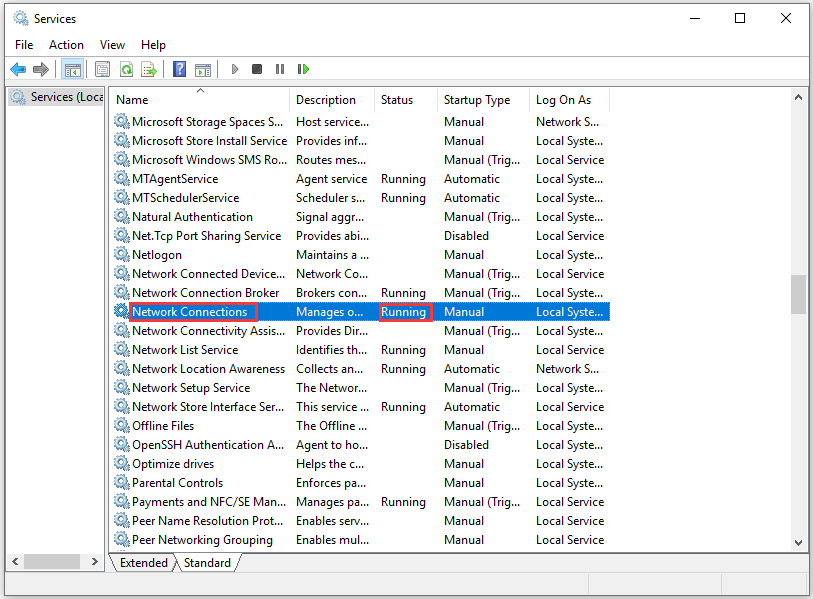
Step 2. Navigate to the service Networking Connections and check if the Status column is Running. If not, you can start it using the above method.
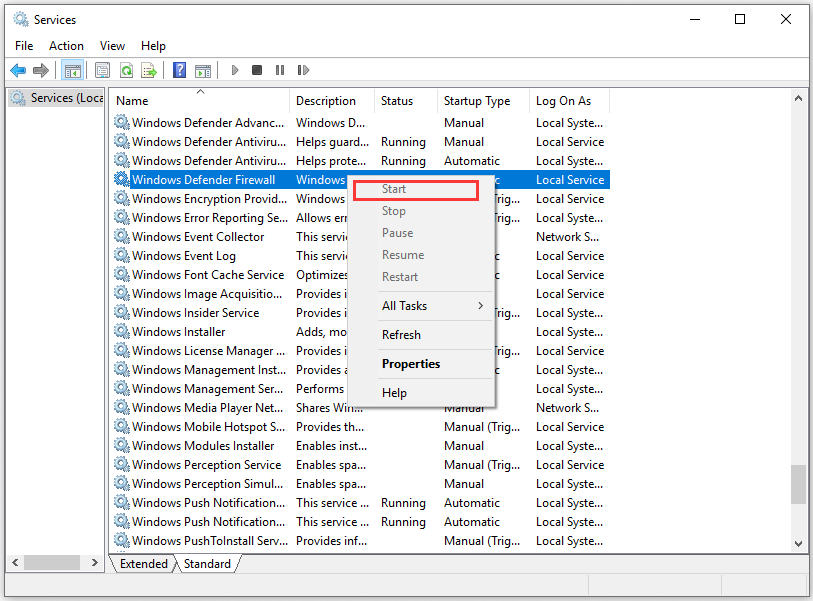
Step 3. Navigate to the service Windows Firewall and check if the Status column is Running. Similarly, if the status of Windows Firewall is not running, just right-click the service and select Start.
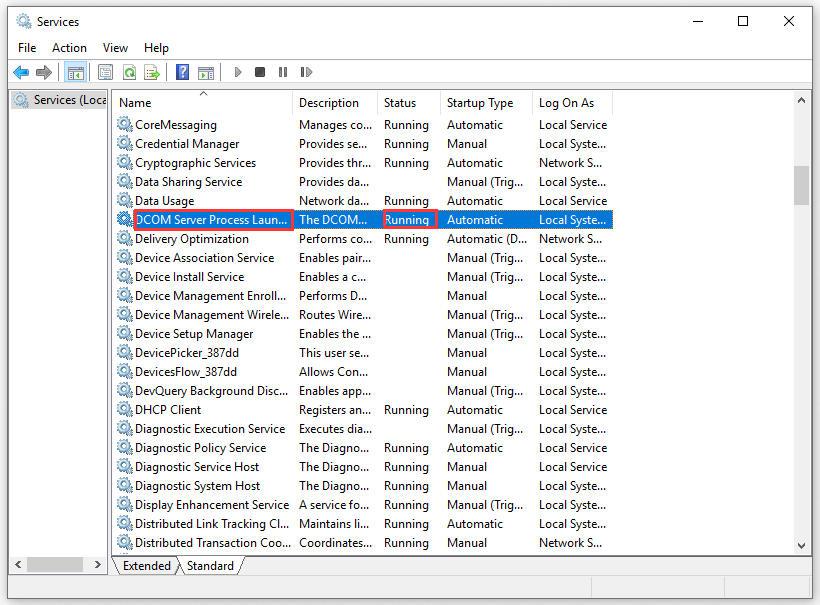
Step 4. Find the service DCOM Server Process Launcher in the list and check if the Status column is Running. If not, right-click it and select Start.
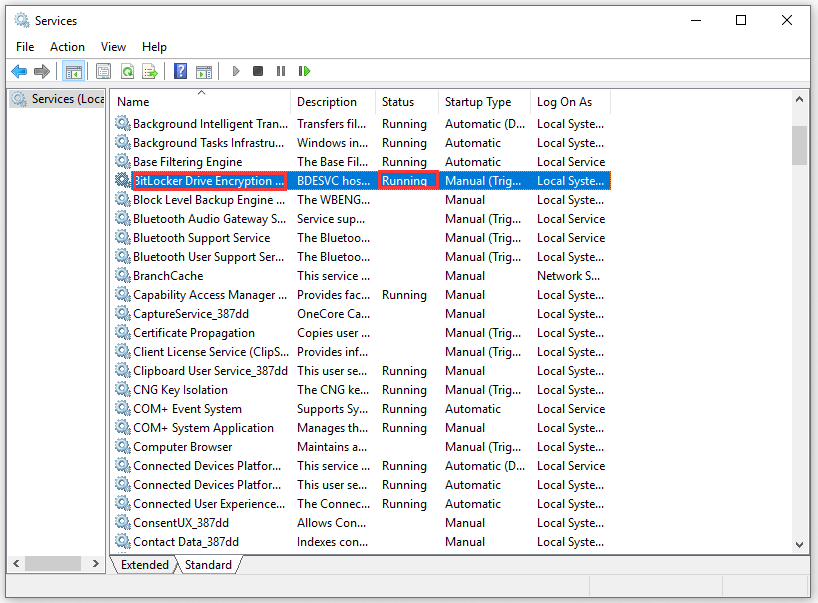
Step 5. Navigate to the service BitLocker Drive Encryption Service and check if the Status column is Running. If the service is not running, then right-click it and select Start.
After starting all these services, you can check if Windows 10 0x80070422 error code gets resolved or not when you install Windows Updates.
Method 4. Disable IPv6
Disabling IPv6 has been confirmed by many users who encounter Windows 10 Update error 0x80070422. The steps for disabling IPv6 are given below:
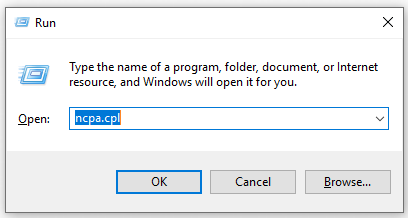
Step 1. Press Win + R keys in the keyboard to call out the Run dialog box. Then type ncpa.cpl in the box and hit Enter.
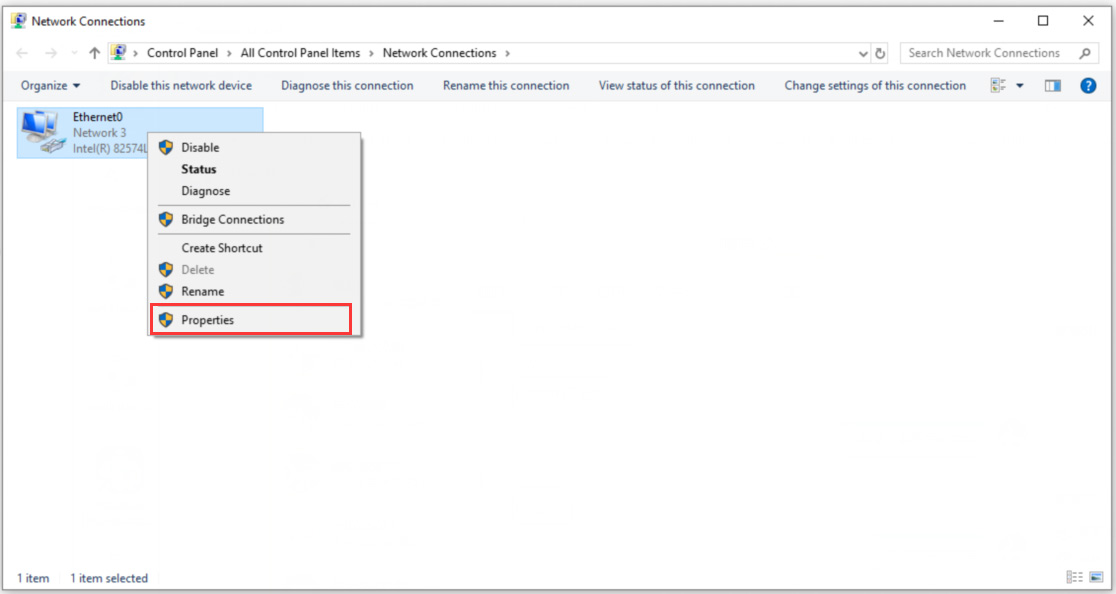
Step 2. Right-click the internet connection that is connected to your computer and select Properties.
Step 3. Navigate to the option Internet Protocol Version 6 (TPC/IPv6) from the This connection uses the following items and Uncheck it.
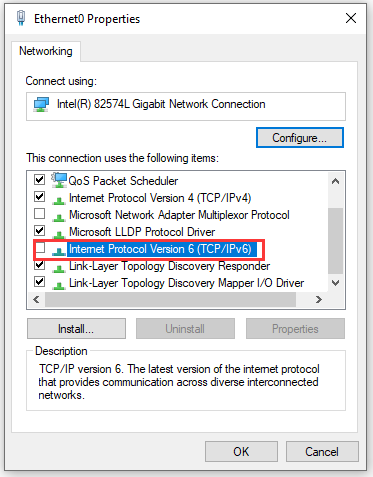
After finishing all above steps, you can reboot the Windows to check if the error code 0x80070422 still exists.
Method 5. Enable/Disable Network List Service
Network list service was designed to identify the network connected with the computer, gather and store the properties of the networks. It is reported that lots of users get rid of the Windows 10 Update error 0x80070422 by disabling or enabling the Network List Service.
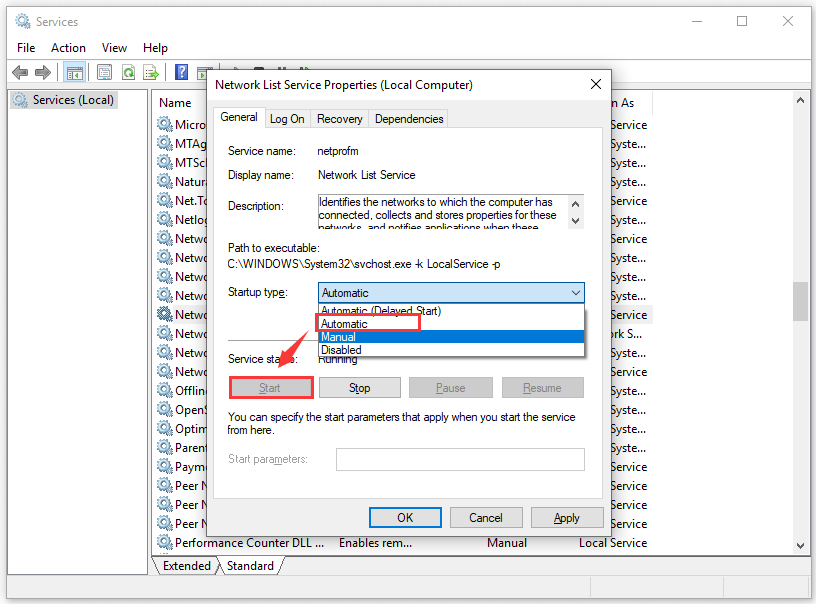
Disabling or enabling the service depends on its initial state. In other words, if the service is running, then try to stop it. If the service is already stopped, then try to start it.
Step 1. Press Win + R keys to call out the Run dialog box. Then type service.msc in the box and hit Enter.
Step 2. Inside the services window, navigate to the service Network List Service and double-click it to open the properties window.
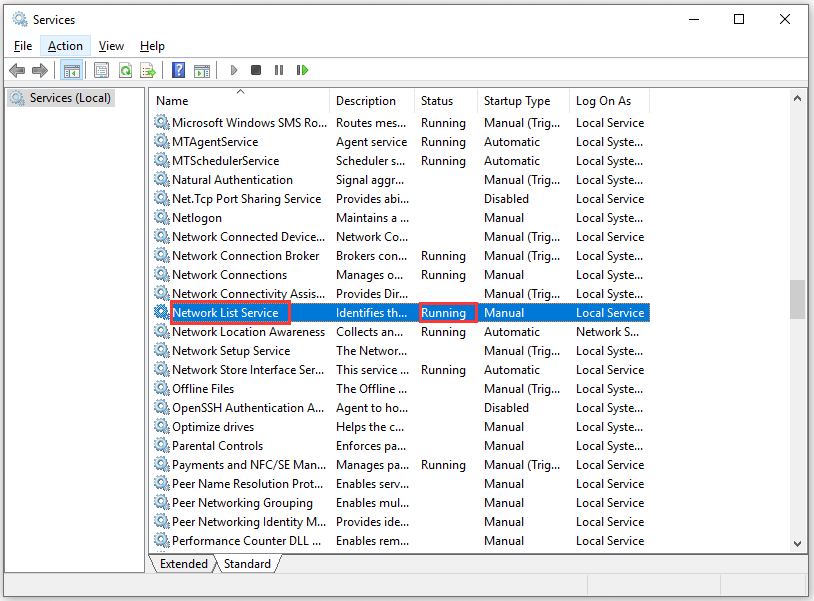
Step 3. Select Automatic from the drop down menu in Startup Type section. Then click on Start button if the status is stopped.
Step 4. If the status of the service is running, select the Disabled from the drop-down menu in the Startup Type section. Then click on Stop in the Service Status.
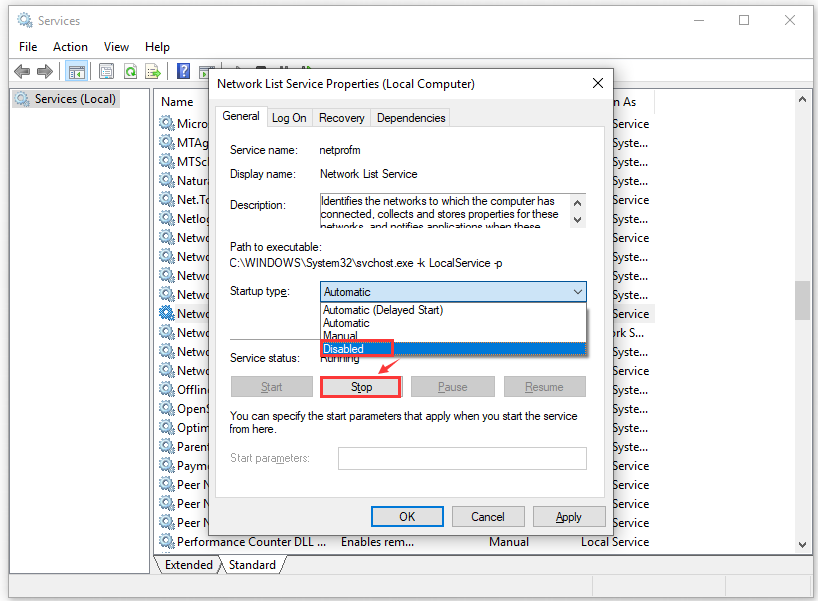
Step 5. Click on Apply then OK.
This method should fix your problem. If not, move on to the following steps.
Method 6. Create a .BAT File to Fix This Error
The error code 0x80070422 can also be fixed by creating a .BAT file to make sure you can download and install new features successfully when you update Windows.
In order to create a .BAT file, you need to:
Step 1. Open up the Notepad by typing notepad in the Run dialog box and hit Enter.
Step 2. Copy and paste the following text into the notepad:
Notepad:sc config wuauserv start= auto
sc config bits start= auto
sc config DcomLaunch start= auto
net stop wuauserv
net start wuauserv
net stop bits
net start bits
net start DcomLaunch
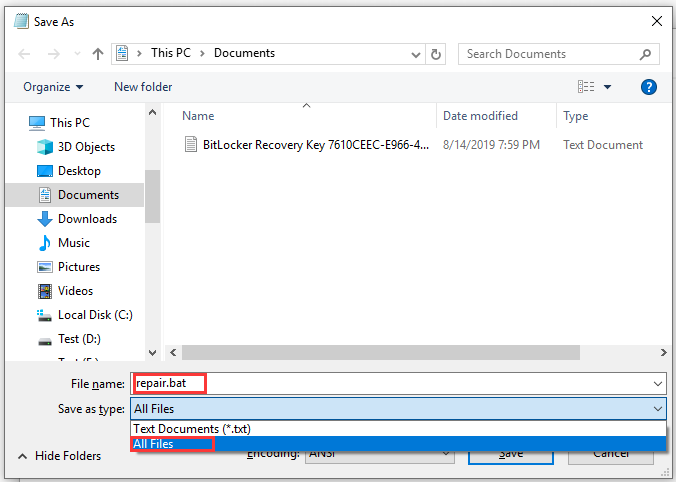
Step 3. Press Ctrl + S to save the text as All Files and name it repair.bat. Then select a place you want to save .BAT file and click on Save button.
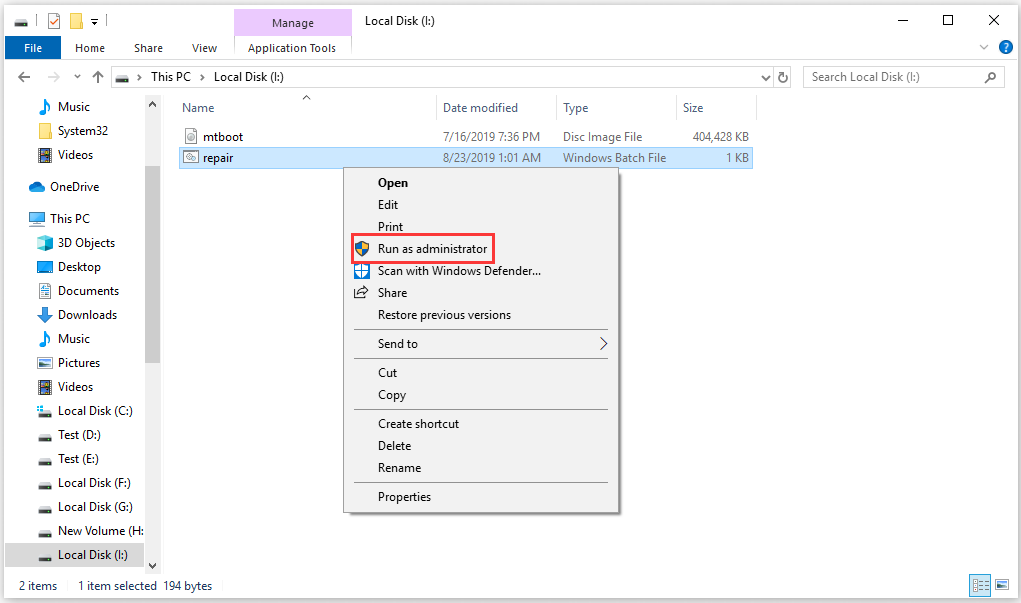
Step 4. Find this.BAT file you saved and right-click it to select Run as administrator.
Step 5. After that, an elevated Command Prompt will be opened by this file. Just click Yes to execute each of the required commands.
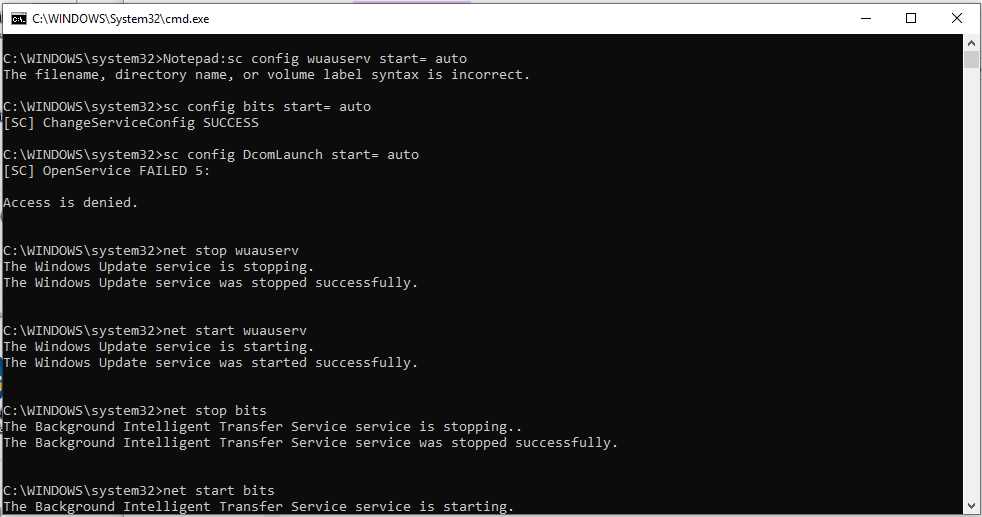
Now, you can see whether Windows 10 0x80070422 error is resolved or not.
Method 7. Check EnableFeaturedSoftware Data
To check EnableFeaturedSoftware Data, you need to open the registry editor.
Step 1. Press Win + R key in the keyboard to call out the Run dialog box and type regedit in the box.
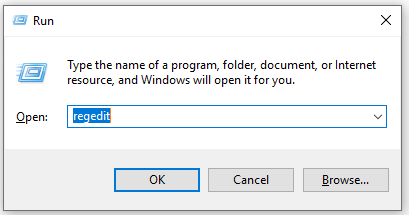
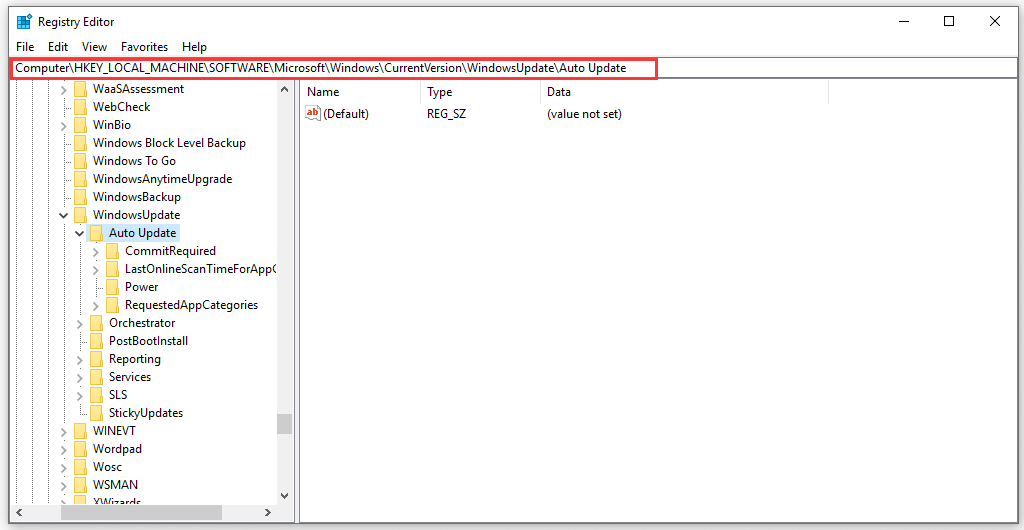
Step 2. Navigate to the following path:
HKEY_LOCAL_MACHINE > SOFTWARE > Microsoft > Windows > CurrentVersion > Windows Update > Auto Update
Step 3. Double click the Default file and make sure that its value is set to 1 In the Edit String window.
Step 4. Double click the Default file and make sure that its value is set to 1 In the Edit String window.
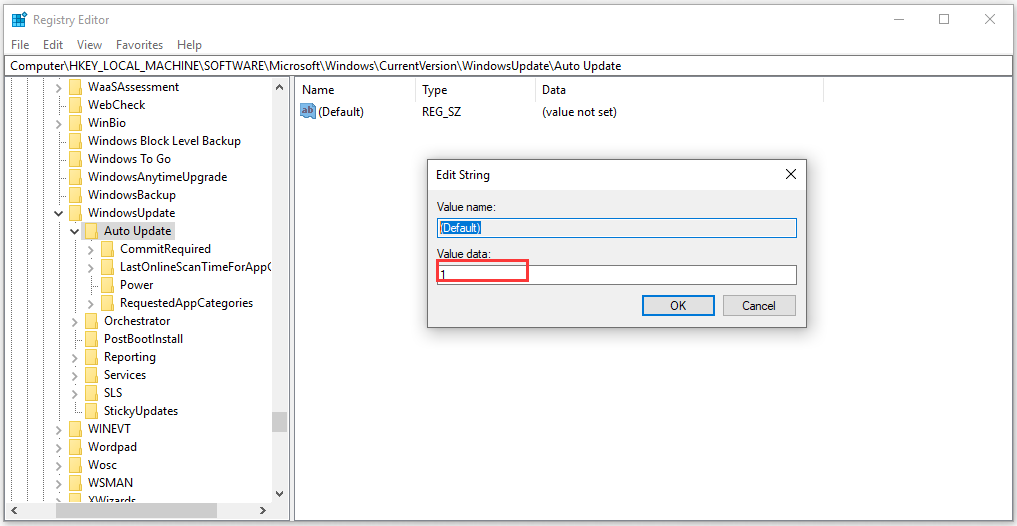
Then you can try to install Windows 10 update and check if the Windows 10 update error 0x80070422 is eliminated.
Method 8. Run Windows 10’s Update Troubleshooter
Troubleshooter is a built-in utility in Windows 10. This tool can be able to quickly fix some technical issues affected by all kinds of Windows components, including Windows Update service.
So, if the Windows 10 0x80070422 error code is still not resolved after trying all the above methods, you can run the troubleshooter of Windows 10 Update.
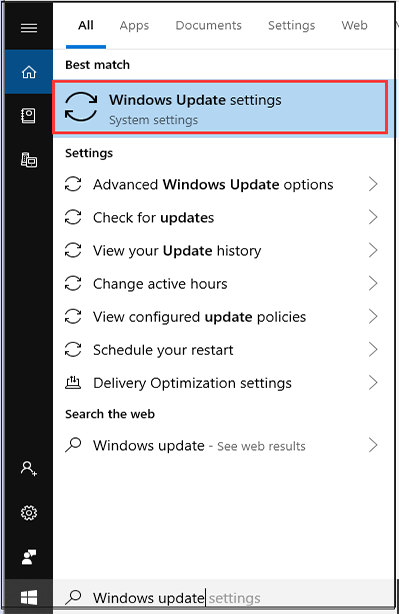
Step 1. Type Windows Update in the search box and select the Windows Update settings under the best match.
 <
<
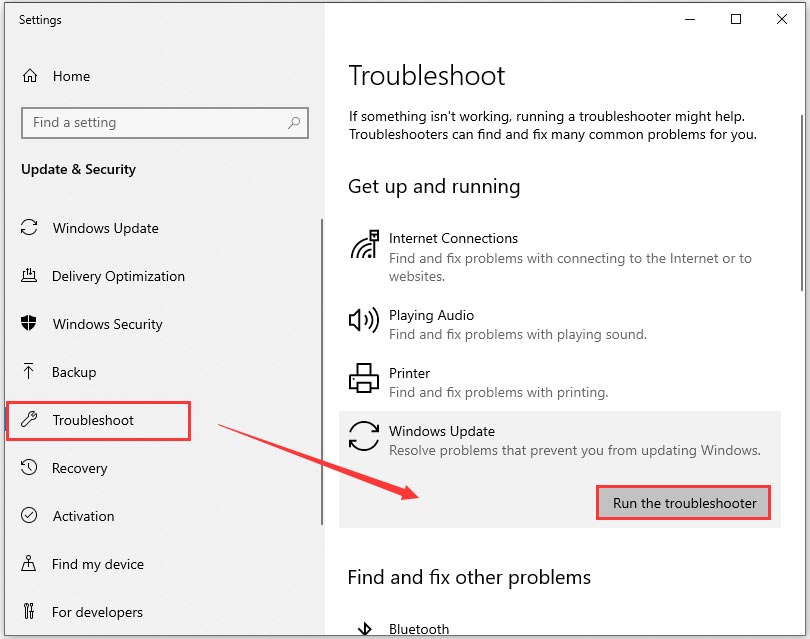
Step 2. In the pop-up window, click on Troubleshoot from the left action panel under Update & Security.
Step 3. Then double click Windows Update from the right panel and you will find Run the troubleshooter, just click on it.
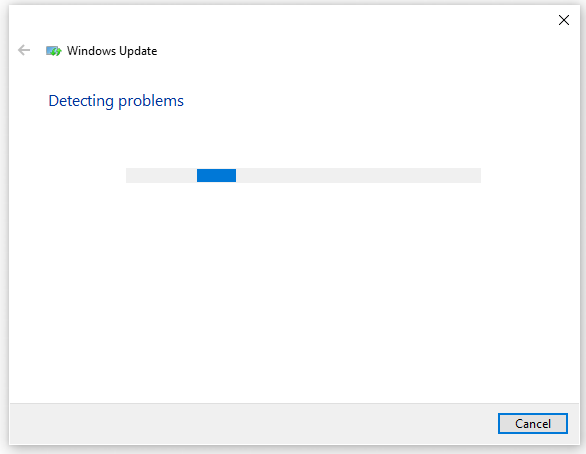
Step 4. Then you will see the Windows Update Troubleshooter is detecting problems
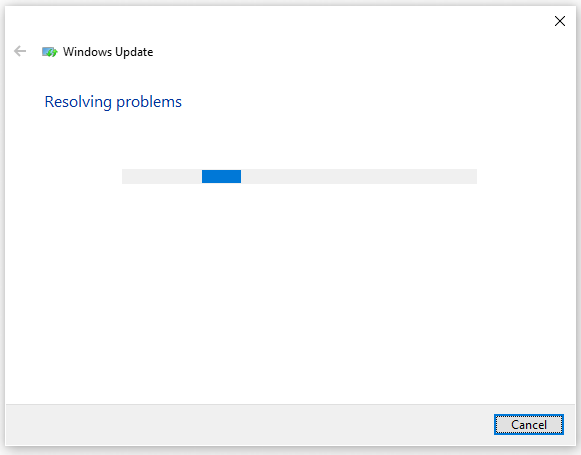
Step 5. After a while, you can see the Windows Update troubleshooter is resolving problems below. This process will take some time.
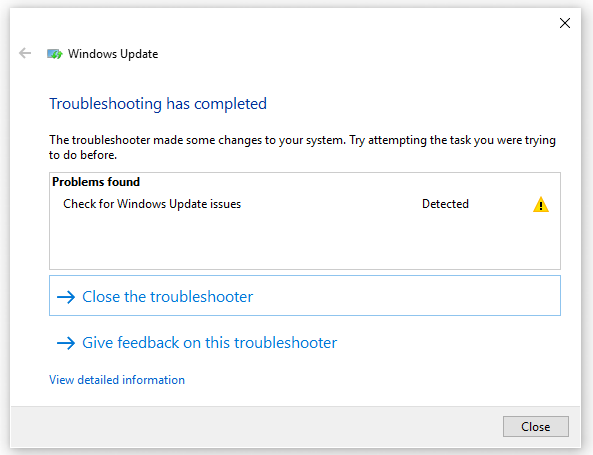
Step 6. After the fix completes, close Windows Update Troubleshooter and check if the error 0x80070422 still persists.
Final Words
Top 8 methods about how to fix Windows 10 update error 0x80070422 has been elaborated. Hope there is a suitable way that can really help you.
Welcome to leave your good ideas in the following comment area. Or if you have any questions, you can send an email to [email protected]. Much appreciated!
Windows 10 Update Error 0x80070422 FAQ
- Open the Settings window, and then click Update & Security
- Navigate to the Troubleshoot section on the left pane, and select the Windows Update section.
- Click the Run the troubleshooter button
- Click Apply this fix option
- After the troubleshooting process completes, restart your computer
- Type check for update in the search box and then select the top result from the context menu
- In the Settings window, click on the Check for update button on the right pane.
- Now, Windows will install the updates for you automatically and you just need to wait for some time
According to Microsoft, Windows 10 May 2019 Update requires the free hard disk space up to 32GB. It is an increase from the 20GB needed for the 64-bit version. However, Microsoft said that these are only requirements for new computers.
You need to check if there is enough free space on the hard disk before installing updates, or you will encounter the error codes such as 0x80070070.
- Press Win + I keys to open the Settings window, and then navigate to Update & Security > Windows Update.
- Select Pause updates for 7 days. Also, you can click on the Advanced options to select the drop-down menu and specify a date for updates.

User Comments :