Screensaver is a software program that becomes activated after the computer is inactive for a specified amount of time. But some computer users reported that this program is not working and this article shows the solutions to fix that. By the way, you can try MiniTool Partition Wizard to manage your hard drive on Windows 10 easily.
Considering that you are eager to know the solutions to Windows 10/11 Screensaver not working, let’s come straight to the point.
Please make sure you have activated Screensaver on Windows 10/11. If not please enable it. If you have activated it, please refer to the following solutions.
Fix 1: Check Windows 10 Screensaver Settings
Windows 10 Screensaver not working can be ascribed to improper Screensaver settings. In this situation, you can try to check the settings by following the steps below:
Step 1: Click the Start menu and select the Control Panel option.
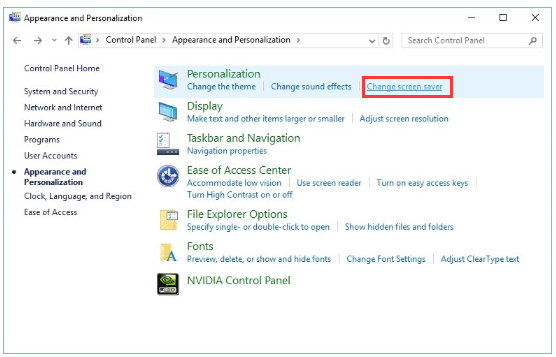
Step 2: Click Appearance and Personalization and Change screen saver under Personalization.
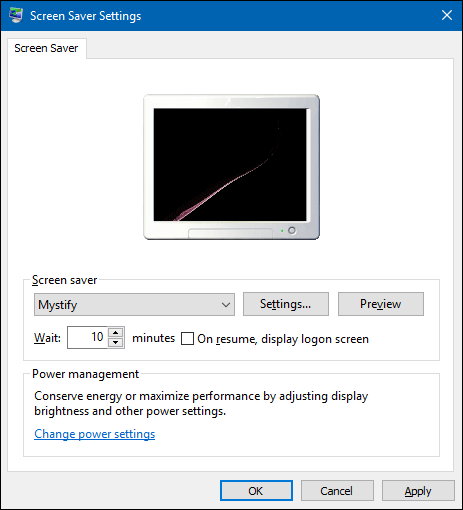
Step 3: After accessing the Screen Saver Settings window, please select which screen saver you would like to use, customize it and select the time before it appears. Then click the Apply and OK buttons to confirm these changes.
Fix 2: Disconnect Unnecessary Devices
According to the reports from some computer users, Windows 10 Screensaver not working can be caused by certain devices, like game controllers. Therefore, please remove unnecessary devices and check whether “Windows 10 Screensaver not starting” has been solved.
Fix 3: Clean Mouse Sensor and Mouse Pad
As we know, optical mouse uses an optical sensor to detect movement and direction. However, if the sensor has dust on it, the mouse might detect false inputs and prevents your screen saver from showing up.
To clean your mouse, you need to flip it over and use a paper towel or a cotton swab to do gently. You might also consider cleaning or replacing your mouse pad in case the dust on it might get into the mouse optical sensor.
Fix 4: Reset Power Management Option
Although Screensaver is designed to protect monitor, it is also a power-saving feature. Therefore, it is tightly connected to your power saving settings. In other words, if your power saving settings have been changed or corrupted lately, there is a chance that your Screensaver will not start properly.
So, let’s going to bring your Power Management settings back to default to make your Windows 10 Screensaver work properly again. Here is the tutorial:
Step 1: Access Control Panel again.
Step 2: Click System and Security, and select the Power Options.
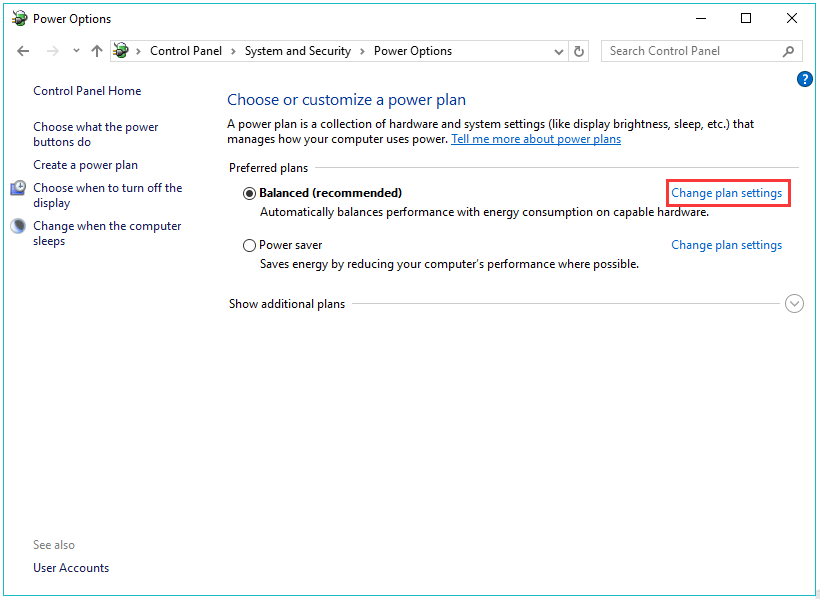
Step 3: Now, you will see your current power plan. Click Change plan settings next to your selected plan.
Step 4: Click the Change advanced power settings in the new window.
Step 5: In the Advanced settings section, choose the Restore plan defaults button.
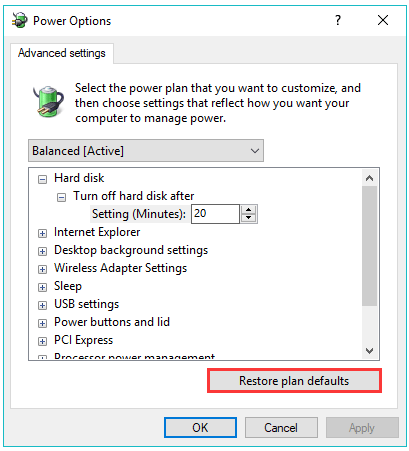
After carrying out the above steps, your power plan settings are now back to default. And you should check whether your Windows 10 Screensaver works properly.
Fix 5: Update Your Windows 10/11
As we know, Microsoft delivers Windows fixes to vulnerabilities, problems, and bugs discovered after releasing a Windows distribution. Furthermore, in case of the shortcomings behind your Windows 10, the last solution is updating your Windows 10.
To do that, please refer to the following steps:
Step 1: Hit the Windows icon on the keyboard and select the Settings icon from the Start menu.
Step 2: After accessing the Settings window, please click the Update & security section.
Step 3: Select Windows Update from the left side menu and click on the Check for updates button.
Step 4: If there are any updates available, download and install them. Reboot your computer to check whether “Windows 10 Screensaver not working” is solved.
Please note if you run into Windows update stuck on checking for updates, MiniTool offers you solutions. And it is highly worth remembering not updating Windows blindly, which is one of the biggest mistakes PC users make.

User Comments :