The HDMI connection is the go-to, versatile option for streaming content from Windows 10/11 to a TV or monitor. However, the problem occurs when Windows 10/11 does not or cannot detect the TV or monitor via the HDMI cable.
In addition to this, you may have problems with PC not projecting to another screen, Surface not connecting to TV or second screen or Windows not detecting the second monitor.
Well, how to fix the Windows 10/11 not detecting HDMI TV or 4K TV issue? Please keep reading.
Before trying the methods below, you should try the following basic solutions:
- Make sure the HDMI cable is properly plugged into the TV or monitor’s HDMI port.
- Use a soft brush or microfiber cloth to clean the HDMI port to remove dust or debris.
- Unplug the HDMI cable from the PC and monitor. Restart your computer and try plugging in the cable again.
- Double-check which HDMI cable you are trying to use. Make sure its ends are not severely frayed or torn.
- Change the HDMI port, as most external monitors and TVs have multiple HDMI ports.
- Make sure you are using the correct HDMI cable and not an outdated standard cable.
If you’re still having issues with Windows 10/11 not detecting HDMI TV or 4K TV, here’s how to fix it.
Way 1: Manually Detect Display
If you are trying to connect an old monitor or TV to Windows 11/10, you may encounter the Windows 10/11 not detecting HDMI TV issue. In this case, to fix the problem, you need to detect the monitor manually.
To manually detect Display in Windows 10, here is how to do that.
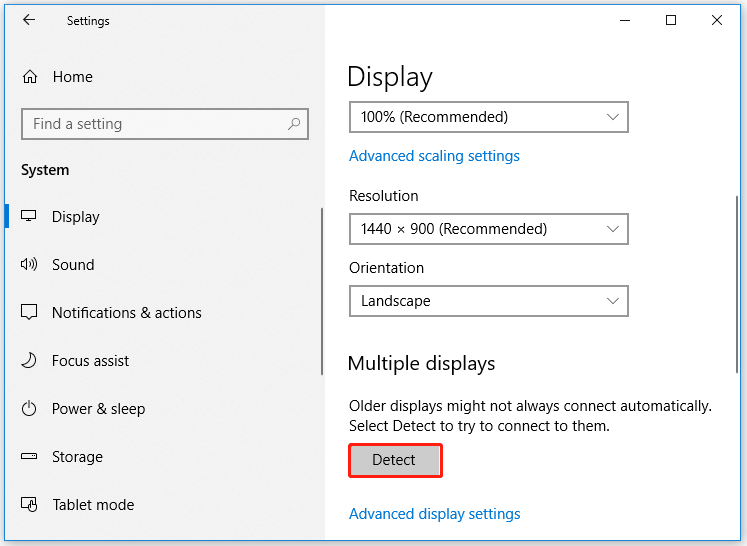
Step 1: Press the Win + I key to open Settings. Then go to System > Display.
Step 2: On the right pane, scroll to the Multiple displays section and click on the Detect button.

Step 3: Once done, close the Settings app.
For Windows 11, navigate to Settings > System > Display. Then expand the Multiple displays and click on the Detect button for the Detect other display option.
Way 2: Check and Change Projection Setting
Windows 10/11 offers different options to mirror, cast or view your PC screen on a connected monitor or TV. When your PC is connected to an external monitor or TV, use the Win + P key to launch the projection option. Window users can project visuals to a second monitor using the following options:
- PC screen only
- Duplicate
- Extend
- Second screen only
If you selected PC Screen Only from projection, it is time to change it to Second Screen Only.
Way 3: Update Display Driver
If you’re using an outdated display driver on your computer, Windows 10/11 may have issues detecting the display over HDMI. So, you need to update the Display driver to fix the Windows 10/11 not detecting HDMI TV or 4K TV issue.
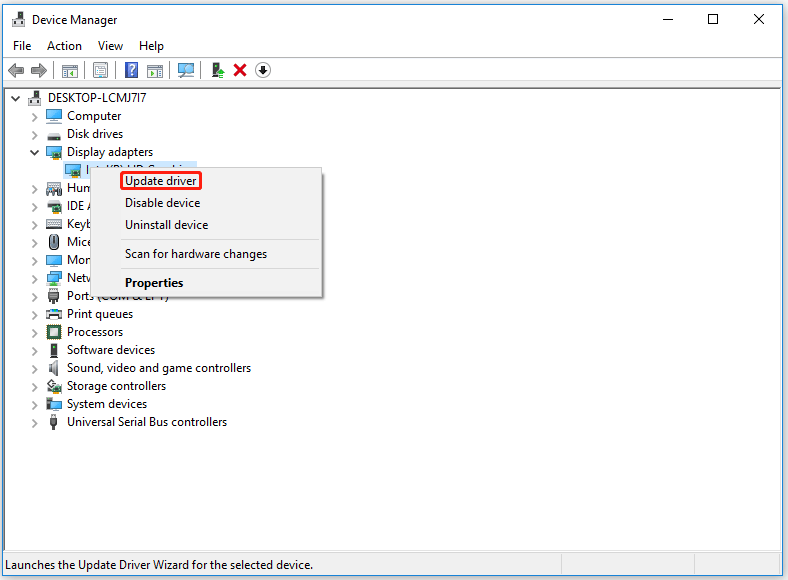
Step 1: Press the Win + X key and select Device Manager from the menu.
Step 2: Find and expand the Display adapters menu and right-click it. Then select the Update driver option.

Step 3: Select Search automatically for drivers. Then Windows will install the latest drivers.
Way 4: Detect Displays Using Intel Graphics Control Panel
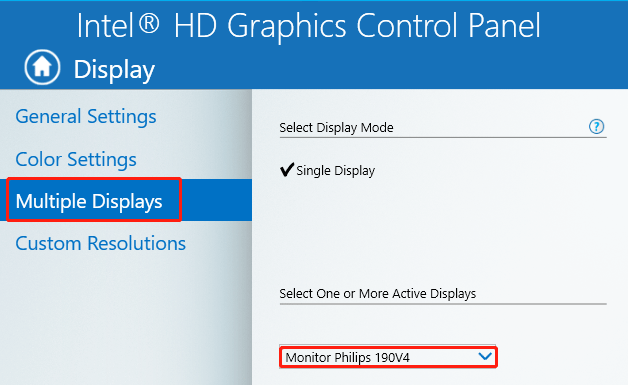
The Intel Graphics Control Panel allows you to select a connected monitor from the Display Mode menu. This only works if your system has hardware with on-board Intel graphics supported.
Step 1: Right-click any blank space on the desktop. Then select Graphics Properties. (For Windows 11, you need to go to Show more options > Intel Graphics Settings).
Step 2: The Intel Graphics Control Panel window will open. Then select Display > Multiple.
Step 3: Select the external monitor or TV from the Select One or More Active Displays section.

To rule out the possibility of a faulty HDMI TV or monitor, you may also have to run the Hardware and Devices troubleshooter to fix the problematic device.


User Comments :