Windows 10 File Explorer slow is one of the most common problems while managing files or folders. It is a great inconvenience that your work efficiency is reduced due to the slow File Explorer. Now, MiniTool will provide you with top 5 troubleshooting methods.
File Explorer is a widely used application in Windows 10 that you can use it to copy, move and edit files. However, it is very possible that you may encounter all kinds of problems related to it such as Windows 10 Explorer keeps crashing, exeplorer.exe system call failed and the one discussed here.
How to fix Windows 10 File Explorer slow? You can try the following 6 methods one by one until the problem is resolved.
Solution 1. Disable Cortana Using Registry Editor
Cortana is a useful feature on Windows 10 that helps you find the wanted programs and features quickly. However, some users report that it will lead to File Explorer slow Windows 10. To fix this issue, you can disable it by the following steps.
Step 1. Press Win + R Keys to open the Run box, and then type regedit in it and hit Enter.

Step 2. In the Registry Editor window, navigate to the following path on the left pane and open the destination folder.
HKEY_LOCAL_MACHINESOFTWAREPoliciesMicrosoftWindowsWindows Search.
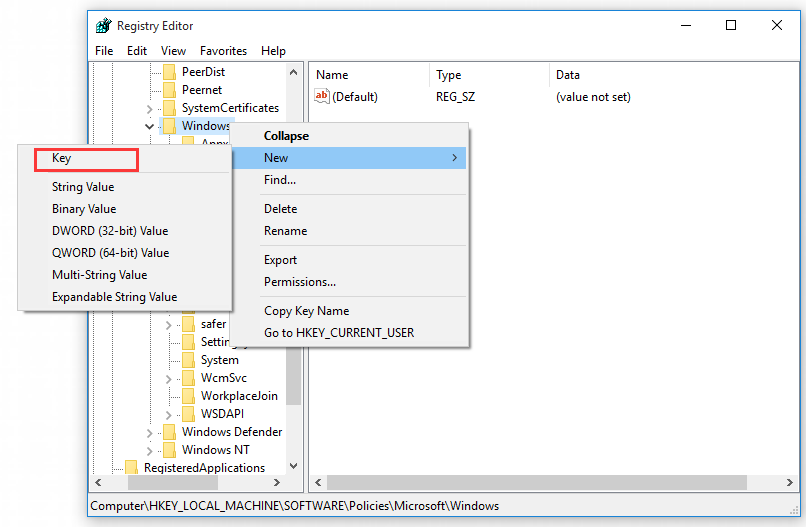
Step 3. Once you open the WindowsSearch folder, right-click any blank space and select New > DWORD (32-bit) Value from the context menu.
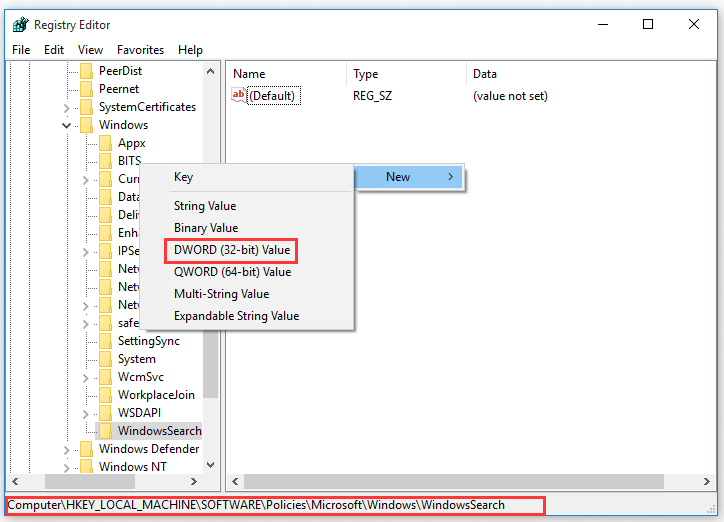
Step 4. Type AllowCortana to name the new DWORD, and then double click the DWORD and set its value date to 0. Click OK to save these changes.
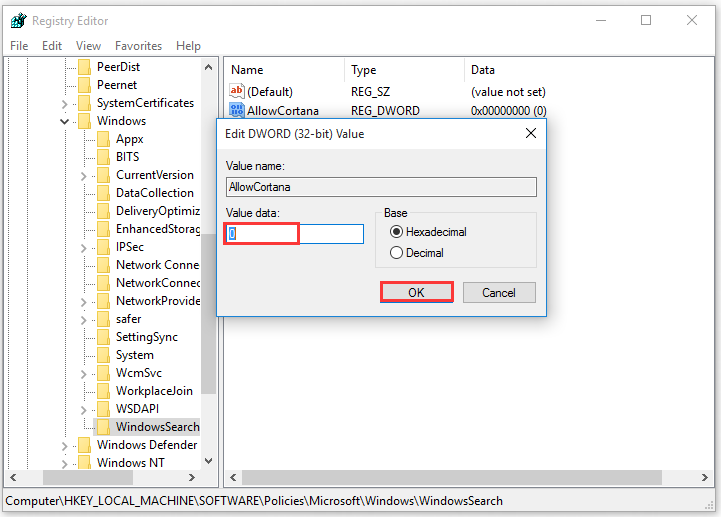
Step 5. Restart your computer and see if the File Explorer slow Windows 10 issue is fixed.
Solution 2. Disable Windows Quick Access Service
Quick Access is a feature of File Explorer that can help you access a certain folder or file quickly. However, sometimes this service can cause your File Explorer Windows 10 slow. So, you can try disabling it.
Step 1. Open your File Explorer, and then click on File on the upper left corner and select the Change folder and search options.
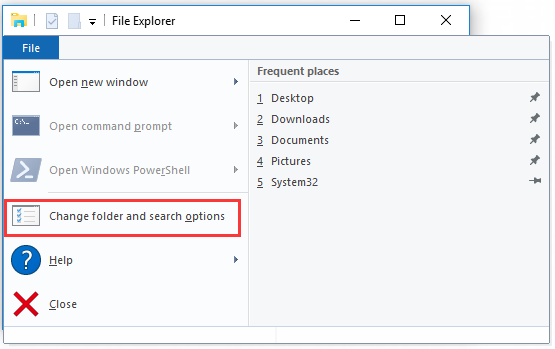
Step 2. In the pop-up window, change the Open File Explorer to location from the Quick access to This PC, and then click OK to save the change and exit.
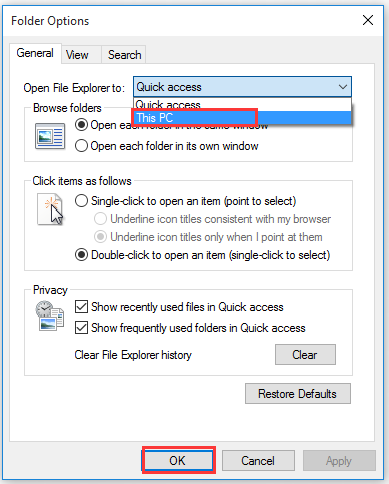
Step 3. Now, restart your computer and see if Windows 10 File Explorer slow still exists.
Solution 3. Change Folder Optimization Settings
If your Windows PC often performs optimization in the background, File Explorer might be slow. Here you can change the folder’s optimization to fix the problem.
Step 1. Right-click the folder that causes Windows 10 Explorer slow and select Properties.
Step 2. Navigate to the Customise tab, and then change the Optimize this folder for General items.
Step 3. Select the checkbox of Also apply this template to all subfolders, and then click OK and Apply to execute these changes.
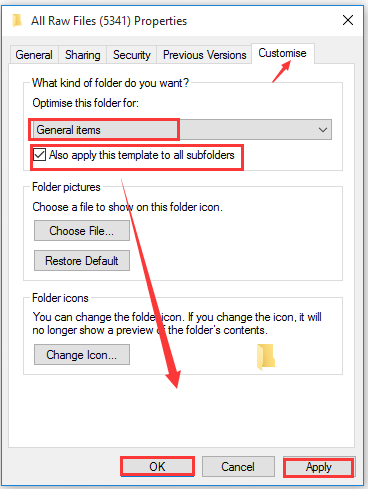
If there are more than one folders that lead to the problem, please repeat the above steps for each affected folder.
Solution 4. Press Win + E Keys to Open File Explorer
Some users reported that this problem simply occurs when using the File Explorer shortcut. In addition to right-clicking the icon, you can try another method to open it. Press Win + E keys to start File Explorer.
Solution 5. Reset File Explorer
Resetting File Explorer has been proven to be useful by many users. You can reset File Explorer to default settings. It is very simple to operate, just follow the quick guide below.
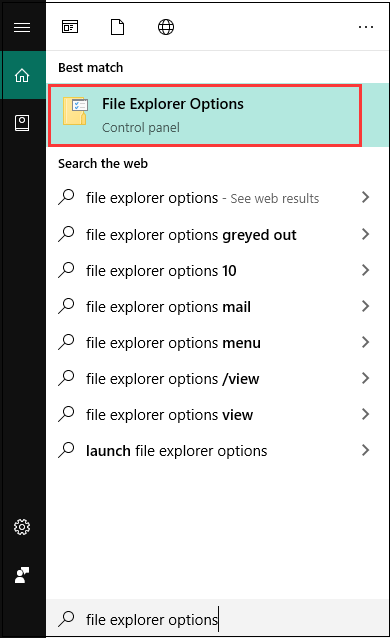
Step 1. Type file explorer options in the search box and select it from the context menu.
Step 2. Navigate to the View tab and click on the Reset Folders button. Then click on the Yes button when you are prompted with the confirmation message.
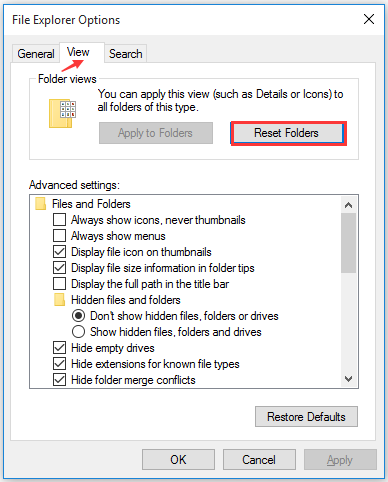
Step 3. Click on OK and Apply to save these changes.
After you reset the folder view, the Windows 10 Explorer slow problem should be resolved.

User Comments :