What is XMP file and what benefit it will bring to you? If you are bothered by these questions, this post is worth reading. MiniTool will focus on them and show you the detailed information in this article.
It’s likely that RAM on your manually build computer doesn’t run at its announced timings. In fact, RAM usually runs slower than its advertised speed unless you adjust its timings or enable XMP.
What is XMP file and how to enable it? To get the details, please keep reading the post.
What Is XMP
XMP refers to Extreme Memory Profiles, which is a specification serving as an extension to the standard JEDEC SPD specifications. It is an Intel technology that allows you to change multiple memory settings by choosing a different profile. By doing so, you can obtain higher RAM speed.
With XMP, you can overlock RAM and access to new users via profiles and predefined overlocking configuration more easily. In addition, you don’t have to go into your BIOS and set the RAM timings value by value manually.
On the contrary, the RAM you buy has a small amount of storage on it that offers one or two Intel Extreme Memory Profiles. The BIOS is capable of reading these profiles and configuring the optimal timings selected by your RAM’s manufacturer automatically.
Top recommendation: Some Basic Information about Intel Rapid Storage Technology
How to Enable XMP
How to enable XMP to get the advertised speed of your RAM? You may have such doubt like many other people. Well, this post will show you the detailed information.
Step 1: Restart your computer and press a key during the startup process. The key varies on different computer, which can be Esc, F2, or F10.
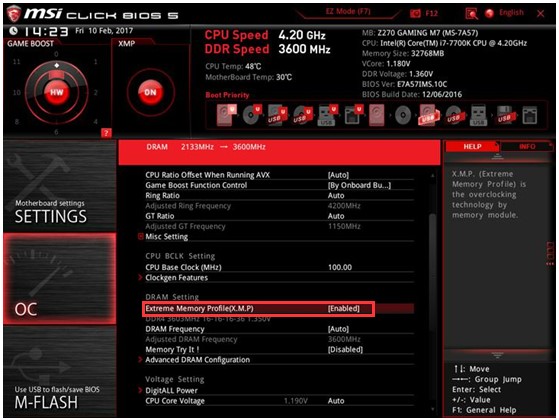
Step 2: Find the XMP option in BIOS setup. This option probably locates on the main settings screen or hides behind in advanced section. Here are two profiles under the XMP option. You should choose Profile 1.
Step 3: Click on Profile 1 and enable it.

-image from msi.com
Bonus Guide: Check RAM Timings
Actually, you can check XMP RAM timings in Windows by yourself with the help of CPU-Z. Download this program and install it on your computer. Then launch it and move to the Memory tab. Here, you will see the details of your RAM timings. Then compare the timings on the program with the advertised one to see if they are same.
What is XMP file? You may have an overall understanding of it now! Besides, you can follow the given steps to enable XMP to obtain advertised speed of your RAM.


User Comments :