Sometimes, you may need to install BIOS from USB. The specific process may vary depending on different PC or motherboard brands. This post from Partition Magic shows you how to update BIOS with USB for the top 8 PC or motherboard brands.
BIOS, short for Basic Input/Output System, is a firmware program stored in the ROM chip on the motherboard. When you power on a PC, it is the first program to be loaded. When it is loaded, it will check the computer hardware status, initialize the hardware, find the bootable disk, and then load the operating system on the drive.
BIOS is very important. If it is corrupt or out of date, your PC may encounter some issues. For example, the PC won’t boot up, a device can’t be recognized because it hasn’t been recorded in BIOS, etc. Therefore, you may need to update BIOS sometimes.
Nowadays, updating BIOS is very easy. Many manufacturers will offer an executable version of the BIOS update so that you run this file in Windows to update the BIOS directly. Or, they offer software to update all drivers of the PC, including BIOS. However, you may need to update BIOS with USB sometimes, especially if your PC becomes unbootable.
How to update BIOS with USB? This post will show you that in detail. Keep reading to get the guide.
Stage 1. Prepare a FAT32 USB Drive
To install BIOS from USB, you need to prepare a proper USB drive. Most PCs support the FAT32 file system when updating BIOS with USB. Therefore, you should format the USB drive to FAT32 first. Here are 2 ways for you.
Way 1. Use CMD (DiskPart)
If your USB drive is smaller than 32GB, you can try this method.
Step 1: Press the Windows logo key + R to call out the Run dialog. In the text bar, type “diskpart” and press Enter to open it.
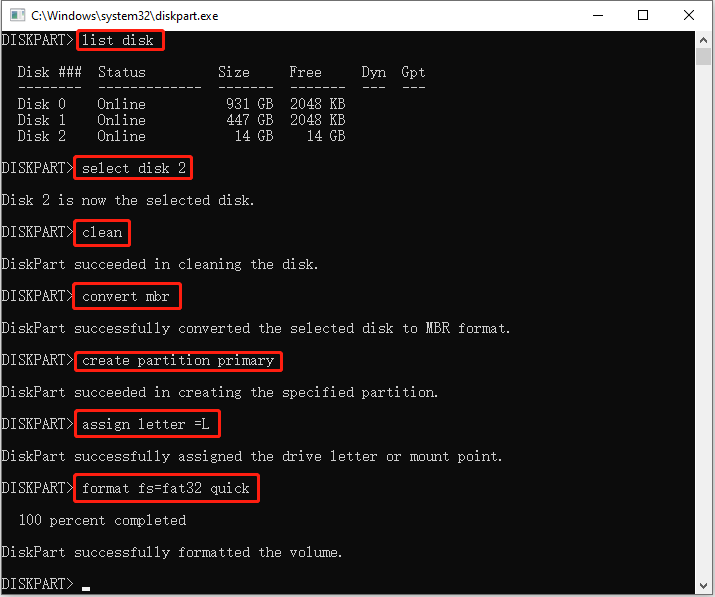
Step 2: Execute the following commands one by one.
- List disk (This will list all disks connected to your computer)
- Select disk # (# is the number of the USB drive. You can identify it according to the size)
- Clean (This will clean the USB drive)
- Convert MBR (This will convert the USB drive to MBR)
- Create partition primary (This will use all the space on the USB drive to create a primary partition)
- Assign letter = * (* should be a letter not used by other partitions)
- Format fs-fat32 quick (format the partition to FAT32 in the quick format way)
Way 2. Use MiniTool Partition Wizard
If the USB drive is larger than 32GB, the first way may fail. Then, you can try MiniTool Partition Wizard. This method is also free. Here is the guide:
MiniTool Partition Wizard FreeClick to Download100%Clean & Safe
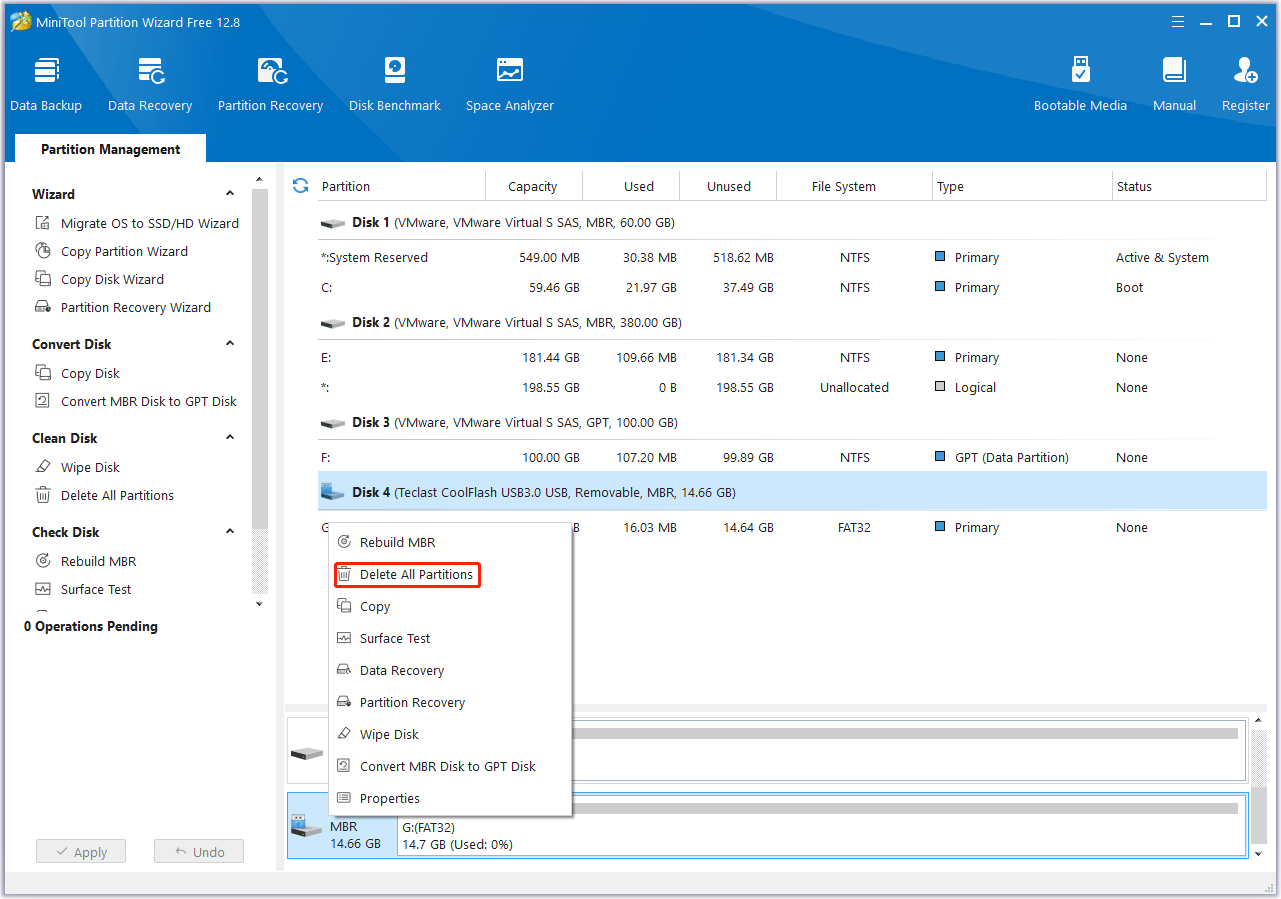
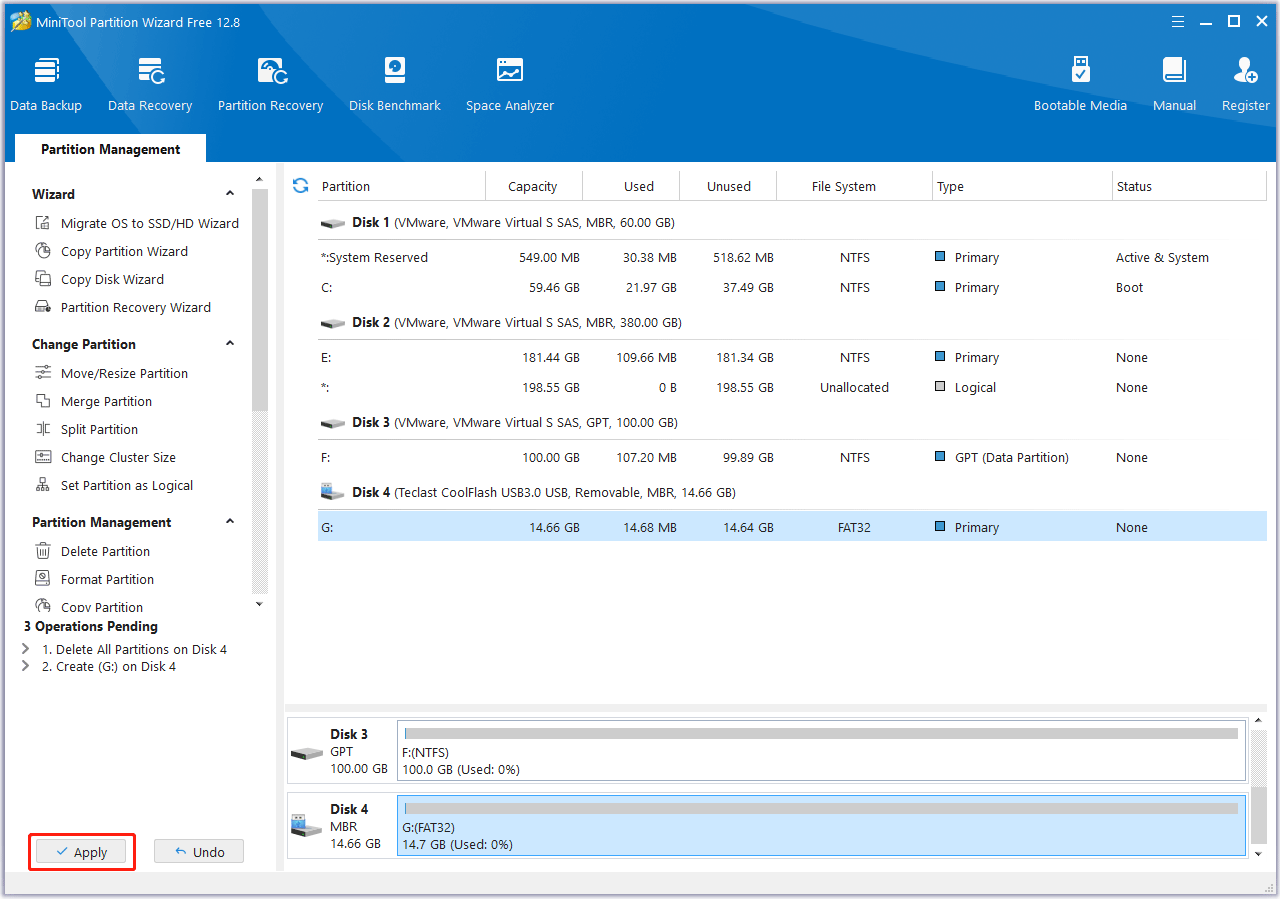
Step 1: Download and install MiniTool Partition Wizard. Launch this software and right-click on the USB drive. Then, choose Delete All Partitions. Click Yes to confirm this operation.
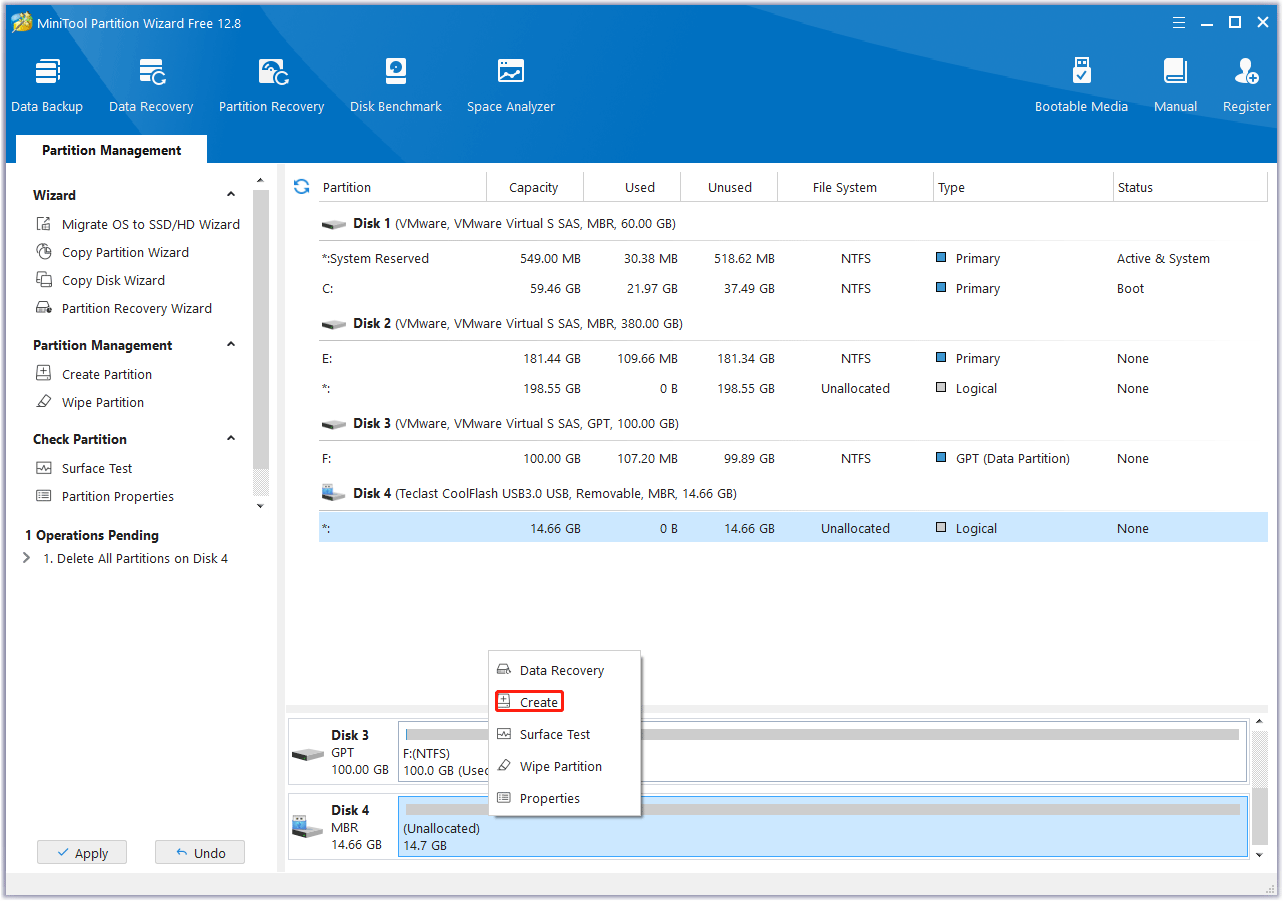
Step 2: Right-click on the unallocated space on the USB drive and choose Create.
Step 3: On the pop-up window, change the File System to FAT32 and keep other parameters to default. Then, click OK.
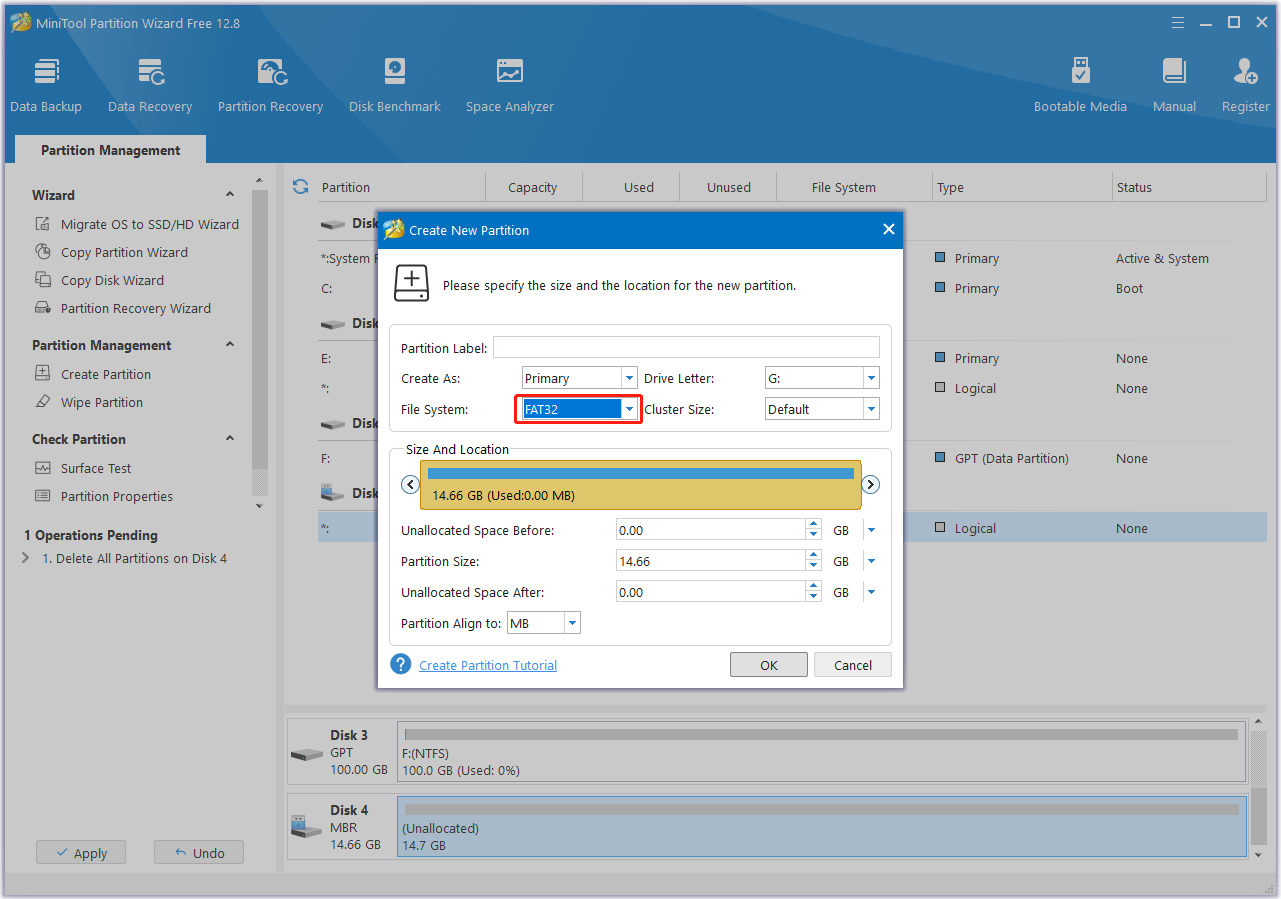
Step 4: Click Apply to execute all pending operations.
Stage 2. Download the BIOS File and Update the BIOS
The specific process of updating BIOS may vary depending on the different PC brands (Lenovo, HP, Dell, ASUS, and Acer) or motherboard brands (Gigabyte, MSI, ASUS, and ASRock). You need to find the guide according to your condition.
#1. Lenovo PCs
How to update Lenovo BIOS with USB? You can refer to this guide:
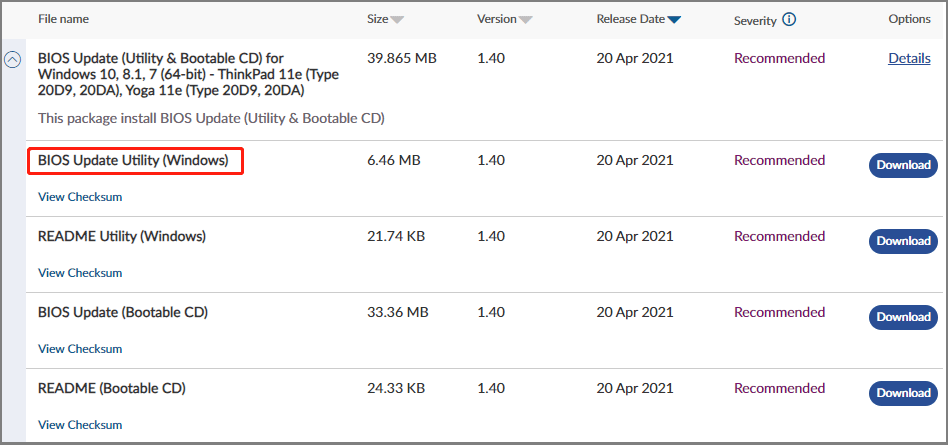
Step 1: Open the Lenovo support website. Follow the wizard to find your PC model. On the product page, click Drivers & Software and then click Select Drivers under Manual Update. Click BIOS/UEFI to filter files. Select BIOS Update Utility (Windows) to download.
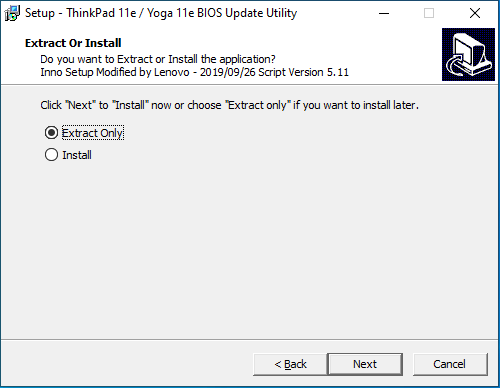
Step 2: Run this tool. When it asks you whether to extract or install, select Extract Only.
Step 3: On the next page, copy the path where files will be saved. Then, click Extract.

Step 4: After the extraction is completed. Open File Explorer and paste the path in the quick access bar. Then, press Enter to open it. Select all files here (Ctrl + A) and copy them (Ctrl + C). Then, go to the C drive to create a folder named lenovo and then paste all files into this folder (Ctrl + V).
Step 5: Insert a USB to your computer. Then, search “cmd” in the Windows Search. From the result list, right-click Command Prompt and select Run as administrator to open Command Prompt.
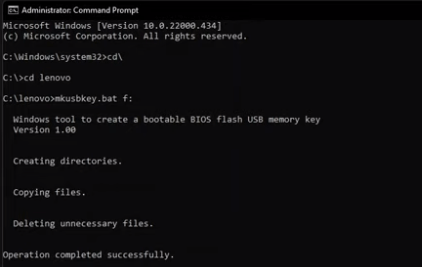
Step 6: Open the lenovo folder to find the mkusbkey.bat file. Only if you see this file, you can continue to make a USB for updating BIOS. Now, in the Command Prompt, execute the following commands.
- Cd\
- Cd lenovo
- Mkusbkey.bat [drive letter]: (the drive letter is that of your USB drive. You can check that in File Explorer)
Step 7: Insert the USB drive into the Lenovo PC that needs to update the BIOS. Make the PC boot from the USB drive. Then, select the option to update system program. Then, follow the wizard to flash BIOS.
![How to Update Lenovo BIOS [3 Ways]](https://images.minitool.com/partitionwizard.com/images/uploads/2021/09/lenovo-bios-update-thumbnail.png)
#2. HP PCs
How to update HP BIOS with USB? The process should be as follows:
Step 1: Go to the HP Software and Driver Downloads page. Navigate to the product page for your computer. Select BIOS from the list that displays, and then review any available BIOS updates. Download the BIOS file and you will get an executable file.
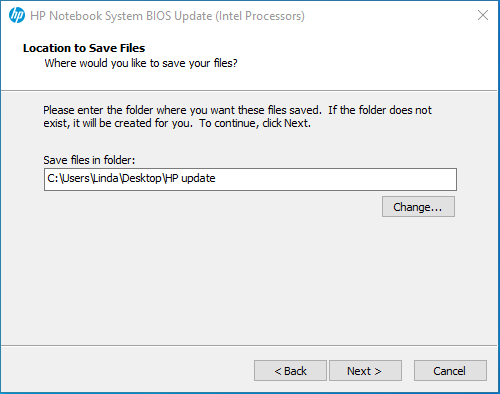
Step 2: Create a folder named HP update on Desktop. Run the BIOS file. When it asks you where to save files, you can click Change and then navigate to the HP update folder. Then, continue to complete the process.
Step 3: HP BIOS Update and Recovery will open automatically. Insert a USB drive into the computer. Follow the wizard to Create Recovery USB flash drive. It will detect the USB drive. Select it and click Next to go on.

Step 4: After the recovery USB drive is created, insert it into the HP PC that needs to update BIOS. Then, boot the HP computer from the USB drive. HP PC Hardware Diagnostics UEFI should open.
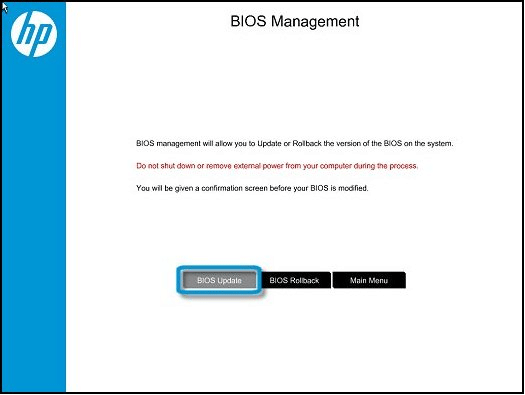
Step 5: Select Firmware Management or BIOS Management > BIOS Update > Select BIOS Image to Apply > HP_TOOLS-USB Drive > Hewlett-Packard > BIOS > Current. Then, select the BIOS update file that matches the System Board ID (example: 02291.bin). Click Apply Update Now.
#3. Dell PCs
How to update Dell BIOS with USB? The process should be as follows:
Step 1: Download the Dell Diagnostic Distribution Package (DDDP) and run it directly. Go to the C:\Dell\Drivers\R174621 folder created by DDDP. Open DIAGS and remove everything, EXCEPT for the following:
- AUTOEXEC.bat
- COMMAND.com
- CONFIG.sys
- DELLBIO.bin
- DELLRMK.bin
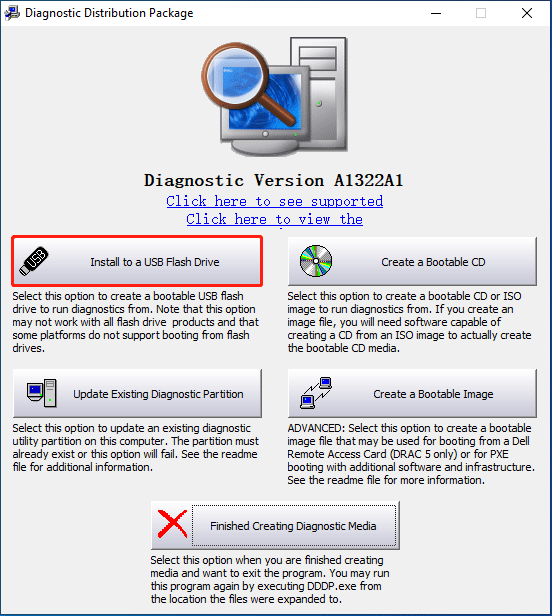
Step 2: Insert a USB drive into your PC. Go to C:\Dell\Drivers\R174621\ and double-click the application DDDP to run it again. On the tool, choose Install to a USB Flash Drive. Click OK to confirm the operation. This will make the USB drive bootable.
Step 3: Go to the Dell Support website. In the Search box, enter the Service Tag, product ID, or system model of your computer, and then click Search. Under the Drivers & Downloads tab, filter the BIOS file in Download Type or Category. Download the BIOS file and you will get an executable file.
Step 4: Move the BIOS file into the USB drive. Now, insert the USB drive into the Dell PC that needs to update the BIOS and boot the PC from the USB drive. After that, you need to select BIOS Flash Update, make sure the Current Path is the BIOS file, and then hit Flash Upgrade. Then, follow the wizard to complete the update.
#4. ASUS PCs or Motherboards
How to update ASUS BIOS with USB? The process is very simple. Just follow the guide below:
Step 1: Go to the ASUS Support website to find your product. Select Driver & Utility > BIOS & Firmware. Under BIOS, select a proper BIOS file to download. You will get a ZIP file. Unzip it.
Step 2: Insert a USB drive into your PC and move the unzipped BIOS file into the USB drive. For ASUS PCs, the unzipped BIOS file’s extension name should be a number (example: .305). For ASUS motherboards, the unzipped BISO file’s extension name should be CAP.
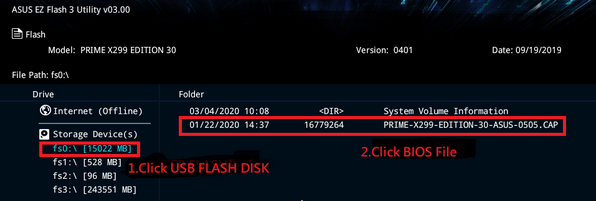
Step 3: Insert the USB drive into the ASUS PC that needs to update BIOS and boot into the firmware. Go to Advanced Mode and select ASUS EZ Flash 3 Utility. Now, select the USB drive and then the BIOS file. Then, follow the wizard to complete the update.
If you want to learn more methods to update ASUS BIOS, you can read this post: Perform ASUS BIOS Update with Four Methods.
#5. Acer PCs
How to Acer BIOS with USB? Here is the guide:
Step 1: Go to the Acer Support website and select Drivers and Manuals. Type your device serial number, SNID, or model number, and then press Enter to find your product. Under the Drivers and Downloads tab, expand BIOS/Firmware. Select a BIOS file to download. You will get a ZIP file.
Step 2: Insert a USB drive into your computer. Unzip the BIOS file and move all files in the extracted folder into the USB drive.
Step 3: Insert the USB drive into the Acer computer that needs to update BIOS. While pressing the Fn key and Esc key, press the Power button. When the power light comes on, release the Fn and Esc keys. The power light will begin to flash. Let the system run. After approximately 1 to 7 minutes, the system will reboot and the BIOS will be updated.
#6. Gigabyte Motherboards
How to update Gigabyte BIOS with USB? The guide is as follows:
Step 1: Download the BIOS file for your motherboard from the GIGABYTE’s website. You will get a ZIP file. Unzip it and save the new BIOS file (e.g. Z68XPUD4.F1) to your USB flash drive.
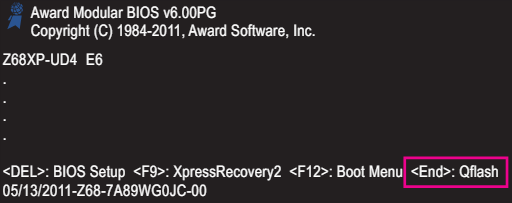
Step 2: Insert the USB drive into the PC that needs to update BIOS. Power on the PC and press the End key to enter Q-Flash.
Step 3: In the main menu of Q-Flash, select Update BIOS from Drive and press Enter. Select HDD 1-0 and press Enter. Select the BIOS update file and press Enter. Then, follow the wizard to complete the BIOS update.
#7. MSI Motherboards
Here is how to update MSI BIOS with USB:
Step 1: Go to the MSI official website. Search your motherboard and download the latest BIOS. You will get a ZIP file. Extract it.
Step 2: Insert a USB drive into your computer and copy all files in the extracted folder to the root folder of the USB flash drive.
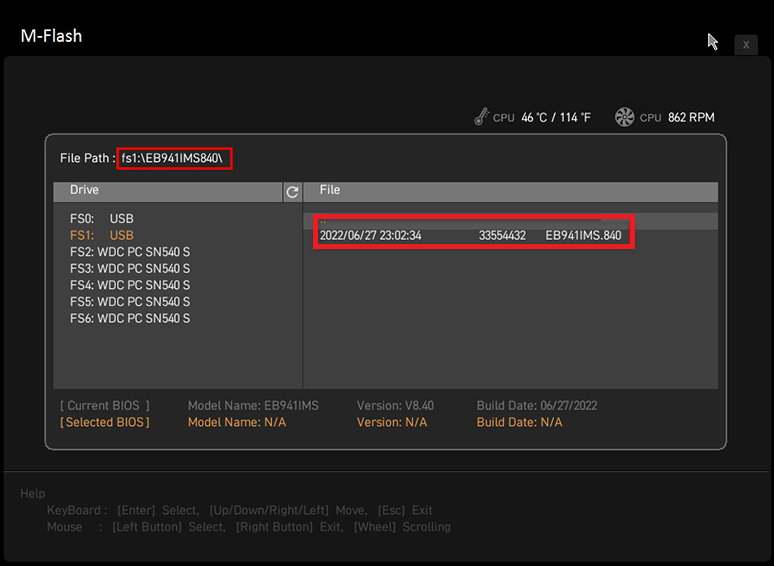
Step 3: Insert the USB drive into the computer that needs to update BIOS. Power the computer and then press the Del key immediately to enter the firmware. Enter M-FLASH. Select the USB flash drive and choose the BIOS file. Then, follow the wizard to complete the update.
#8. ASRock Motherboards
How to update ASRock BIOS with USB? The guide is as follows:
Step 1: Download the BIOS file of your motherboard from the ASRock website and then unzip it.
Step 2: Insert a USB drive into your computer and move the unzipped BIOS file into the USB drive.
Step 3: Insert the USB drive into the PC that needs to update BIOS. Power on the PC and press F2 immediately to enter the firmware. Go to the Tool tab and select the Instant Flash utility. Then, follow the wizard to complete the update.

Bottom Line
If you want to update BIOS with USB without CPU, you need to use BIOS FlashBack. Then, this post may help you: How to Use BIOS FlashBack [ASUS, MSI, Gigabyte, ASRock Boards]. In addition, if you encounter problems when using MiniTool Partition Wizard, feel free to contact us via [email protected]. We will get back to you as soon as possible.
About The Author

Position: Columnist
Linda has been working as an editor at MiniTool for 5 years. She is always curious about computer knowledge and learns it crazily. Her articles are simple and easy to understand. Even people who do not understand computer can gain something. By the way, her special focuses are disk management, data recovery and PDF editing.
User Comments :