Do you have to uninstall Ubuntu? If so, you can read this post, in which MiniTool shows you how to remove Ubuntu from your computer safely—both in dual boot mode and single boot mode. You just need to follow the guide step by step.
Why Do You Need to Remove Ubuntu?
Ubuntu is an open-source and light-bloated operating system, which means that you can get the official version for free and run it on your computers. Due to these advantages, many of you who are tired of Windows decide to switch to Ubuntu without careful consideration, just like me.
A few weeks ago, I decided to switch to Ubuntu because my computer is too old (I bought it in 2012) and the Windows 7 support has been ended already. But my Ubuntu installation process was not smooth.
Actually, I have installed Ubuntu successfully on my PC—the alternate version. But I didn’t know how to use this version and later I learned that what I need is the desktop version in fact. Then I tried to install the desktop version but I failed.
I tried many installer programs like Universal USB Installer, Unetbootin, Rufus, and UltralOS, but none of them helped me install Ubuntu correctly on my PC, so I decided to return to Windows, after all, Windows can certainly be installed in this PC.
Apart from the above reason, some of you may also return back to Windows for the following reasons:
- You are not familiar with Ubuntu operation.
- It doesn’t fit the needs of your work.
- It behaves differently than you think.
- …
Anyway, you must uninstall Ubuntu and put Windows back on. In this post, I will show you how to uninstall Ubuntu step by step.
How to Uninstall Ubuntu
How you uninstall Ubuntu depends on how you’ve installed it—dual boot or single boot. In this post, I will show you how to uninstall Ubuntu dual boot and single boot.
Remove Ubuntu Dual Boot
When making a dual boot system of Windows and Ubuntu, some people may like to install them on the same disk, while some people may like to install them on two different disks.
1. Ubuntu and Windows Are Installed on Different Disks
If your Ubuntu and Windows operating systems are not installed on the same disk, the Ubuntu uninstall process will be much easy. You just need to delete these Ubuntu partitions and then create NTFS partitions.
Here are 3 methods you can use to delete Ubuntu partitions and then create NTFS partitions.
Method A. Use Disk Management
Step 1: Log into Windows. Press “Windows + R” shortcut to call out Run box. Type “diskmgmt.msc” in the Run box and then press Enter to open Disk Management.
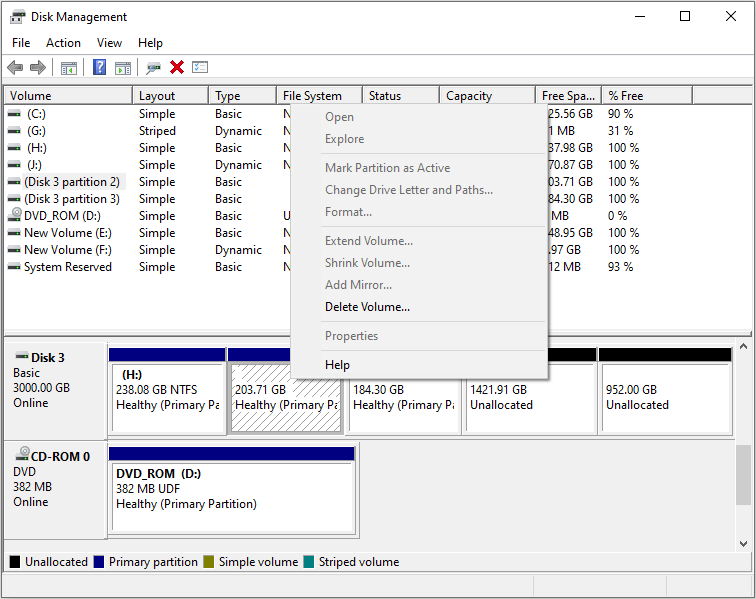
Step 2: Right-click the Ubuntu partition that has no drive letter and shows no file system. Click Delete Volume. Then, click Yes to confirm.
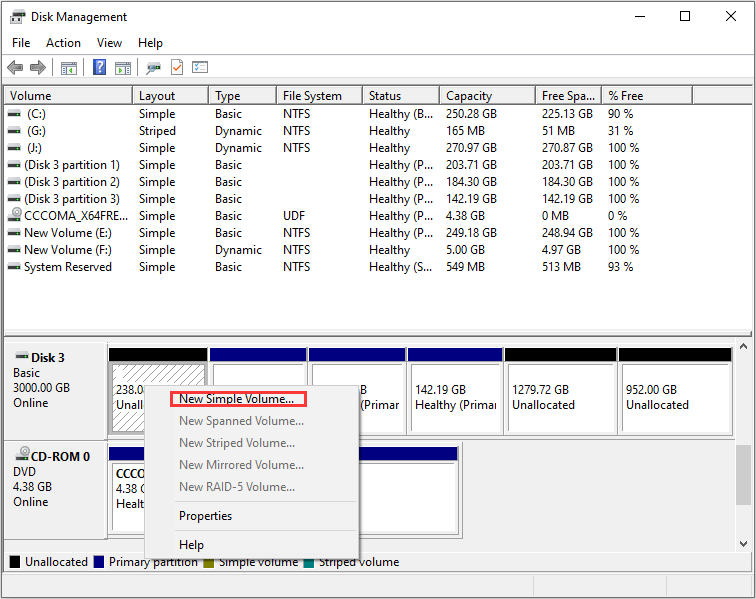
Step 3: After deleting all the Ubuntu partitions, you can then right-click on the unallocated space to choose New Simple Volume. Then, follow the wizard to create NTFS partitions.
Method B. Use MiniTool Partition Wizard
MiniTool Partition Wizard FreeClick to Download100%Clean & Safe
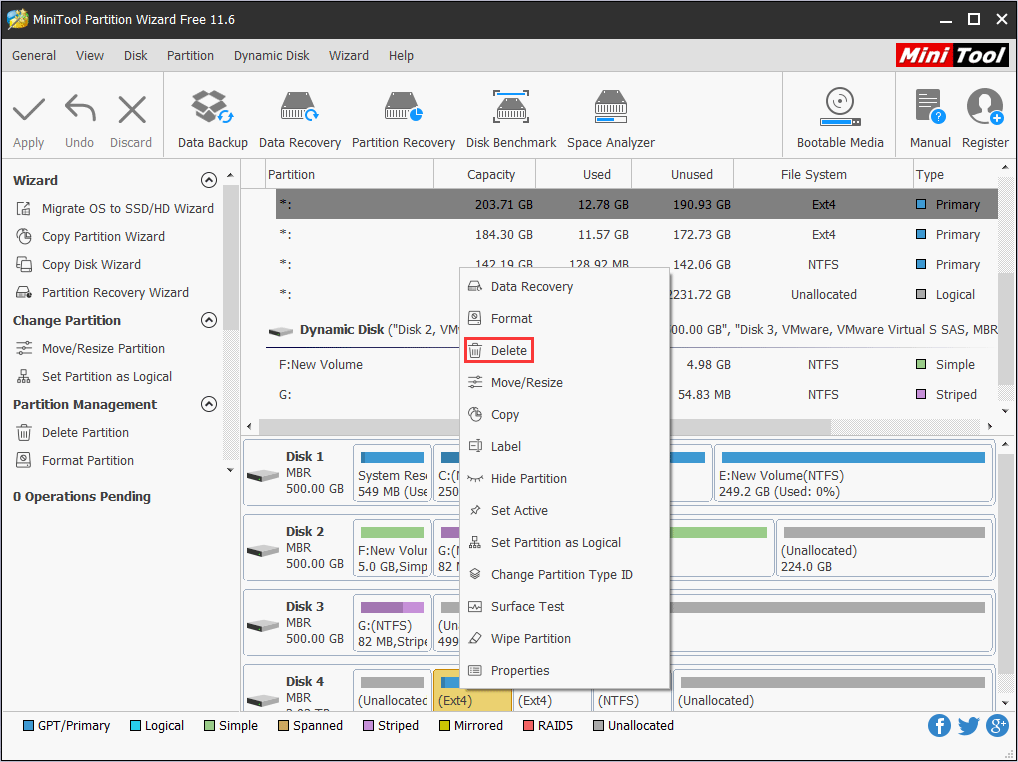
Step 1: Log into Windows. Then, click the above button to free download and install MiniTool Partition Wizard. Launch this software and get to its main interface. Right-click the Ubuntu partition and choose Delete.
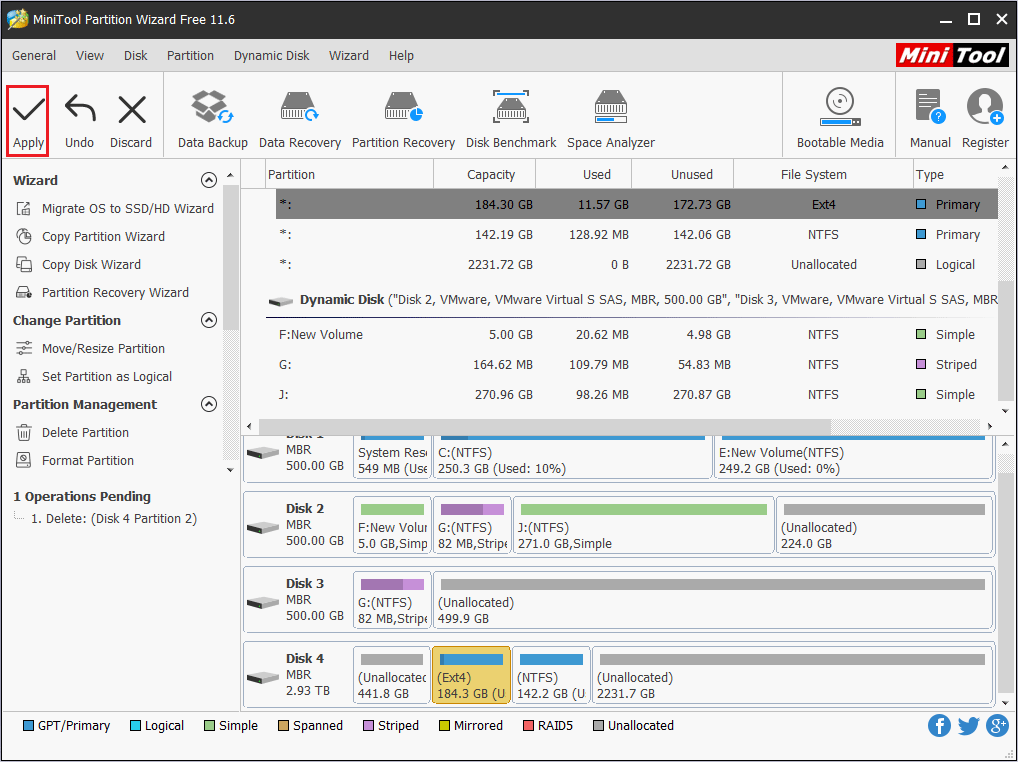
Step 2: Click the Apply button to execute the operation.
Step 3: Right-click the unallocated space and choose Create. Then, in the pop-up window, click OK button. A NTFS partition will be created automatically. After that, click Apply button again to execute the operation.
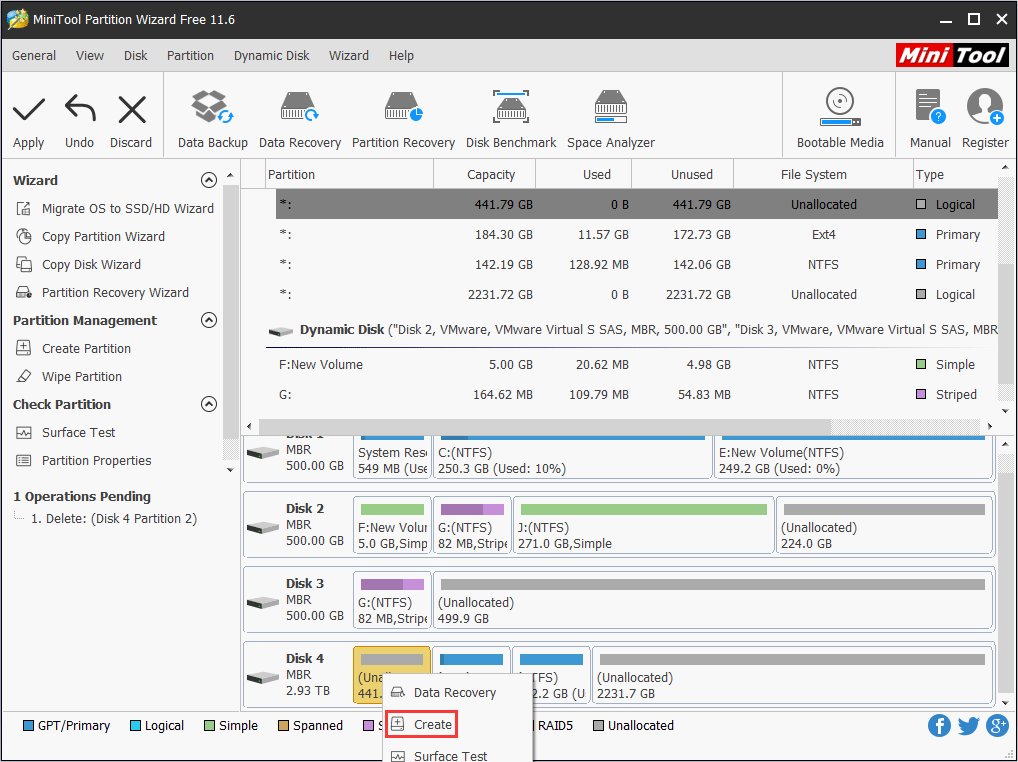
Method C. Use DiskPart
I don’t recommend this method, because some people may be not familiar with commands. If you want to use this method, please open DiskPart window and type the following commands:
- list disk
- select disk [number]
- clean
These commands will delete the partition table and all partitions on the disk. If you want to use the disk, you should initialize the disk later. If you want to delete a single partition, the commands are as follows:
- list disk
- select disk [number]
- list partition
- select partition [number]
- delete partition override
To create a NTFS partiton, the commands are as follows:
- create partition primary size=*
- assign letter=g
- format fs=ntfs quick
With these commands, you can create a NTFS partition whose drive letter is g and size is * MB.
2. Ubuntu and Windows Are Installed on the Same Disk
If the Ubuntu is installed beside Windows—they are on the same disk—Ubuntu uninstall will be more complicated. Similarly, you should log into Windows and delete Ubuntu partitions. Then, you can create new NTFS partitions or extend existing partitions.
The trouble is that you should repair Boot Loader. The Boot Loader is a small program that runs before the operating system kernel runs. It will initialize the hardware devices and establish a map of the memory space, so as to prepare a suitable software and hardware environment for the operating system kernel.
When you install Ubuntu, the MBR has been rewritten. So if you delete Ubuntu partition directly without fixing MBR, your computer will get no such partition grub rescue error when you restart PC, due to corrupt MBR. This error almost only occurs when Windows and Ubuntu are installed on the same disk. Let’s go on to repair that.
To repair MBR, there are two ways for you.
Method A. Repair MBR with MiniTool Partition Wizard
If the disk where Ubuntu is installed is an MBR disk, you can repair the boot loader easily with MIniTool Partition Wizard and don’t need to make a bootable disk. You just need to right-click the MBR disk and choose Rebuild MBR. Then, click Apply button to execute the operation.
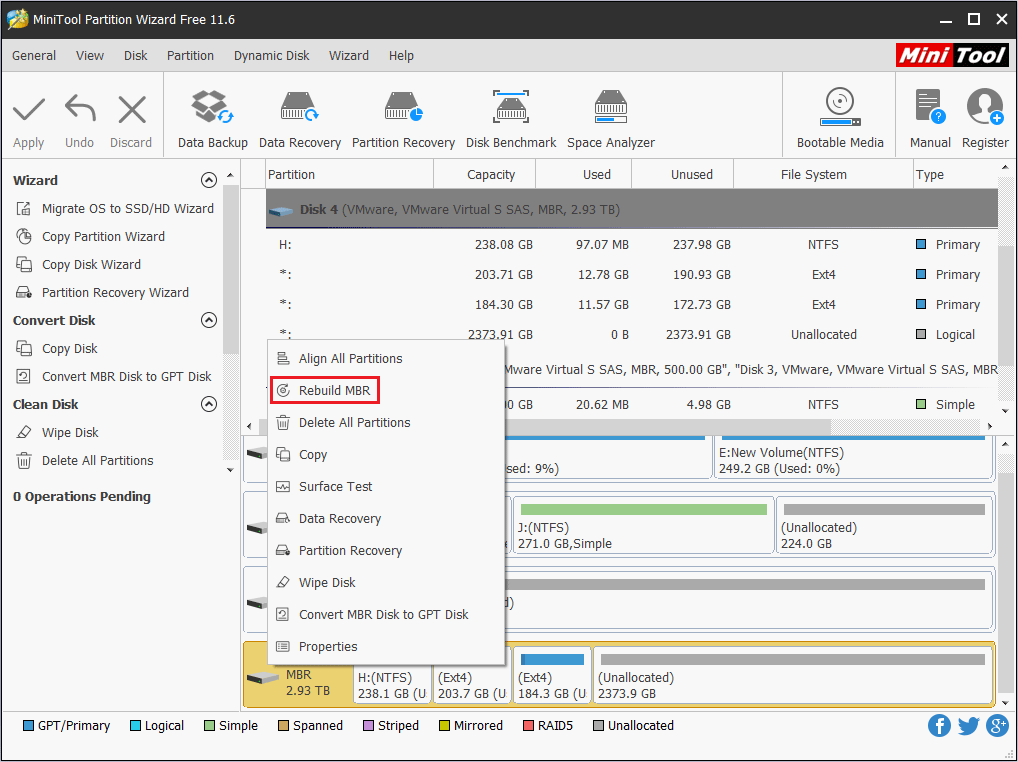
Method B. Repair MBR with a bootable disk
If the disk is a GPT disk, repairing boot loader would be more complicated (MBR vs GPT). You need to make a bootable disk and then repair the boot loader with commands. The detailed steps are as follows:
Step 1: Assign a drive letter (like q) to the Windows EFI partition by choosing Change Drive Letter and Path in Disk Management. You can also do that in MiniTool Partition Wizard. Right-click the EFI partition and click Change Letter.
Step 2: Use a USB drive to make a Windows installation media, with which you can repair both BIOS+MBR and UEFI+GPT boot loader.
Step 3: Connect the USB drive to your computer. Restart your computer and boot into firmware. In the firmware, put the USB drive at the first boot sequence and boot your computer, so that you can enter WinPE. Please note that you can repair the boot loader with command only when you enter WinPE.
Step 4: After entering WinPE, click Next and then Repair your Computer. Navigate to Troubleshoot > Advanced options > Command Prompt.
Step 5: After opening Command Prompt, type the following commands and then press Enter.
- bootrec /fixmbr
- bootrec /fixboot
- bootrec /rebuildbcd
The above commands can fix the boot loader of an MBR disk. But if you want to fix the boot loader of a GPT disk, you should type the command below:
- bcdboot c:windows /l en-us /s q: /f uefi
In this command, c is the drive letter of the partition where the Windows is installed and q is the driver letter of the EFI partition. You should replace them accordingly.
After repairing the MBR, you can then boot you PC and use the Ubuntu partition normally.
Remove Ubuntu Single Boot
In this case, Ubuntu is the only OS on your computer. Now, you want to uninstall Ubuntu and put Windows back on your PC. If so, please refer to the following steps:
Step 1: Use a USB drive to make a Windows installation media. Connect the USB drive to your computer and boot from the USB. Click Next and then choose Install now.
Step 2: Click I don’t have a product key. Check I accept the license terms and click Next. Then, choose Custom: Install Windows only and you will get a window like the following one.
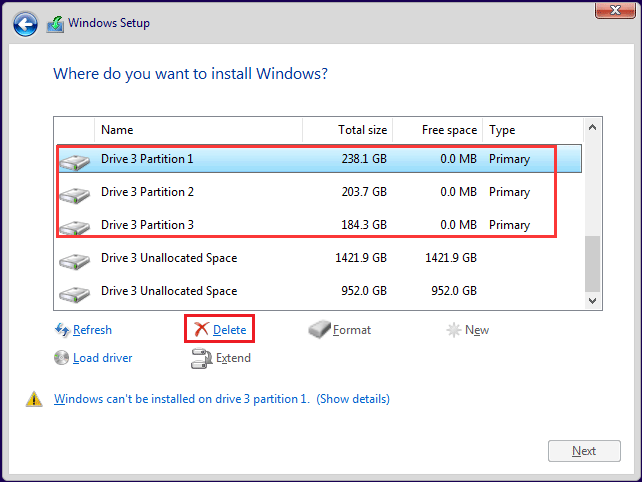
Step 3: Delete Ubuntu Partition and create new partitions on the unallocated space. First, you should identify Ubuntu partitions according to the size. Then, highlight these partitions and click Delete. After that, highlight Unallocated Space and click New. You will get the following picture. Set the size of the new partition and then click Apply. A NTFS partition will be created.
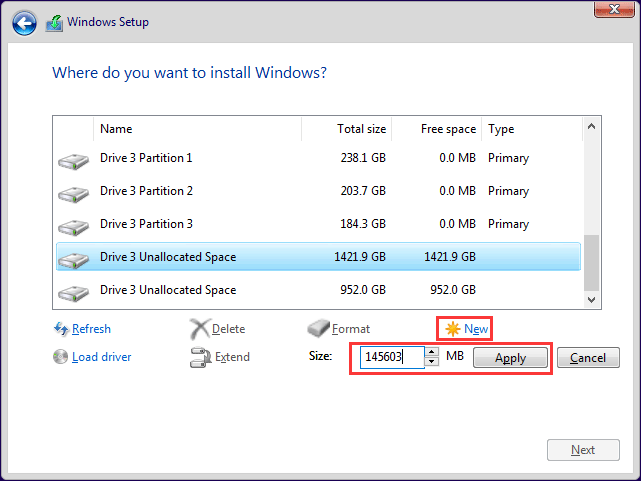
Step 4: After deleting all Ubuntu partitions and creating NTFS partitions, highlight a NTFS partition where you want to install Windows and then click Next button. Then, follow the wizard to install Windows. In this case, you don’t need to fix MBR, because it will be rewritten when installing Windows.
This is the whole process of Ubuntu uninstall. I hope this can help you solve the problem.
Further Reading:
In Windows 10, there is a feature named Windows Subsystem for Linux (WSL), which is a compatibility layer that allows users to natively run Linux binaries like Ubuntu, openSUSE Leap, SUSE Linux Enterprise Server, Kali Linux, and Debian. If you install Ubuntu on Windows via WSL, you can uninstall Ubuntu distribution through the following steps:
- Press “Windows + I” shortcut to open Settings
- Click Apps.
- In Apps & features tab, type Ubuntu in the ‘Search this list’ box. Ubuntu will appear.
- Click Ubuntu and then the Uninstall
Then, you can uninstall Ubuntu WSL from Windows. But please note that this method doesn’t work in earlier versions of Windows 10. For example, prior to the Fall Creators Update.
Bottom Line
Has this post helped you in uninstalling Ubuntu? If you encounter problems while uninstalling Ubuntu through the above methods, please give me a feedback in the comment zone below. I will appreciate that. Besides, if you have difficulty in fixing MBR or managing partition, you can contact us via [email protected] for help. We will reply to you as soon as possible.
Uninstall Ubuntu FAQ
If you want to uninstall Ubuntu WSL from Windows 10, the process is as follows:
- Press “Windows + I” shortcut to open Settings
- Click Apps.
- In Apps & features tab, type Ubuntu in the ‘Search this list’ box. Ubuntu will appear.
- Click Ubuntu and then the Uninstall
- Make a Windows installation media.
- Delete Linux partitions and create NTFS partitions.
- Follow the wizard to install Windows.

![How to Install Linux (Ubuntu) on Windows 10 [Ultimate Guide]](https://images.minitool.com/partitionwizard.com/images/uploads/2020/02/install-linux-on-windows-10-thumbnail.png)
User Comments :