Many users report that they are unable to activate Windows after cloning a hard drive to SSD. Is there a need to reactivate Windows after cloning? How to fix Windows not activated after cloning? Let’s explore the answers together with Partition Magic.
A hard drive may get corrupted or become slow due to low disk space with time going by. That’s why people want to upgrade their hard drive to a larger SSD. However, they have many confusions about this, such as whether need to reactivate Windows after cloning, what to do if failed to activate Windows after cloning, etc. Like the user from the tom’s hardware forum:
Cloned OS, now I need to reactivate Windows? I recently cloned my OS from my HDD to SSD, everything was fine and it boots off of the SSD, but now I need to activate Windows again. Why it would need to activate again? I’m unable to activate Windows after cloning. Please helps.
Do You Need to Reactivate Windows After Cloning
Is there a need for you to reactivate Windows after cloning? If you make significant hardware changes to your computer during cloning, Windows might no longer find a license that matches your device. This is because Windows activation is tied to your computer’s hardware configuration. Then you need to reactivate Windows after cloning.
Why Are You Unable to Activate Windows After Cloning
It’s necessary to discuss what causes the “unable to activate Windows after cloning” issue. In a normal situation, cloning a hard drive to an SSD should have no impact on the Windows activation unless you make significant hardware changes, such as replacing the hard drive, motherboard, etc.
The digital license of Windows will be stored on Microsoft’s activation servers after Windows is activated on a PC. The license is linked to the hardware ID of the PC. If you made hardware changes, it could not connect the activation servers and cause Windows activation failure after cloning.
How to Fix Windows Not Activated After Cloning
What to do if you are unable to activate Windows after cloning? Here we summarized 3 feasible solutions after investing lots of user reports from different forums.
# 1. Manually Reactivate Windows After Cloning
Usually, Windows can be activated automatically after you migrate from a hard drive to another one on the same computer. However, if you failed to activate Windows after cloning, you can try manually reactivating Windows if you have the product key. Here’s how to reactivate Windows 10 after hardware changes.
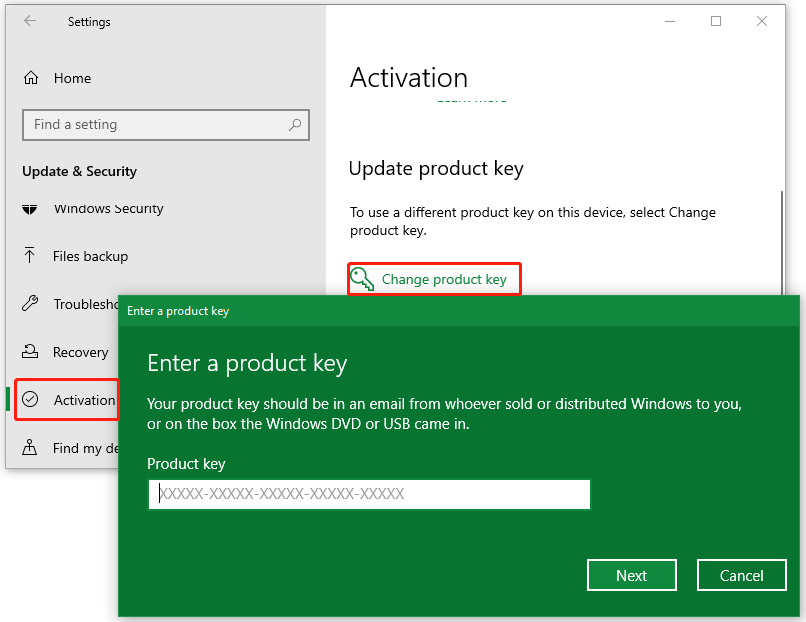
Step 1. Press the Win + I keys to open the Settings window and select Update & Security.
Step 2. Select Activation from the left panel and click the Change product key link on the right panel listed under Update product key.
Step 3. Enter a valid product key and click Next to activate it. If you still encounter the Windows activation failure after cloning issue, move to the following solutions.

# 2. Run Windows Activation Troubleshooter
In addition, you can try fixing the cloned Windows not activated issue by running the Windows activation troubleshooter. This troubleshooter can help fix the Windows activation issue caused by hardware changes.
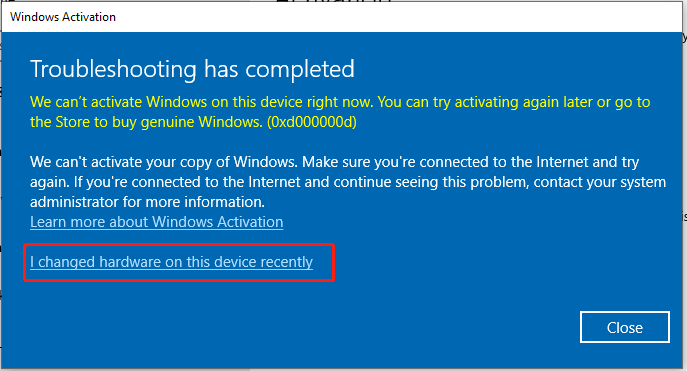
Step 1. Go to the Activation section as we just showed above and click on Troubleshoot if you have problems with activation.
Step 2. In the Windows Activation window, click the I changed hardware on this device recently link.

Step 3. Enter your Microsoft account credentials and click Sign in. Then it should list your devices. Select the hardware devices you have changed, click This is the device I’m using right now, and click Activate.
# 3. Change the Hard Drive Serial Number
Windows operating systems have their checking mechanism. It will check your hard drive’s serial number when you clone Windows 10 to SSD. If the operating system detects that the serial number doesn’t match the original hard drive, you may encounter the cloned Windows not activated issue.
In this case, you can try changing the serial number of the hard disks. There are 2 parts to change the hard drive’s serial number.
Part 1. Find your hard disks’ serial numbers on the computer.
Step 1. Press the Win + R keys to open the Run dialog box, and then type cmd in it and press Ctrl + Shift + Enter keys at the same time to open the elevated Command Prompt window.
Step 2. Type the following command and press Enter to check the serial numbers of all your hard disks on the computer. Then note down the serial numbers of the original hard drive and cloned one.
wmic diskdrive get Name, Manufacturer, Model, InterfaceType, MediaType, SerialNumber

Part 2. Change hard disk’s serial number using MiniTool Partition Wizard.
So, how to change the hard disk serial number without formatting? MiniTool Partition Wizard is a powerful disk manager that can change disk serial number easily. This feature-rich partition and disk manager can partition hard drive, change cluster size, recover hard drive data, rebuild MBR, convert FAT32 to NTFS without data loss, convert MBR to GPT, and more.
Step 1. Get MiniTool Partition Wizard installed on your computer and enter its main interface.
MiniTool Partition Wizard DemoClick to Download100%Clean & Safe
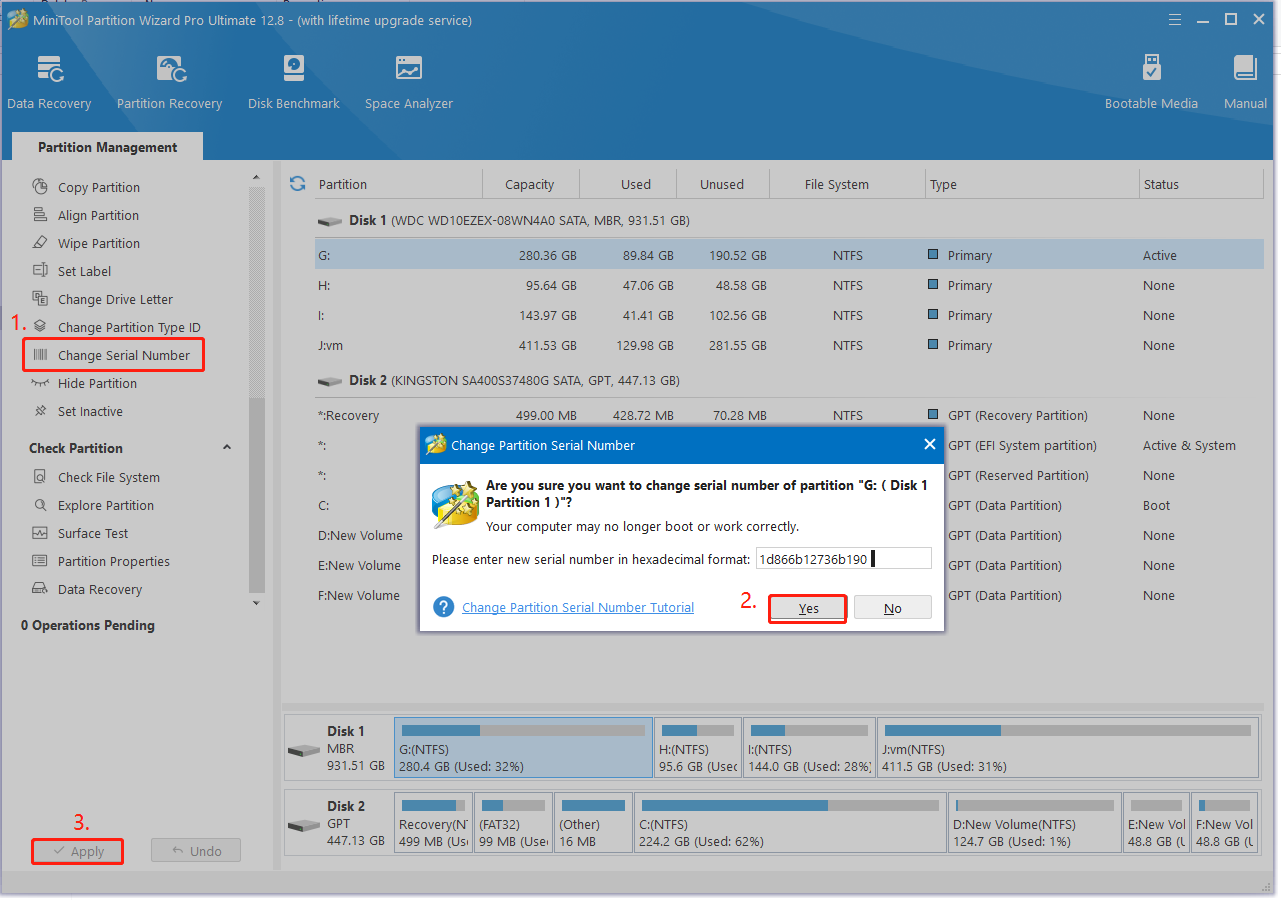
Step 2. Select the cloned SSD from the disk map, and click on Change Serial Number from the left action panel.
Step 3. In the pop-up window, exchange the serial numbers of the old hard drive and the new SSD. Input the serial number of the old disk in the box and click on Yes.
Step 4. Click on Apply to execute the change.

Bottom Line
Here comes the end of this post. It focuses on how to fix Windows not activated after cloning. You can try manually reactivating Windows, running the activation troubleshooter, or changing the serial number using MiniTool Partition Wizard.
If you have any questions or feedback about MiniTool Partition Wizard, you can contact us via [email protected] and we will reply to you as soon as possible.

User Comments :