Nowadays, most new computers support UEFI firmware as UEFI enjoys more security feature, faster boot times and support larger hard drive.
However, some users reported that they came across UEFI firmware settings missing Windows 10 issue. The UEFI Firmware settings are missing in the Advanced Options screen. So they are unable to see the UEFI menu, which could cause inconvenience.
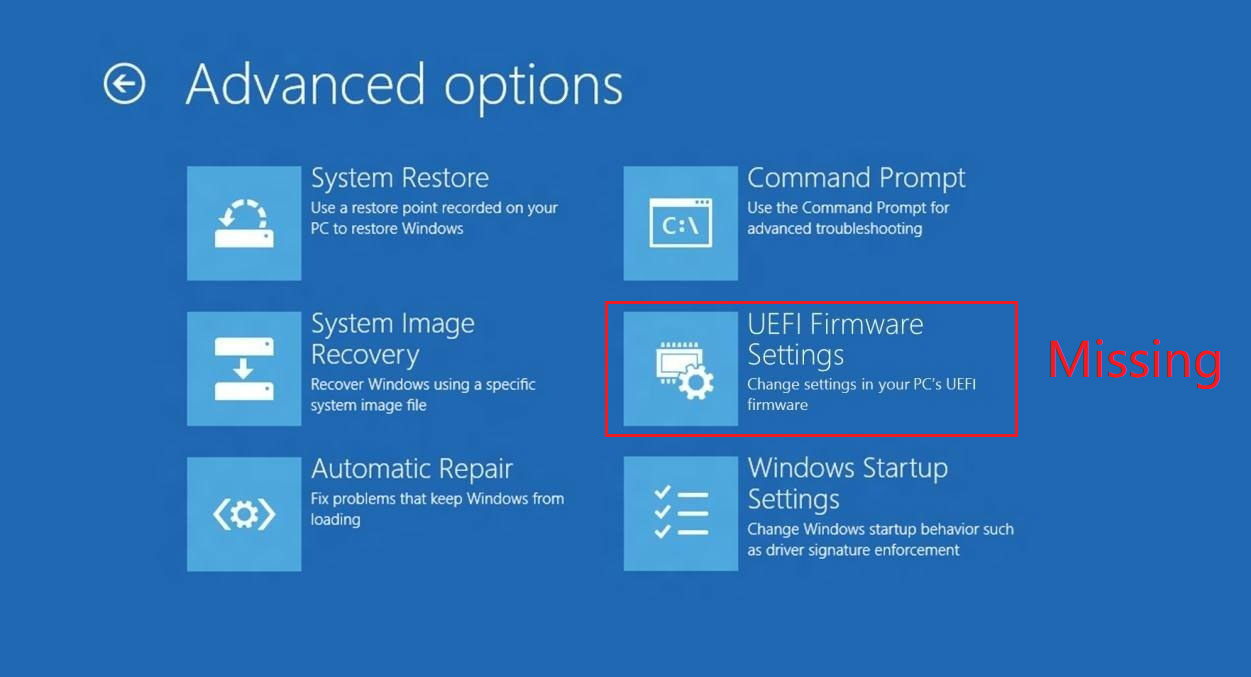
Well, what causes Windows 10 UEFI firmware settings missing issue? After analyzing several posts, we have summarized some possible reasons. Let’s have a look together.
What Causes UEFI Firmware Settings Missing Windows 10
1. The motherboard on your computer doesn’t support UEFI
Not all computer motherboards support UEFI. Older computers may only support BIOS and boot into BIOS (Legacy Mode). In this case, you will encounter Windows 10 UEFI firmware settings missing. To make sure that your computer supports UEFI, you need to use the MSINFO utility to figure it out.
2. Windows 10 was installed in Legacy Mode
If your motherboard supports UEFI firmware but your system drive is formatted with MBR instead of GPT, you will encounter UEFI firmware settings missing Windows 10, as BIOS uses the MBR to save information about the hard drive data while UEFI uses the GPT.
If this is the case, you can convert MBR to GPT and then change legacy to UEFI without reinstall to fix the issue.
3. Fast startup feature blocks the access to the UEFI menu
Fast Startup may prevent the Windows user from accessing the UEFI menu to speed up the boot process. If this is the reason for UEFI firmware settings missing Windows 10, you can fix it by disabling the fast startup.
4. Extra Fast Startup is enabled.
Extra Fast Startup is only available with a limited number of UEFI-based motherboard. With this option set, it will disable keystrokes during the boot sequence, which could make the UEFI menu inaccessible. By clearing the CMOS battery, you can reset the setting.
After knowing the reasons for the UEFI firmware settings missing Windows 10 issue, it’s time to show you the corresponding solutions. This following will provide you with the detailed troubleshooting process.
Solution 1. Check If the Computer Motherboard Supports UEFI
It’s important to check if your computer has the necessary UEFI firmware. If not, it is sure that you are unable to access the UEFI firmware settings menu. If you’re using an older computer which has an older motherboard, chances are the motherboard only supports BIOS Mode is Legacy, so UEFI firmware setting is unavailable.
To check if your computer motherboard supports UEFI, you can run the MSINFO utility to find out the BIOS Mode inside the System Information screen. If you don’t know how to run MSINFO utility, you can follow the steps below.
Step 1. Press Windows log key + R to bring up the Run dialog box. Then type msinfo32 and hit Enter to open the System Information screen.
Step 2. On the left side pane of the System Information window, select System Summary.
Step 3. Then scroll down to find BIOS Mode. If the BIOS Mode is UEFI, then your computer motherboard supports UEFI firmware. If it is shown as Legacy, then UEFI is not supported with this motherboard. So you are unable to see UEFI firmware settings.
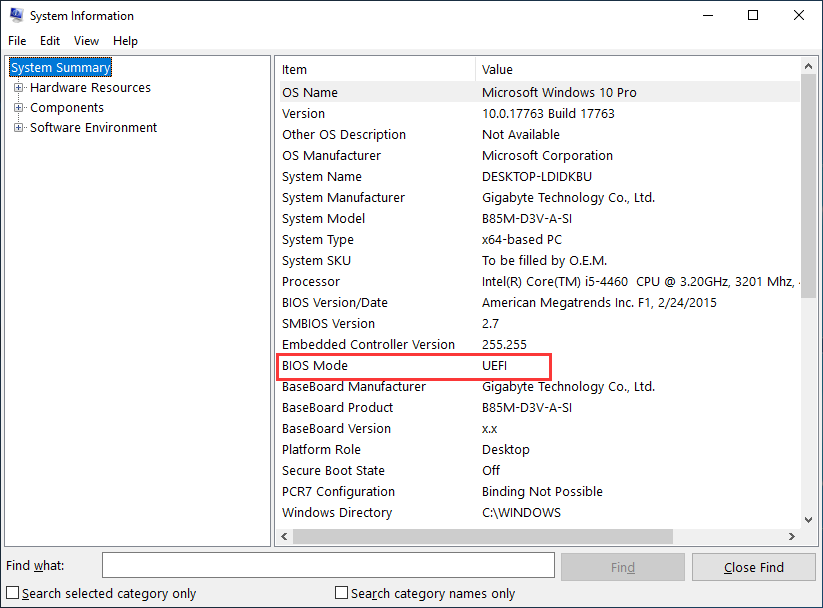
And if you want to make your computer support UEFI firmware, you need to change a new motherboard which supports UEFI. If the BIOS mode is UEFI but you are unable to access UEFI firmware setting, you can try the following fixes to get rid of the issue.
Solution 2. Disable or Bypass Windows 10 Fast Startup
As mentioned before, Fast Startup feature could give rise to Windows 10 UEFI firmware setting missing issue. If you have enabled the Fast Startup feature in Windows 10, it will probably bypass the delay in BIOS that allows you to press the specific key to enter BIOS when you start up your computer, leading to UEFI firmware settings missing Windows 10 issue.
You can try disabling the Fast Startup feature to fix the error. Here are some detailed steps.
Disable Windows 10 Fast Startup
Step 1. Press Windows log key + R to open the Run dialog box. Type the powercfg.cpl and hit Enter to open the Power Options menu.
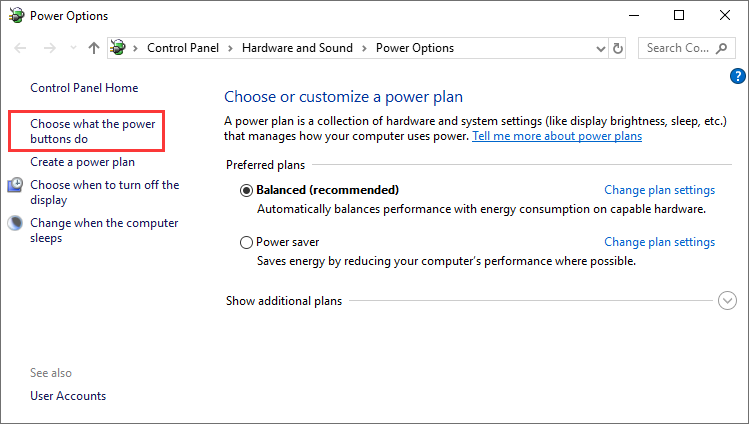
Step 2. On the Power Options window, click on Choose what the power buttons do.
Step 3. On the System Settings menu, click the Change settings that are currently unavailable.
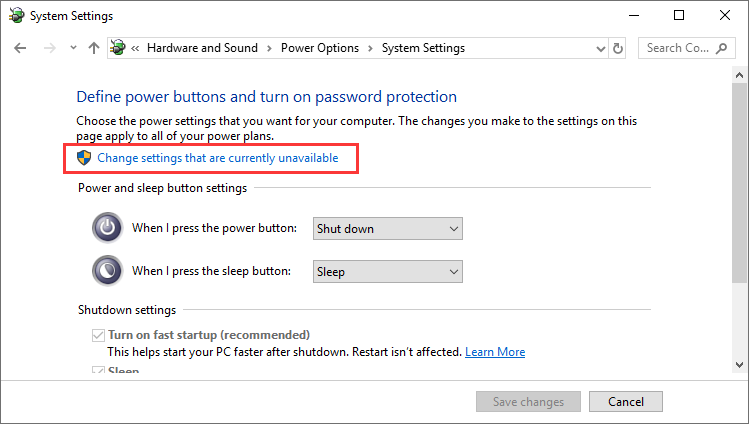
Step 4. Then under the Shutdown settings, uncheck the box next to the option Turn on fast startup (recommended).
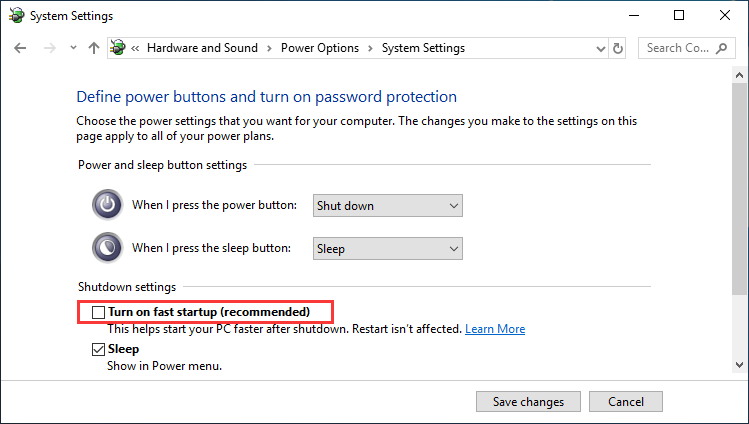
Step 5. Then click on Save Changes to allow the change. Then restart your computer and check if can access the UEFI settings menu now.
Bypass Windows 10 Fast Startup
If you don’t want to disable Fast Startup on Windows 10, you could also bypass Windows 10 Fast Startup and then access UEFI firmware setting, which enables you to get into UEFI firmware setting menu.
If you don’t know how to bypass Windows 10 Fast Startup, you can follow the steps below.
Step 1. Click the Start icon and then click the power icon.
Step 2. Hold down the Shift key and then click on Shut down in the power icon options. This will bypass Windows 10 fast startup and shut down your computer completely.

Step 3. Power on your computer again and press the specific key to enter the BIOS setup. The key to enter BIOS setup will be displayed on the screen with a message like “Press Del to enter BIOS setup”. Pay attention to that. Normally the keys to enter BIOS could be Esc, Del, F2, F1, F4, F8, F10, F12.
After bypassing Fast Startup feature, you should be able to access your UEFI settings. If the UEFI firmware settings missing Windows 10 is not caused by Fast Startup and this fix doesn’t help, you can try the next resolution.
If this still doesn’t work, try the next method.
Solution 3. Create Boot to UEFI Shortcut
You can create a boot to UEFI desktop shortcut, which may help you boot into the UEFI Firmware settings menu. If the above fixes don’t help, you can try accessing the UEFI Firmware settings menu with this method.
Here are detailed steps.
Step 1. Right-click on the empty space on the Desktop and select New > Shortcut.
Step 2. Copy and paste the following command to the text field of the window that opens.
shutdown /r /fw
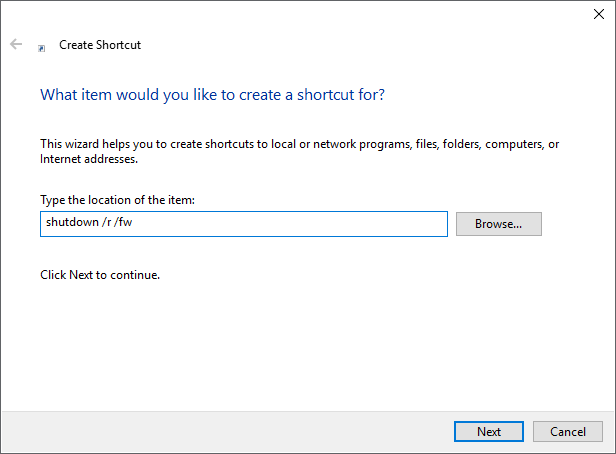
Step 3. Click on Next button to continue.
Step 4. Name the newly created desktop shortcut and click on Finish.
Step 5. Right click on the newly created shortcut and select Properties.
Step 6. Click on the Advanced button and then check the box next to Run as administrator. And click OK button.
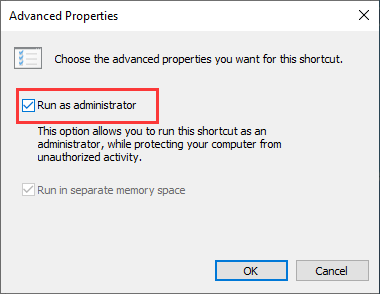
Step 7. At last, click Apply and OK to save the changes.
Then you can execute this boot to UEFI shortcut to access the UEFI Firmware Settings.
Solution 4. Clear the CMOS
Another work around for UEFI firmware settings missing Windows 10 issue is to clear the CMOS.
Extra Fast Startup feature is only available in UEFI systems. With the feature set, it’s possible that no keypress will take your PC into the BIOS setup, which leads to Windows 10 UEFI firmware settings missing issue. If this is the case, you can fix it by clearing the CMOS.
Step 1. Turn off your computer and remove all the peripheral devices.
Step 2. Disconnect the power cord and remove the computer cover.
Step 3. On the computer motherboard, find the CMOS battery. Use a non-conductive screwdriver to remove the CMOS battery.
Step 4. Wait about 1–5 minutes and then put it back.
Step 5. Put the computer cover back on and plug your computer and reconnect all peripheral devices.
Then check if you can access the UEFI firmware settings menu.
Solution 5. Change Legacy to UEFI Without Reinstall
If your computer is using legacy BIOS to boot up your computer, you will not see UEFI firmware setting menu.
If your computer’s motherboard supports both Legacy and UEFI and you want to change from Legacy to UEFI, you can convert MBR disk to GPT disk to convince your computer to use the UEFI menu.
Well, how to convert MBR to GPT without losing data? Here is a handy tool for you – MiniTool Partition Wizard Pro Edition. MiniTool Partition Wizard Pro is an all-in-one partition manager, which can help you move/resize partition, extend partition, convert NTFS to FAT, convert MBR to GPT, migrate OS to SSD/HD, copy disk/partition, wipe disk/partition, etc.
If you want to convert MBR disk to GPT disk or perform other operations with MiniTool Partition Wizard Pro, you can click the following button to get one.
Considering that you are converting a system disk, it is best to do the followings in advance in case of any accidents after the conversion:
- Create a bootable USB drive with MiniTool Partition Wizard Pro.
- Create a system image or back up the whole system disk.
Then you can follow the steps below to convert MBR disk to GPT disk with MiniTool Partition Wizard Bootable Edition.
Step 1. Connect the USB bootable USB drive to the computer that has UEFI firmware settings missing Windows 10 issue.
Step 2. Press a specific key on the keyboard to enter BIOS. And set the USB drive as the first boot device. Then save the changes and exit from BIOS.
Step 3. On the MiniTool PE Loader interface, MiniTool Partition Wizard Bootable Edition will be launched automatically.
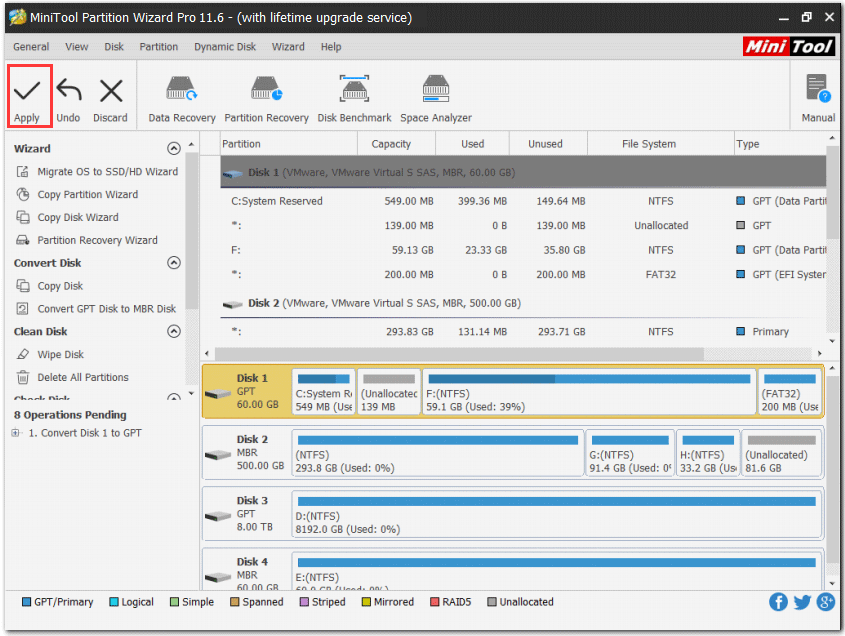
Step 4. On the main interface of MiniTool Partition Wizard, select the system disk and choose Convert MBR Disk to GPT Disk from the left action panel.
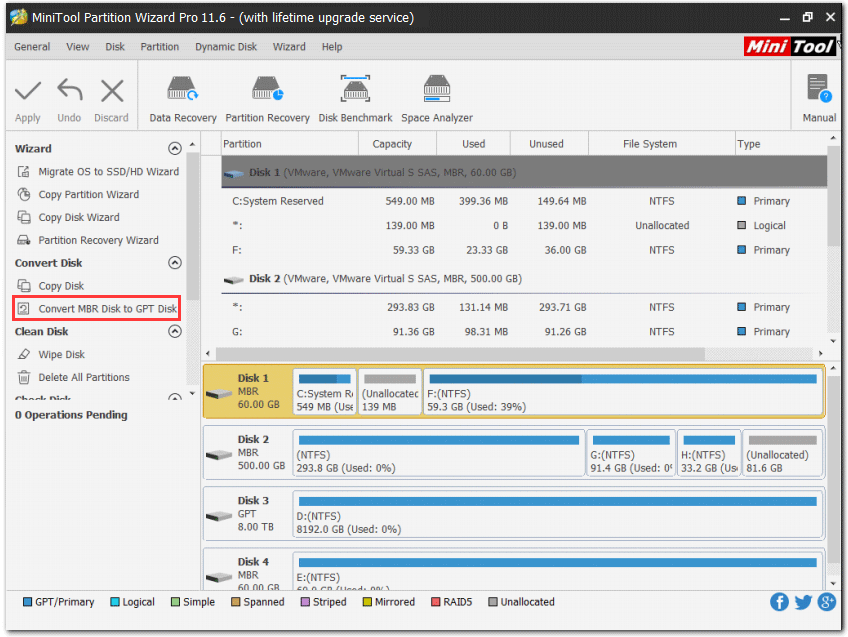
Step 5. Click the Apply button to allow the pending operation. After conversion, you can remove the USB bootable drive and boot Windows from the GPT disk.
Bottom Line
Now, you should know how to fix UEFI firmware settings Windows 10 missing issue. If you have any question about how to fix UEFI firmware settings missing Windows 10 or if you have other better solutions, you can leave a message in the following comment zone and we will reply as soon as possible.
If you need any help when using MiniTool software, you may contact us via [email protected].
UEFI Firmware Settings Missing Windows 10 FAQ
- Right click Windows Start menu and choose Settings.
- On the Settings window, scroll down to find and click Update & security.
- Switch to the Recovery tab and click on Restart now under Advanced startup.
- Select Troubleshoot > Advanced options > UEFI Firmware Settings.

User Comments :