If you are seeking for some effective methods to fix Twitch buffering issue, you are at the right place. In this post, MiniTool Software put together several proven solutions from users to help you fix this annoying problem.
If you are using Twitch to stream video or something else, you might encounter Twitch buffering issues randomly even if you have a good internet connection. This type of issues, including Twitch VOD buffering and Twitch playback buffering, could largely affect your user experience.
But you don’t need to worry as it can be resolved easily. You can try the methods displayed below one by one if your Twitch keeps buffering.
Fix 1: Make Some Changes for Your Browser
Commonly, when you meet a certain problem in a browser, it is very likely that there is something wrong with your browser. So, you can try using Twitch in another browser. If Twitch constantly buffering issue disappears, you can make some changes for the original browser. But if the issue still exists, the browser is not the culprit and you should move on to the next solution.
Here’s what you can do for your browser and I take Google Chrome as an example.
#1 Disable Hardware Acceleration
The hardware acceleration feature utilizes your GPU to process data to improve your browsing experience. But it may lead to various problems in your browser such as Twitch buffering issue. Follow the steps below to disable it:
Step 1: Click the three-dot icon and choose Settings.
Step 2: Go to Advanced > System section.
Step 3: Uncheck Use hardware acceleration when available option to disable this feature.

#2 Clear Browser Cache and Cookies
It is rather common that browser cache and cookies can causes certain problems including Twitch constantly buffering. To fix it, you need to clear your cache from time to time.
Step 1: Click the three-icon and go to More tools > Clear browsing data.
Step 2: In the pop-up window, set Time range to All time and choose Cookies and other site data and Cached images and files items.
Step 3: Click Clear Data button to remove your browsing cache and cookies.
#3 Disable Extensions
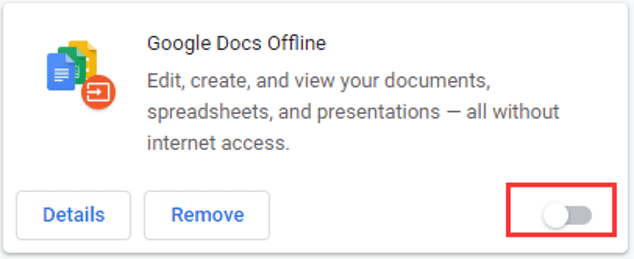
Also, the extensions added to your browser might be responsible for Twitch buffering issue. So, you might need to disable all your extensions and check if it is helpful. If it works, you can enable the extensions one by one to figure out the problematic one, and then keep it disabled or remove it.
To disable extensions, just open three-dot menu, go to More tools > Extensions and then switch the button off.
Fix 2: Change DNS Server
If your Twitch keeps buffering, perhaps your DNS setup is faulty and is not accepted by Twitch or its servers. In this case, you can try using Google’s public DNS to get rid of this problem.
Step 1: Right-click the network icon on your Taskbar and choose Open Network & Internet settings.
Step 2: Choose Change adapter options. Right-click the network connection you are using currently and choose Properties.
Step 3: In the pop-up window, select Networking tab, select Internet Protocol Version 4 (TCP/IPv4) and click Properties.
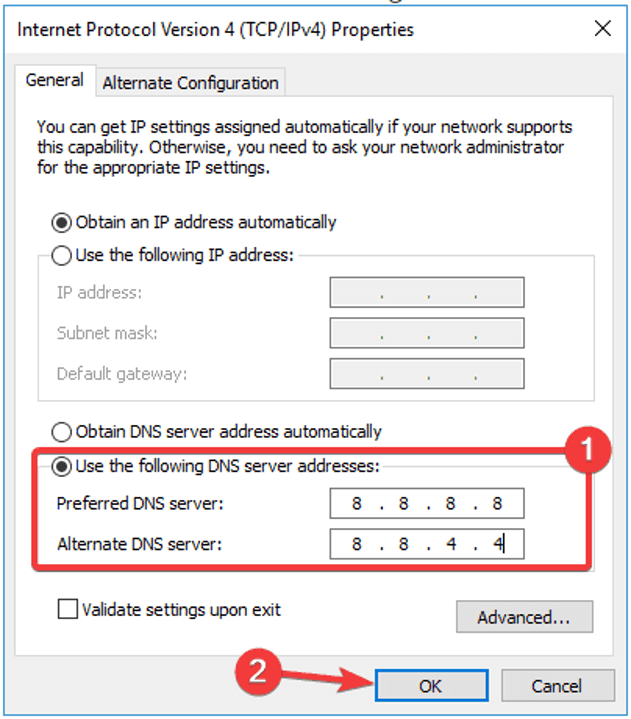
Step 4: When you get the following window, check Use the following DNS server addresses, enter the following address and click OK to save the change:
- Preferred DNS server: 8.8.8.8
- Alternate DNS server: 8.8.4.4
After that, you can go to use Twitch to see if the issue is resolved.
Fix 3: Turn Off Proxy or VPN
You can use a proxy or VPN to protect your privacy online, but you might be bothered by Twitch buffering issue because of them. So, if you are using proxy or VPN, you’d better turn them off.
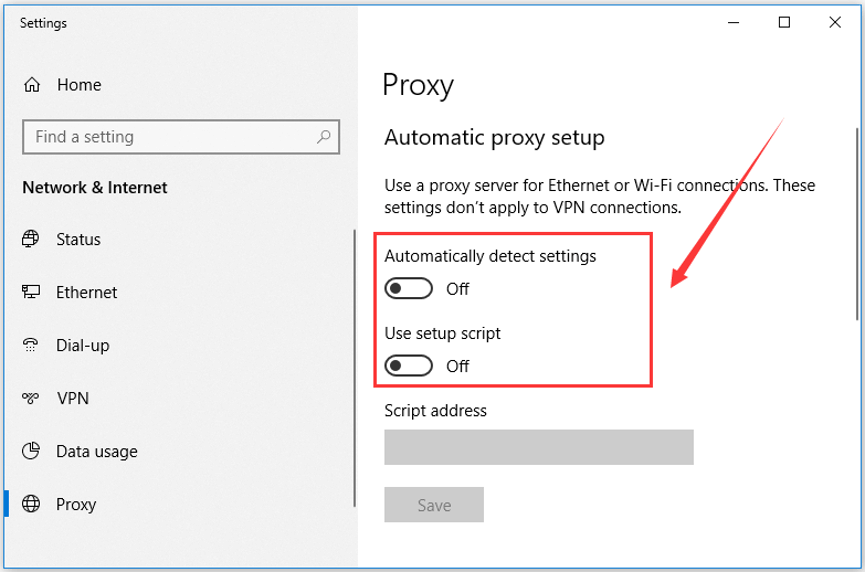
To disable VPN, just locate it in your network list and disconnect it. To disable proxy, you need to go to Settings > Network & Internet > Proxy, and disable all options in the right pane.
Fix 4: Block Specific IP Range
According to the report from some users, they have resolved Twitch constantly buffering issue by blocking certain IP range in firewall. You can also have a try. It is a little complicated but you can make it by following the given steps below.
Step 1: Press Windows + S, enter Windows Defender Firewall with Advanced Security and double-click the search result to open it.
Step 2: In the new window, click Inbound rules in the left pane and click New Rule in the right pane.
Step 3: Choose Custom rule to create and click Next.
Step 4: Go to Scope screen and check IP address in Which remote IP address this rule applys to section and click Add.
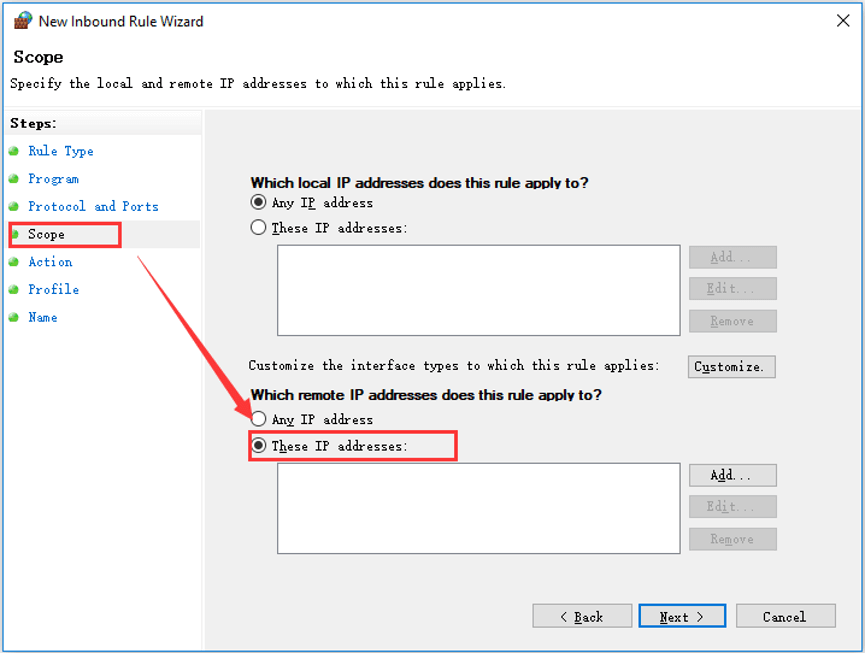
Step 5: Choose This IP address range, enter the following addresses and click OK to save.
- From: 206.111.0.0
- To: 206.111.255.255
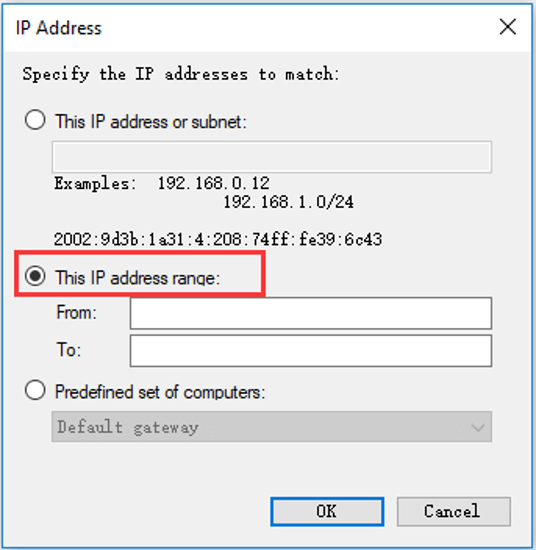
Step 6: Repeat Steps 4–5 but add the following IP address range this time:
- From: 173.194.55.1
- To: 173.194.55.255
Step 7: In Action screen, choose Block the connection and keep clicking Next to finish the process.
Once you have completed the configuration in your firewall, restart your computer and you should be able to use Twitch smoothly.


User Comments :